


The Dyke Kitchen is a bi-weekly series about how queerness, identity, culture and love are expressed through food and cooking.
When Sarah and I first became friends, I was highly entertained by her Instagram cooking stories, and excited by the idea that she was teaching herself how to make South Asian dishes. We both like to watch Padma Lakshmi’s cooking stories and revel in our crushes on her, which are half about Padma’s hotness and half about pretending that she is the Indian mom that neither of us had, the woman who could have taught us the nuances of making the food of our people — though, yes, Sarah is Bengali, it’s not quite the same.
Anyway, now that Sarah and I are dating, and eating excellent food together is one of our mainstays, I wanted her to show me the secrets of her South Asian cooking. She decided that biriyani was the best option, because she’s made it a few times and was pretty confident about it. Before we begin, I’m not someone who can say I’m an expert in the dum cooking method (which is the sealed-pot method that makes biriyani so delicious), nor am I the most experienced blender of Indian spices. But that’s okay, because Sarah kinda is! The paneer and chicken biriyani that we made was our own take on this recipe, from Dassana Amit, who is Sarah’s internet Indian cooking guide. Her website Veg Recipes Of India makes it all feel easy and is full of actually useful tips, especially great for a semi-clueless half-South Asian like me.
This style of cooking biriyani is one that’s partly inspired by this recipe and also just our idea: you mostly cook each part of the dish, and then do a quicker cook of them all together in one pot. It makes it easier to make sure each element cooks at the rate that makes it most delicious. Also, I really like cooking with chicken, and paneer is Sarah’s best friend, so we decided to throw both in here, but Sarah has made it with just paneer before and sings its many praises.
How To Make Paneer and Chicken Biriyani
Ingredients
Fried Onions
1 thinly sliced white onion
4 tablespoon oil or ghee
Paneer & Chicken Marinade
1 cup of paneer cubes, and we highly suggest rehydrating the paneer by soaking it in a hot water bath for 15 min before you do anything else with it
1 pound of boneless skinless chicken thighs, trimmed and cut into cube-ish pieces, salt them and put aside in bowl
8 tablespoons yogurt, if you use a Greek yogurt you’ll need to loosen it up with a couple tablespoons of water
1 inch of ginger root
4 to 5 garlic cloves peeled
2 green chilies
1 tablespoons cilantro leaves
½ tablespoon chopped mint leaves
¼ teaspoon turmeric powder
¼ teaspoon red chili powder, we used Kashmiri for the color
¼ teaspoon garam masala powder
½ teaspoon ground coriander
¼ teaspoon caraway seeds
1 teaspoon lime juice
3 teaspoons salt
Biriyani Rice
1 cup basmati rice
2 cups water
1 teaspoon salt
1 inch cinnamon stick
1 fresh Indian bay leaf, you can also use a regular one
2 to 3 cloves
2 to 3 green cardamom pods smashed and deseeded
¼ teaspoon caraway seeds
Layering Ingredients
3 tablespoon milk
16 to 18 saffron strands
1 tablespoon ghee
1/2 cup chopped cilantro leaves
1/2 cup tablespoon chopped mint leaves
Directions
Element 1: The Onions
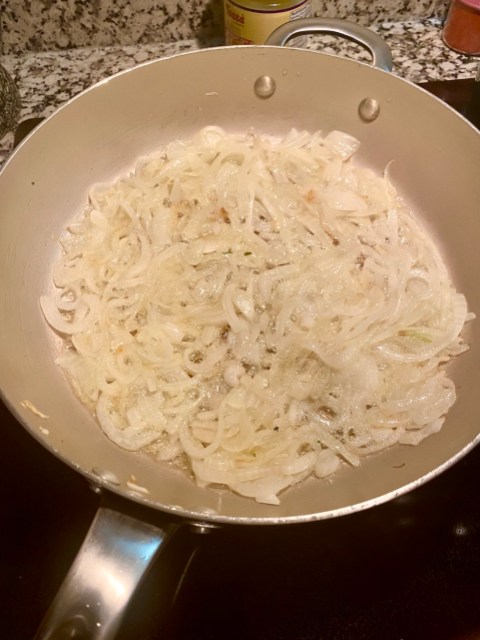
Sarah is obsessed with these onions and ate a bunch of them while we cooked. You start by gently frying the onions in ghee until they’re a deep dark brown. (Make sure to salt the onions when they start to brown!) This serves to not only to make your kitchen smell AMAZING, but they’ll give texture and a great flavor to your biriyani in the layering process. Be patient, pour a glass of wine and let them get really dark and tasty (much darker than the photo, this is just the beginning!). When they’re done, let them drain on a paper towel and set aside for when you start making layers.
Element 2: Yogurt Coated Chicken And Cheese, Please
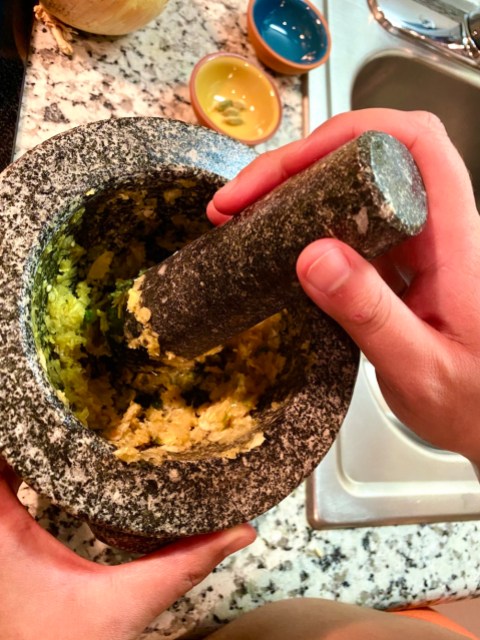
As you may know from my other pieces in this series, I’m a big fan of marination and I always think the longer the better. So while the onions started frying, we got this marinade going. Sarah got out her mortar and pestle to smash up the garlic, ginger, cilantro, mint and green chilies. You could also do this just by chopping or food processing, but there was an undeniably good flavor from the smashing.
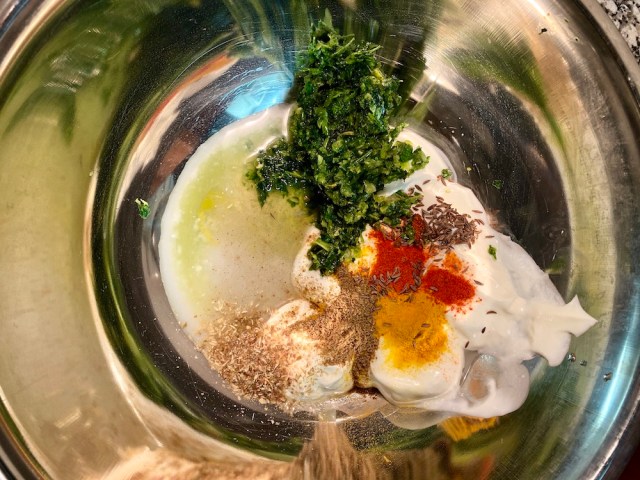
I added the contents of the mortar to a bowl where I whisked it together with the yogurt, salt, lime juice and spices: turmeric, red chili powder, ground coriander, caraway seeds, garam masala.
Then I added our rehydrated paneer cubes and chicken pieces, coated them and let them hang out for a while. It can also make sense to separate the chicken and paneer, but to me, getting another bowl dirty seemed not worth it.
Element 3: Basmati
I’m notoriously bad at cooking rice when I can’t do it in my Zojirushi rice cooker — I’m an Asian princess, so what? So Sarah monitored me AND the frying onions, while I rinsed our rice and then let it soak for 30 min, and got the rice water ready.
We prepared the cooking water for the rice by putting 2 cups of water into a sauce pan along with a cinnamon stick, the caraway seeds, bay leaf, the contents of two smashed cardamom pods and a pinch of salt and then brought it up to a boil. After it was finished soaking, I added our rice to the water, let it come back up to a boil, and then turned down the heat a little to let it simmer.
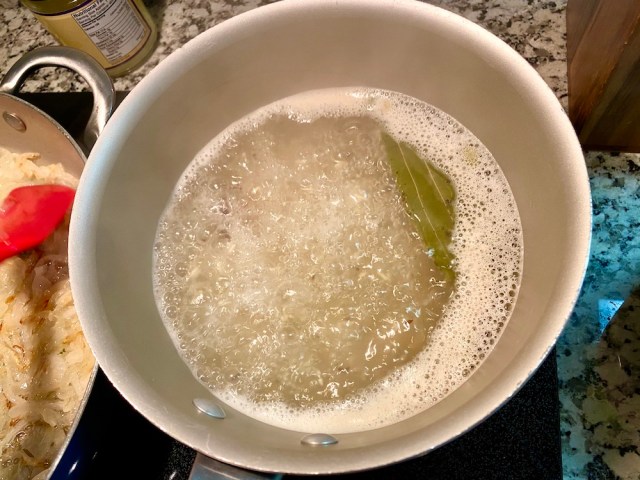
Sarah told me that we wanted the rice mostly cooked, but not all the way done. We wanted it to do its final cooking after we had layered all of our ingredients and were letting them cook all together at the end, with a tight lid over the top of the top — this part was important since rice is really the crown jewel of a biriyani. While the rice cooked, we got started on the chicken.
Element 2: Yogurt Coated Chicken And Cheese, Please
Because I wanted a tender chicken in this dish, I wanted to give the chicken a longer cooking time than the paneer. So I heated up the leftover ghee from our fried onions in the dutch oven, and then picked out the chicken pieces from the marinade.
I cooked them so they got firm. When the chicken was mostly cooked through, which took 10 min or so, I added the paneer into the dutch oven with the rest of the marinade. Everything cooked together in harmony briefly, and then we took all of it out of the dutch oven, strained the juice in to a measuring cup and waited for the rice to get nearly done.
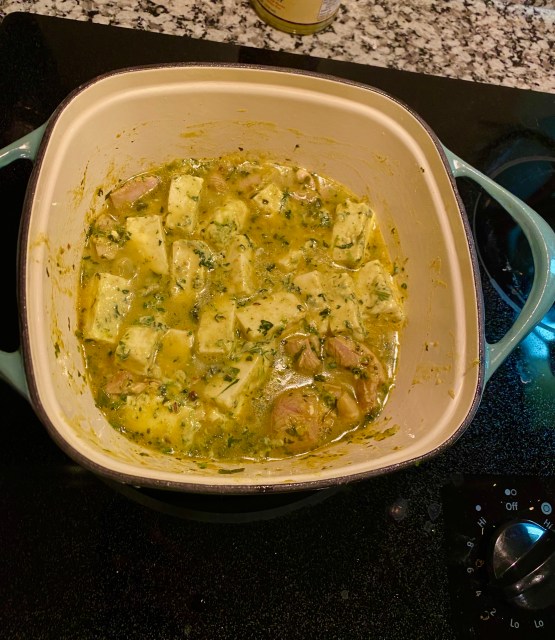
If you were doing this just with paneer, you could skip this step, and go directly into layering. Though, I will say, the chicken fat tasted SO GOOD in this rice.
Element 4: The Saffron Milk
Heat up your milk on the stove, just so it’s warm and add the saffron strands.
Make The Biriyani Layers
When your rice is sufficiently cooked, but still with a little bite left in it, go ahead and drain it, and you’re ready to layer!
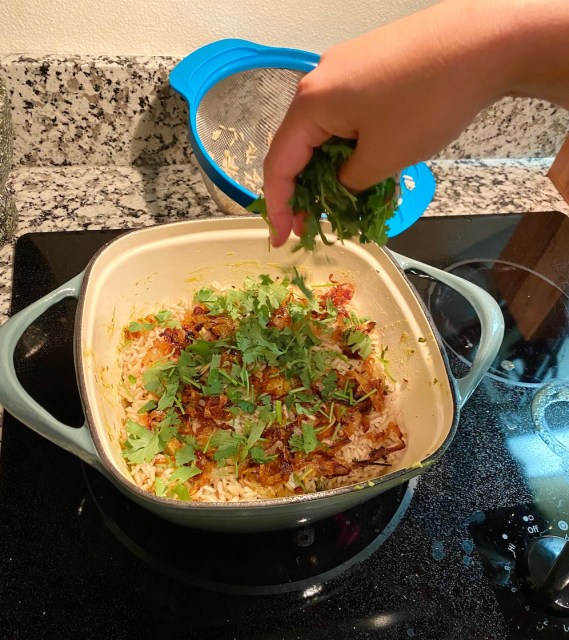
Start with a layer of protein at the bottom of a small dutch oven or pot. Next add a layer of rice. Following that, add a hefty handful of fried onions, a spoon of the saffron milk and ghee and a pinch of herbs on top. Do this again until you’re out of ingredients, and you can dump the extras on top.
What we did not do next, but should have done, is added back the liquid we had drained from the cooked chicken, paneer and marinade. Later, at the end, when I was struck with this genius, I went back and did it, but adding it earlier would only have made it taste better. I poured about half a cup over the top, but you could do more if you think your rice needs more cooking — you don’t want more liquid than will get absorbed by the rice.
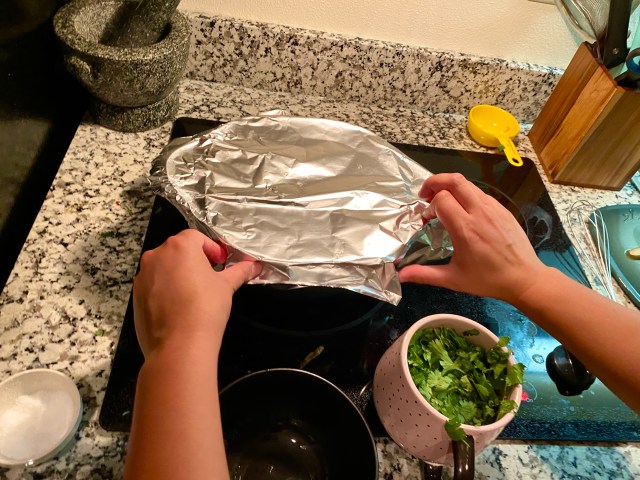
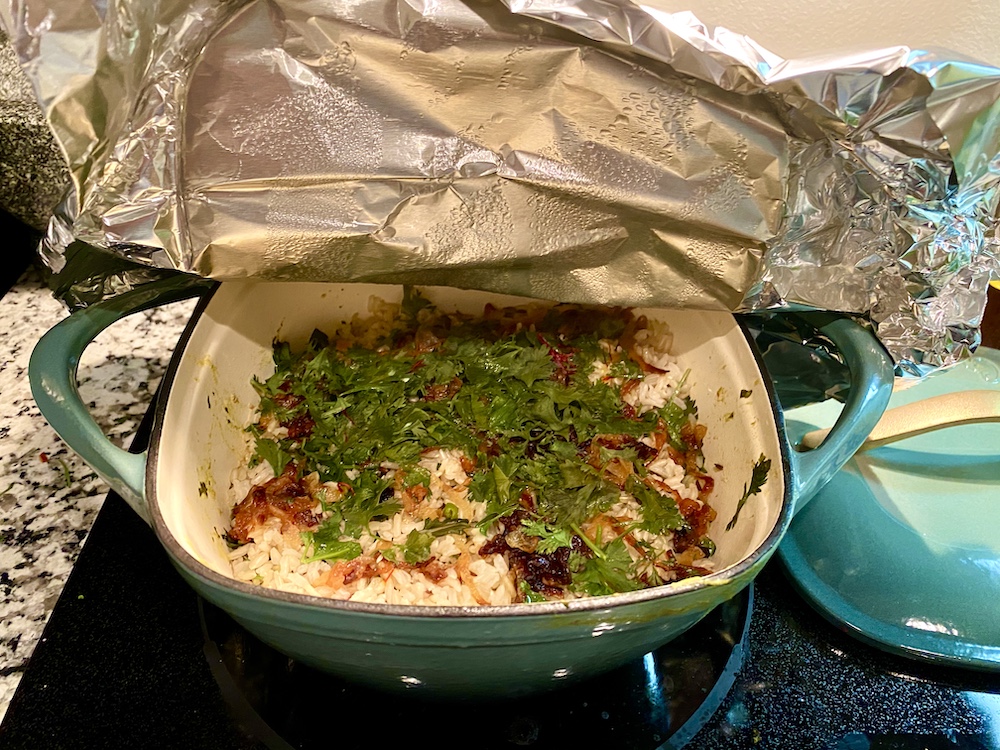
Once you have your layers, you’re ready to let it cook and marinate in its own juices. Sarah added a few generous dabs of ghee to the top, and then we covered the top of the dutch oven with foil, put the lid on top, and let everything simmer on medium-low heat for almost 30 min — I think we got impatient and wanted to eat it at around 25 min.
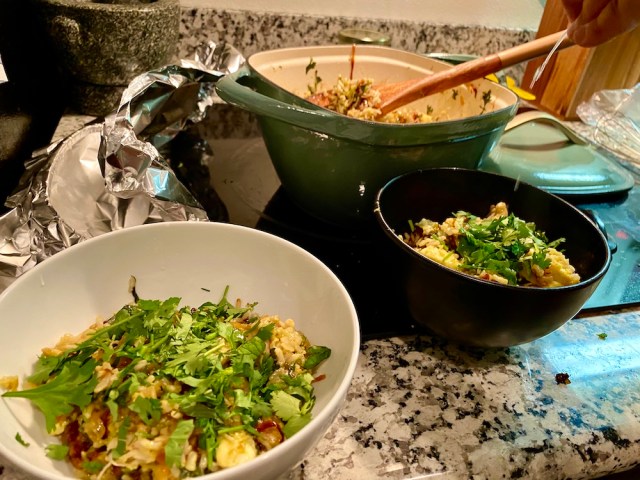
Your beautiful biriyani is done when the rice is fluffy and you have a little crisp to some of the parts too. The best part is uncovering it and digging in with a spoon! I served ours with a cocktail made from mezcal and smoked tea & vanilla syrup, topped with a tiny charred marshmallow.
I learned a lot from cooking with Sarah and we were really happy with our results — turns out we don’t need Padma after all! Just kidding, we always will, call us, Padma.


Comments
Veg Recipes of India is my absolute go to for recipes, followed by all of my aunty’s old cook books that are half English/half Hindi and time the cooking according to how many whistles you hear from the pressure cooker. It’s been a great way to try to connect with my Punjabi heritage.
i love that you’ve been getting in touch with your punjabi culture, do you have any favorite recipes from the site?
This isn’t specifically Punjabi, but I recently discovered this masoor ki dhal/red lentil dish finished off with methi/fenugreek, and it’s my new favourite thing: https://www.vegrecipesofindia.com/masoor-dal-easy-masoor-dal/. It’s so comforting. The various ‘green chutney’ recipes are also great, especially if you’re making channa chaat/chickpeas: https://www.vegrecipesofindia.com/chana-chaat-recipe-chana-chaat/. It went down so well at a queer pan-Asian potluck I was at earlier in the year. Love your column!
ohhhh these look great, I will have to try them, thank you!
Paging @sally !
This is a good post.
I am excited that there are people that get as excited about slowly cooking onions as I do.
Ahhh Kamala and Sarah this looks so good!!! And, “smoked tea & vanilla syrup” ?? *swoon* 😍
I cannot pretend that I’d ever have the skill or patience to cook this but let it be known to the universe that I’d love to meet someone who would cook it for me and also mix up the accompanying cocktail 😻
In return I will do the dishes and other dirty things.
This looks absolutely delicious! As luck has it, my first autumnal household project is reorganizing my spice cupboard and making some more garam masala. It might also be the opportune time to try this biriyani.
BTW, I also want to say how much I love this column ☺️. I look forward to every new post!
thank you, this is so lovely to hear! also hell yeah to your own garam masala blend!
I’m definitely going to try this out, thanks for sharing the recipe!
Biryani!!! 🙌🏾 (!!!!) is totally a dyke chef skill. My wife laughs because I’ll decide to whip up different versions of midnight biryanis when they usually are reserved for midday/hours-long dinner cooking.
Also can I just saw how ridiculously awesome it is to have diasporic cooking on Autostraddle. My family is Indian from the Caribbean and I never grew up eating biryani, but developed a love for it after trying South Asian food in my 20s..
Kamala, ur awesomeness prevails 🙌🏾
midnight biriyanis!! you are truly more skilled than I can ever imagine, YOUR awesomeness prevails! I’m so thrilled to share this diasporic gay biriyani moment with you.
This sounds INCREDIBLE and more labor intensive than I have capacity for most days but probably worth a special weekend effort, as I imagine it reheats beautifully as leftovers. Yum.
I made this*
*quarantine edition, I took absurd amounts of liberties
I had to sub some of the whole spices for ground ones + omitted the chicky because my partner and I are veggies but I added some sauteed potates/carrots/peas to make up the rest of the bulk. It’s hard to let it cook for the half hour. I wanna peek under the lid so bad. It’s so good. Each layer has its own flavour. I love mining for little gems in the rice.
This looks absolutely delicious! As luck has it, my first autumnal household project is reorganizing my spice cupboard and making some more garam masala. It might also be the opportune time to try this biriyani.
Nice Briyani Recipes. I love your blog. Thank you