


click for more on a-camp
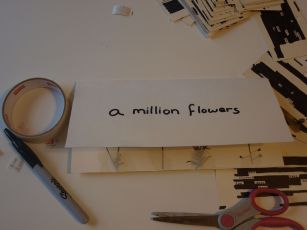
Have I mentioned I love flowers? When I found out Autostraddle Camp was happening and that I could suggest activities, I immediately thought “flower picking.” It seems like the most ridiculous thing, but it’s all I want to do while I’m there. I want to pick lots of daisies! But don’t worry, I know that’s not allowed. That’s why we’re bringing our own.

Whether or not you’re at Camp, a flower-filled life is a ful-filled life, so let’s learn how to press flowers together! And then let’s make pretty books to hold them in. We’re doing this in real-time today at A-Camp, but as you’ll see, you have a slight advantage doing it at home.
Get ready to get sunny, crafty, and a little more adorable.
PRESSING FLOWERS
=

What You’ll Need
+ A heavy, heavy book
+ Sheets of notebook paper
What You’ll Do With It
Pressing flowers sounds much easier than it is, mostly because you do it without a machine and everyone else is good at it but me. I had to compile a pressed flower collection for the first time in middle school and it was so bad: I handed it in with petals falling out of pages in a shitty photo album and the book became so thick (since none of my flowers were flattened) that it was hard to transport. I’ve been practicing for you.
1. Once you’ve picked your flowers, create a machanism with which to press them. Start with something as simple as a notebook or as impressive as an encyclopedia, and then find heavy somethings to put on top. I used an old textbook, and I stacked Vogue copies on top until I felt it was a lean, mean, flower-pressing machine.

2. To press, get two sheets of notebook paper and lay one on each side of an open textbook (when they close, they will be sandwiched on top of one another). Each pressing section should be, at minimum, about 25 pages away from the others.
3. Put one flower inside at a time. Lay them in the position you want them to be memorialized in: are the petals open and the contents all flat? Is that tulip going to look like an anatomy presentation or a tulip someone sat on? It’s all up to you.

4. Afterward, close the book and, if possible, weigh it down a little bit. Try to resist the temptation to look at them a lot – it disturbs the process. I gave myself a once-a-day check where I quickly opened sheets to check on “the progress,” also known as “the flowers I love to look at.” It’s a warehouse for the future now.

You have the honor and privilege, as someone reading this at home, to take real care in pressing your flowers and let them be “pressing” for a while. Take all the time you think you need! I left some of mine inside of that textbook for a month before they seemed done. A pressed flower should be dry, without any bulbous or emerging parts, before you put it inside your flower book.
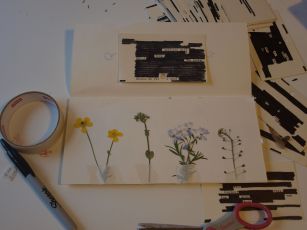
MAKING YOUR FLOWER BOOK
Dedicated to Kennedy Nadler, who helped me make my first book and therefore made me more pretentious.

What You’ll Need
+ FOR COVERS AND PAGES: Whatever kind of paper you want to use in whatever amount. Mixing and matching is allowed and often encouraged for a project like this! You’re going to want them to be all around the same size… or will you? It really is up to you. For mine, I am using one kind of paper: tall craft paper in white. It has a texture to it and it’s equivalent to card stock, which makes me feel like my flowers will be safe.
+ FOR BINDING: A hole punch and thread. (Go for thick if possible! I’m using chunky knitting thread.)
+ CRAFTING SUPPLIES: Think glue, scissors, tape, paper of all kinds, pictures you like and might want to collage, thread, markers, pens, pencils, paints, crayons, and feelings.
+ A collection of pressed flowers!

What You’ll Do With It
1. Fold your paper and cut it into various sheets. Get creative! Mine’s a landscape book, and I cut each big sheet of paper into three smaller pieces. I kept two sheets folded over one another to make a sturdier binding for later.
2. Next, you’re going to decorate the book page-by-page and by hand, unless you have an intern. Remember: the book is your oyster. Whatever you want it to be it will be. I’m doing it museum-style.

3. Once the pieces are done, assemble them like a book! Lay pages on top of one another! Be very careful, of course.
4. For binding, decide whether you’ll bind it on the side, the top, the bottom – whatever. Then, take your hole-punch and punch three holes for binding in that area, with space between. Make sure you do this with the book assembled as you wanted it binded. Then, take some yarn and devise your own magical method for keeping those pages from falling apart, AKA tying a knot around each hole.

Pressed flowers as a whole never particularly moved me. But at one point in time, a pressed daisy from the sheets of a 70-page spiral-bound CVS notebook kind of rocked my world. I watched my dog eat it months later and I kept repeating, “the daisy, the daisy.”
A couple weeks later, spring came. And all of these different things – bulbs, big sprawled out flowers with narrow petals, flowers growing in little bushes on the arms of trees – were suddenly breathing all alongside me as I walked to and from school, and work, and the store. (It was overwhelming. I did a lot of crying.) I began sort of instinctively picking them, still acting as if I’d be putting them in a cup on her nightstand when I got home.
I pressed each and every flower I picked this spring to make this book. I’m hoping this time they last a little longer.

Agh, this is so cute!
I remember my sister trying to press some roses she got, and it didn’t really work well for her, which probably doesn’t bode well for me – being the more useless sister – but I will make this happen I swear.
I really love it with the blackout poetry too, that’s sweet.
I hope that daisy-chaining is a mandatory activity at a-camp.
Your end result is really pretty. The way you’ve presented it makes me think of what adorable home-made greeting cards they’d make. Do you ever pretend that you’ve trapped the souls of the flowers in your pressing collection and they’re constantly screaming for liberation? Because if I had a pressed flower collection, I think I would succumb to that temptation.
So daisy-chaining has a couple of different meanings. I’m just saying.
carmen these are really pretty. so are you.
Oooh, these came out so well! I totally left my flowers in my handmade book in a textbook after the workshop so they could get flatter, but then couldn’t find it again Sunday morning when I was leaving. :( I hope they found a good home with someone.