

Here is something true about me: I forget things a lot. All the time, really. Maybe it’s an ADHD thing. I forget to text people back; I forget what stories I’ve told. I forget my friends’ birthdays — sorry, friends! I love you! I forget what season of a TV show I’m on and whether I ate lunch today. And maybe more than anything else, I forget which books I’ve read.
When I used to spend way too much money on books, this wasn’t much of a problem; I could just check my shelves. But last year, when I started checking books out from the library, I realized I was putting books on my waiting list over and over again, only to get five chapters in and remember I’d already read them. The problem was compounded when I started checking e-books out from the library and reading them without ever even seeing their covers.
Then, on one of those days when I’d accidentally ended up on the crafty straight mom side of TikTok, I saw a video by a woman who was creating small replicas of the books she’d read that year and tossing them into a decorative jar. I scoffed at her jar — is it even TikTok if you’re not judging, just a little bit? But I knew right away that I wanted to start making tiny books.
I began with office supplies, a few colored pencils, and a dream. Those first books I made were cute, but very crooked. They were cut unevenly with sewing scissors and held together with staples. They didn’t even open. I can’t do these things halfway! So I bought some craft supplies and tried to remember what I’d learned in my one-hour bookbinding seminar in college. Now, every time I finish reading a book, I get to work on its tiny counterpart, and I’ve got a shelf full of minis that make me happy every single time I look at them.
Wanna make one with me?
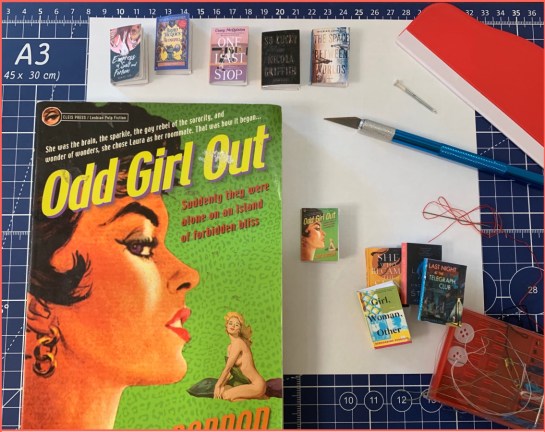
Today, we’ll be recreating the cover of Odd Girl Out, a pulp fiction classic by Ann Bannon. I haven’t read this one in years, but the cover is so gloriously pulpy, I couldn’t help myself.
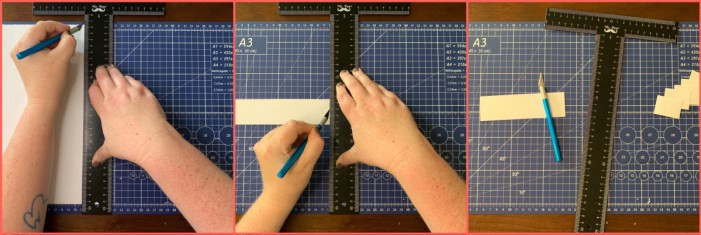
First, we’ll make our inner pages. Using your white paper, cut 15 sheets that measure four by three centimeters each. I use a ruler and an exacto knife, but you can use scissors too.
Fold your sheets in half, hamburger style (was that a thing at your elementary school, too?). If you want to get fancy, use a folding bone to set the crease; I’m using the little red tool that came with my iPhone’s screen protector. Then, sort your pages into three sets of five sheets each. Nestle the five sheets into one another.
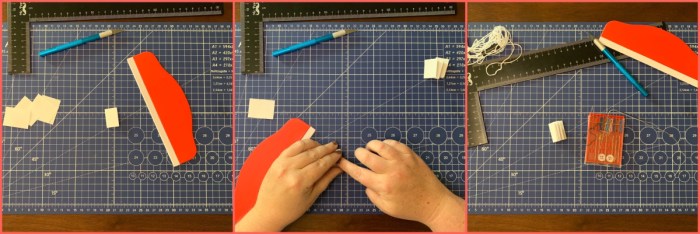
Once you have your little signatures of five sheets each, you can sew each signature together. I usually use white thread, but I used red here for visibility. My stitches definitely aren’t proper bookbinding technique, but they work! If you want to be fancy, you can create a miniature awl by pushing the eye of a needle into a cork and poke your holes before you sew them together so you don’t wrinkle your pages while sewing.
Once you’ve sewn up your signatures and tied them off, set them aside. You may want to put them under a heavy book — or clip them with a binder clip — so they’ll stay flat later.
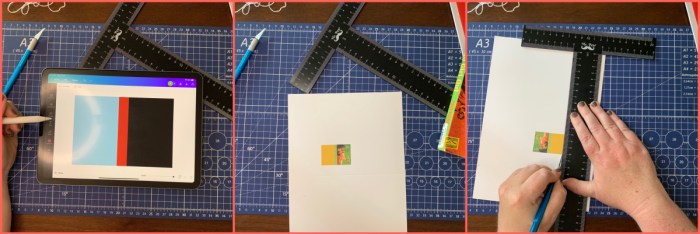
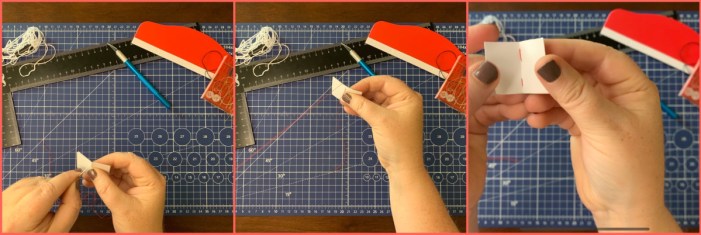
Now it’s time to design your cover! I use Canva, but you could easily use Microsoft Word if you’re comfortable working with images and text boxes. I find my cover images on Goodreads. If you’re artistic and don’t have a printer, you can also hand-draw your cover! You’ll want the cover to be slightly larger than your signatures, so the front and back covers should be about 2.4 cm wide by 3.4 cm tall, with a spine that’s about a half centimeter. Print or draw your cover on card stock, if you have it. Cut your cover down to size.
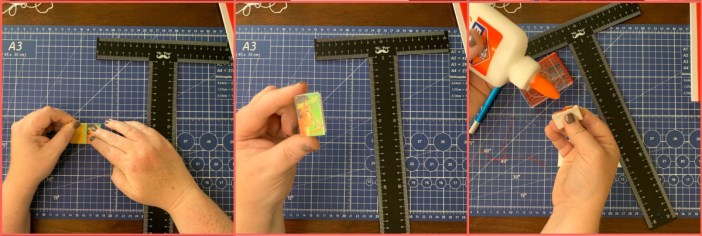
I find that scoring the card stock makes it much easier to fold. Placing the cover right side-up, use a nail or the blunt end of your needle to press four dots into your cover to delineate the edges of your book’s spine. Turn the book over, and run the blunt end of the needle along the ruler to score your two folding lines.
Now that you’ve got your cover, you can put it together with your signatures! Pressing your three signatures together, run some glue down the spine, and then place them directly into your cover. Wipe away excess glue and put your book under something heavy to dry. We did it!
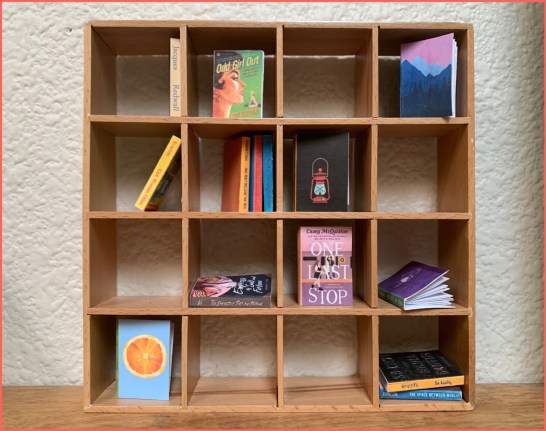
These books fit in some 1:12 scale dollhouse bookshelves, like this one I found on Etsy!
Someday, maybe, I’ll get to the stage where I’m printing a chapter of the actual book inside. For now, these tiny blank pages are there to do what I like with. How will you fill yours?

This is adorable! That little bookshelf with the mini books is amazing.
Younger me would have been all over this – i had a dollhouse that my dad made from a kit and decorating it was my favorite thing ever. I built furniture from a kit. I made little rugs. I took apart costume jewelry to make a chandelier that I’m still pretty proud of.
I use Goodreads to keep track of my reading now and while it’s flawed, I do really like being able to look back on what I read.
Cleo! You made miniatures! I’ve kind of been wanting to make a Danish Modern chair to go near my bookshelf, but I’m not sure where to start, really.
Oh, that would be cool. A quick google found me this tutorial – https://www.dillydallydollhouse.com/modern-miniature-chair/
I also found this full scale pattern that you could probably print out at a smaller scale – https://www.familyhandyman.com/project/build-a-danish-modern-chair/
those are so cool! i don’t have a cricut, but i didn’t realize cricuts could cut wood!
You could also look for kits – that’s how I got started. Here’s one on Etsy – https://www.etsy.com/listing/951908979/mid-century-modern-miniature-chair-kit-1
Just a plug that goodreads is owned by amazon and there’s an alternative called Storygraph which is an independent black-owned business and you can easily automate the transfer of all your data from goodreads if you want to switch!
app.thestorygraph.com
oh cool! i don’t use goodreads to track what i read anymore, just to pull cover images, but this is rad!
This is on my list of intimidating technology changes to make. Did you use the automation to transfer your data? How did it go?
It was very easy to transfer the data from Goodreads to Storygraph! And for me it was a good excuse to clean up the shelves that I had on Goodreads. You do have to do it on a web browser not in the app though. I still use Goodreads as I find the social aspect very lacking in Storygraph (I rely on reading reviews by ppl I trust and follow on Goodreads) but for tracking your reading Storygraph is excellent! It makes you pretty pie charts and everything.
It was so easy! Storygraph gives you instructions of what to click, then goodreads does the work and sends you a file, which you in turn upload to storygraph. It’s honestly two tasks that take 2 minutes each. Definitely recommend.
I have zero crafting instinct/interest in me, but I love these so much! I want someone to make them for me!!
This is highly adorable and very inspiring.
This is way cuter than StoryGraph, but I’ve found that to be a good solution to the memory thing. Now I just pull up the app when someone asks me what I’m reading.
I love this so much and am gonna give it a try!
Ooh let me know how it goes!
I cut up small tear off note pads that have the pages already glued. I then print off the covers and carefully glue in the notebook pages that I’ve cut down. So much simpler.
Bookbinding content on Autostraddle! I love it.
I’ve got a great system for remembering books I’ve read, in a notebook that has, by this point, I think about 38 pages filled with the titles of books that I’ve read, going back quite a few years now. When it’s full, I’ll start a second notebook to keep the collection going – I’ll probably bind one myself so I can make the cover match the old one. Always really interesting to have a chronologically ordered snapshot like that to flick through.
Wait, so did you do 3 separate images for the outside- front cover, spine, and back cover and then merge them into a single image for printing, or is there a way to download the entire book cover from goodreads? Also curious as to why you did a blank back cover. Thanks!
Autostraddle catering directly to my interests once again. (Time to start batting my eyes at my better half to adopt a color printer.)
Probably going to scale up to 1/3 because 1. can print readable excerpts 2. I got my better half the American Girl doll she always wanted as a birthday present…and then proceeded to adopt my own because she was so cute and determined looking.
I love the idea of making some miniature books but I’m curious how to found the entire book jacket. Or did you just screenshot the front cover. I need to figure out how to cope the entire from, back and the spine. Any help will be greatly appreciated.
Thank you!
Don’t tell the crafty straight mom tiktokkers you cut paper with sewing scissors!
That is crimenal !! I have 5 pairs ,1 for the kitchen,1 for NOTHING but paper 2 for cutting cloth 1 for whatever as there are kids in the house.Altho they have learned they get in trouble if they use my cloth ONLY.
They have SPINES!!!!!!!!!!!!!!!!!! And I bet they can very easily be made into necklaces…!
How did you get the scan of the cover? Do you have a huge scanner? Or did you do more than one scan and then knit the pieces together? I’d really like to try making these.
hi sharon! i copied the cover image from a google image search, and used Word (although now I use Canva) to create a spine and plain back cover.