

What if the style and fit of a new shirt doesn’t suit your body? What if you’re not really a ‘t-shirt’ person? Will you just drag your sorry ass through this world without any Autostraddle gear to call your own? NO DON’T BE CRAZY. Go ahead and buy the damn shirt. While you’re at it, grab some other t-shirts that you’ve been saving for no reason in particular. We’re gonna show you how to cut ’em up and turn them into things you like!
These are mostly no-sew projects, with the exception of a few entry-level gigs (aka ‘sewing in a straight line’), and can be used to make any t-shirt better / different / something else entirely.
Books about t-shirt DIY that you will probably like:
+
+
Check out the cute bartenders from Mason Dixon NYC sporting their cut-up Autostraddle shirts at the Rodeo Disco:

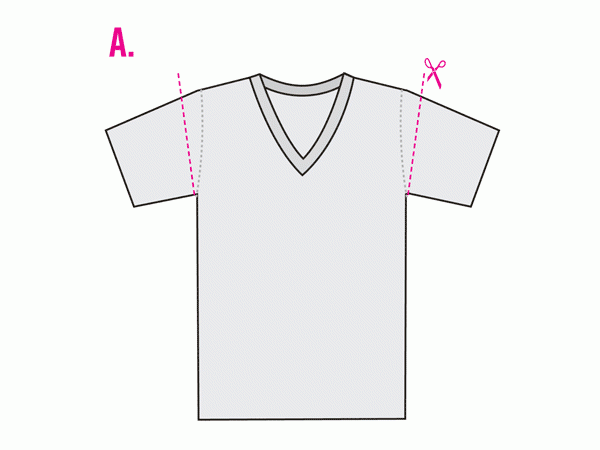
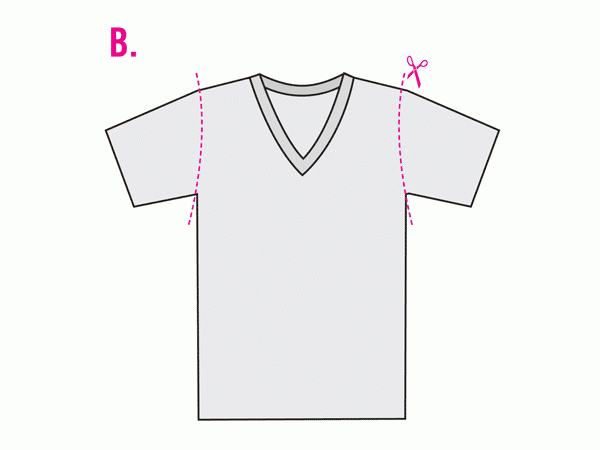
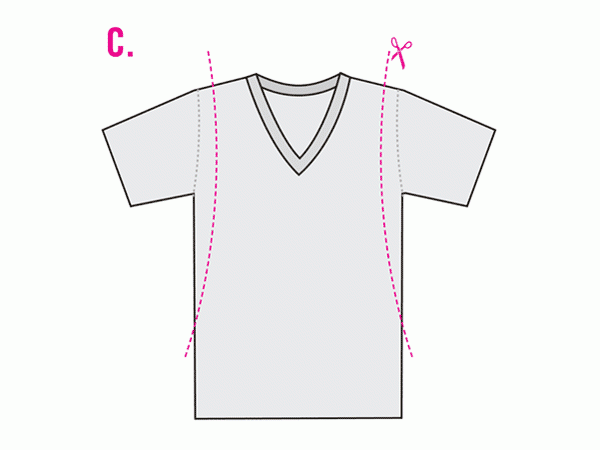
I Will Cut You: How to Cut Your Sleeves
The most obvious alteration is getting rid of the sleeves. You have a couple of options here.
- Cut the Sleeves at an Angle
Cut the sleeves at an angle, keeping a couple of inches of fabric on the top, outside of the sleeve seam. The edges will curl up and you will look very sweet / ‘as if.’
- Cut Just Outside of the Seam
Cut the sleeves just on the outside of the seam. The fabric will fray but not curl, and your arms will look SUPER INTIMIDATING AND SEXY.
- Cut sleeves well into the t-shirt side of the seam.
Don’t be afraid to make this cut enormous – you can wear a bandeau or tank top under the t-shirt and look as sexy as the Rodeo Disco bartenders at Mason Dixon! Hottt.
How To Cut The Neckholes Of Your Shirt
Neckholes can be personalized, too!
(a)

Scoop necks are simple – just cut the collar off of the shirt, making the front lower than the back. If you want, use another shirt’s collar as a guide by pinning it to the inside of the shirt you’re going to cut.
(b)

The Flashdance-style neckline looks best when the front matches the back, so you can just lay the shirt flat and cut into both pieces of fabric at once (make sure you have sharp scissors for this, k?). This cut should go from one shoulder point to the other in a sort of horizontal fashion.
(c)

Cutting a deeper v-neck in the front and back is similar to the Flashdance neckline, but without the off-the-shoulder flirtiness. Again, I defer to the Mason Dixon bartenders.
How To Cut Your Shirt Racer-Back Style
via Save This Shirt by Hannah Rogge. This works best on a tighter-fitting shirt, it seems.

Step 1
If you have one, put a racer-back bra or tank top on underneath the t-shirt to use as a guide.
Step 2
On the top of one shoulder, mark the width of the new shoulder with tailor’s chalk or a pencil. Then, on your shoulder blade, mark how far in towards the center of your back you want the sleeve to go. (You can use the racer-back top that you are wearing as a guide or create an original line.) The cut lines will be different for the front and back of the shirt.
Step 3
Draw a deep scoop on the shirt’s back from the seam of the shoulder to the armhole, following your marks from the previous step.
Step 4
On the front of the shirt, mark a shallow scoop from shoulder seam to bottom of armhole.
Step 5
Take the shirt off and cut a new armhole along the lines you have drawn, making sure to cut the front fabric and back fabric separately. Repeat for the other armhole, using the cut sleeve as a pattern. Remember that more material will be cut from the back of the sleeve than from the front.
Halter Top
via Rachel
Remove the sleeves and cut the neckhole in the style of option C above. Keeping in mind that you’ll need some of the fabric left in tact for tying purposes, cut off the top half of the back of the shirt. You’re going to cut down the side seams and the across the middle of the back, then cut the remaining fabric in half vertically to create ties. This will leave you with two pieces of fabric coming from both shoulders that can now be tied around the back of your neck.
+
+
Needle and Thread
T-Shirt Dress
via Rachel
This works best with an oversized shirt. You’ll need to figure out what you want to do with the sleeves and neckline, but you’ll definitely want to alter them somehow. Cut the oversized shirt in half (not necessarily exactly) across the waistline somewhere. You now have two halves of what used to be a very cute shirt. Good job.
Take another shirt with complimentary colors and cut the middle out of it – the area from underarm to bellybutton, for example.
Sew the band of shirt B to the middle of shirt A. Remember that the pieces must be right sides facing when you sew them to create the hidden seam, etc. You’ve done this before, right?
You’ve basically elongated shirt A via the middle of shirt B, thereby creating a cute, belted-looking shirt dress kind of thing. Do you like it? Ok!
Yoga Pants
I know this might sound insane, but it’s entirely possible to make cropped yoga pants out of a t-shirt. This tutorial on Cut Out and Keep is simple and straightforward. Best of all, your shirt’s logo will be safe and sound on your thighs / hips. Cute!
Drawstring Pouch
Cut the sleeves from a long-sleeve t-shirt and remove the bottom hem. Decide how long you want your pouch to be, add about 1.5-2″ and cut the sleeve to that length. You should have a little tube of fabric. Turn this inside out and sew the bottom of the bag together.
Make two 1.5-2″ (whatever you added) cuts down opposite sides of the top of the bag. Now your bag has a front and back flap and should still be inside out. For the rest of this tutorial, I’ve consulted How to Make Assorted Purses from Let’s Make Cute Stuff by Aranzi Aronzo. I even took pictures of the book for you, which I’m 93% sure might be illegal, so.

Working with one flap only, fold both ends of the top in toward the middle about 1cm (photo #8). Fold the top of the flap down over these folds, almost meeting the bottom of the flap itself. Ironing these folds in place will make the next step much easier (photo #9).
Sew straight across about .5 cm up from the bottom of the flap (photo #10). Flip the pouch over and do the same with the other flap. When you’re done, turn your pouch right side out.

For the drawstring, cut two pieces of cord, yarn, string, whatever. They’ll need to be double the width of the pouch plus 2″ (you can always shorten these later, no worries). Using a bodkin, safety pin or chopstick, thread one piece of cord (or whatever) from one side of the pouch, through and back around through the other side, then tie the string. Do the same from the other side of the pouch and around, tying this string together as well (photo #15).
You have made a drawstring bag. I made one once and now it holds my iPod + earbuds.
+
Tote Bag
I made a bag for my sister a couple of years ago out of an old t-shirt using a variety of bag how-to’s as inspiration. This tutorial from Instructables is really similar to that bag. For extra cuteness or whathaveyou, cut the hem from the sleeves of the shirt, resulting in strips, and tie them onto the straps of this bag.
Patches
Maybe the only salvageable thing about your shirt is its logo. That’s cool – cut it out and hand-stitch it onto a shirt that you like. There are two ways to accomplish this: A) stitching it directly on top of another shirt (or bag or pants or freakin’ anything), which gives you a chance to really play around with stitching techniques and thread colors, or B) applying the patch to the inside of the shirt and revealing it via cutout. Both of these techniques are explained in Save This Shirt or you could figure it out yourself by accessing your own ingenuity, creativity and willingness to fuck up (or succeed!).
Appliques
Sorta like a patch but different. What is the first letter of your name? You should find / make a stencil of this letter, grab some leftover scraps and cut a monogrammy applique for yourself. This can be hand-stitched onto practically anything in the universe, even your girlfriend’s Autostraddle t-shirt. You are so possessive, weirdo.
Don’t stop at letters! Remember when Style Editor Becky introduced you to Fresh & Wholesome? You can do that, too, kids. I mean, you don’t want all of your shirts to look like a preschool art project, but I think one or two wouldn’t be terrible.
Headbands
Speaking of scraps, those sleeves you cut off can easily be turned into headbands. Just um, put it on your head. Bam. Headband. Why don’t you applique that shit with a cute little cloud or something? Yeah.
What do you think? What kind of zany tomfoolery have you attempted with a t-shirt? Can you understand these instructions? Should I drink more or less caffeine the next time I write a how-to post?


Comments
thanks laneia!
other things you can make: bracelets, bandeau tops, and that ugly thing 6th grade girls do at spirit rallies that involves tying the sides up.
That ugly thing is still all the rage in my high school. At least, it was 5 years ago. I have fond memories of tying up the sides of my senior class shirts, fringing the bottom, and putting beads on all the fringe. It was fabulous.
THROW PILLOWS.
Buy a pillow. Measure it. Let’s say it’s 12×12. Cut the image of your t-shirt that you want to show, allowing for about 1 inch on each side that will be sewn into the pillow. Cut that shit out, making sure your lines are straight. Cut out another piece of fabric of the same size – back of the shirt, other shirt, etc. and put the nice (picture/outside) sides of your squares together. Pin it. Sew around three sides, about an inch in, either on a machine or using backstitch. (NOT RUNNING STITCH!)
Fold the top over about one inch, and then sew all along the bottom of the folded-over seam. Make it pretty; you’ll see this on the outside.
Turn it inside out so the picture’s on the outside! Then stick your pillow in!
You’ve got a few options now, so it really depends how ambitious you are. You can stitch the pillow shut, but that way you won’t be able to take the pillow case off to wash if you spill beer or curry or spaghetti sauce or god knows what on it.
Other options are zippers, snaps, velcro – you can get iron-on velcro, which sticks like a sticker to your fabric, and then gets permanently when you iron it, because sewing velcro is a bitch, espesh when you don’t have a machine – buttons, or even bra hooks.
It works really well with band t-shirts. Wanna cuddle with Tegan and Sara? You can cuddle with your Tegan and Sara pillow!
(I think a pillow with “Straddle This” on one side would also provoke some fun conversation with girls when you take them home.)
Dude, stick-on velcro is seriously one of the best inventions the world has ever seen. I love that stuff so much.
These are some awesome ideas, I’m so trying a few of them.
I’ve personally found that another good way to make either a boatneck or flashdance-y neckline is just to either
1) measure the length of neck opening you want on yourself
2) rip the seam out along that length
3) put it on and fold over the excess until it looks good
4) sew that line
5) cut off the extra
OR
1) rip out the entire top seam
2) put it on and see how it looks, holding it together at different points
3) sew it back together to that point
4) do steps 3-5 as above
Both of those methods do require a little sewing, and it helps if you have a seam ripper (which actually I had no idea what that thing was in my sewing kit until I asked my mom), but it’s still pretty easy. You can avoid all sewing involved just by using the first method and cutting off the excess, leaving the edge rough instead of hemming it.
Another thing I do a lot is salvage t-shirts with unwanted holes in them by either sticking on iron-on patches or embroidering a little star over it (because any other design would take more effort). You can do either in arbitrary bits of a pristine shirt though, as well.
i don’t get paid ’til next friday and i’m so MAD. :( hopefully they’ll still be there? PLEASE BABY JESUS!
Oh hell yes! I just paid so I am ALL over this. It’ll go nicely with my Auto-Win tank and t-shirt I got a couple years ago.
Autostraddle T Shirts!! That’s so exciting. It’s a blend of 2 of my favorite things (t shirts and Autostraddle, obvs) I’m so excited! Also, I feel like I would have sexy time with any girl in an autostraddle shirt. They must be super awesome if they have one, right?
I can only cut the sleeves off of my old shirts, because I am an oddly unskilled/uncoordinated cutter.
Laneia!! these tips are so great! i have some old concert t’s and whatnot that i cant really wear anymore because they have fallen apart. why havent i thought about doing some of these things before? i have, however, cut the slogan off of one shirt and sewn it to another brand new shiny shirt, worked really well! also, i have a stack of t shirts that are sleeveless (via step b.). thats all i wear in the summer. with shorts…of course… and a hat. soooo…thanks!!!
I hope you girls know that I’m going to be checking Autostraddle/Twitter on the hour every hour until these shirts are available. I’m hella excited!
For some reason the word neckholes sounded SO dirty to me.
I’m a perve.. ANYWAY..I AM SO HAPPY these are finally out. I would love to customize but something about cutting a t-shirt makes my chest tighten. Like its sacrilegious or something.
You should do a gallery of readers and their shirts!!
WHAT EVER HAPPENED TO KC & ELKA?!
I KNOW! I totes had a “neckhole” flashback.
jesus fucked my neckhole. aah good times.
<3
I have no idea what you are talking about.. I just thought about something sexual.
this is so servicey and useful. i will use it. i cut my t-shirts a lot. sometimes by “cut” i mean “ruin.” But then I keep them. I don’t know why I do that though. There they are. Hey t-shirts over there. I better throw you out before I move. OR TURN THEM INTO SHOPPING BAGS.
THIS.
WHO’S EXCITED ABOUT TOTE BAGS, IT’S ME
this article makes feel super creative and makes me want to take on sewing even though i usually cringe at the thought of needles & thread & stuff. so, laneia, not only are you creatively amazing, your also really good at motivating other people into being somewhat creatively amazing. or maybe just kinda creative. whatever. i’ll get back to you on that after i attack the t-shirts in my bedroom.
I think I’m going to get 2 or 3 shirts, oh my gahhh. One to keep as it is, one to make a pillow, and one to cut up and sew and add beads make a headband and put sequins and fancy shit on. We need to have a t-shirt gallery after we all get them and alter them!
Where were all of these ideas when I had to give away half my tees for a move abroad?! I’m am very excited about the tote.
You can also use the left-over sleeves to make t-shirts for hipster dachshund puppies ;)
I’m going to have to go with the Flashdance option.
This is really helpful and carefully put together. Who wants to be a sheep, wearing what everyone else is wearing (unless, of course, that’s an official autostraddle shirt) when you can mod your own stuff into something really fucking cool?
Mega props to you, laneia.
Now I know what to do with all those previously-useless, free XL promo T-shirts I get.
I bought a justin bieber shirt (solely to to experiment with altering it, i swear…) now, thanks to these handy tips, i am in love with it…
THANKS AUTOSTRADDLE DOT COM!
I love the yoga pants idea! I’ll have to try it sometime.
Back when I owned a sewing machine, I made an quilt from my precious old t-shirts. It was a lot of work but made a fun patchwork of my wardrobe’s history.
All these articles about DIY fashion make me want to start sewing again! Suspenders, skinny ties…so gay. I approve.
Another thing you can do if you have a shirt that’s way too big and if you don’t care too much about looking neat ‘n’ tidy: cut down along the side seams all the way, put it on your body, safety-pin it (just regularwise or in little Xes) all the way down so it’s as form-fitting as you want, take it off and trim the extra fabric from the inside “seams” (but not too much or you’ll have gaps, unless you want to be sexy that way), and you have a new shirt that fits you and is also punk-rock looking. You might have to fuck with the sleeves and neckline too, in any of the ways already mentioned.
I’m doing B sleeves with B neck. Now I just need to find the shirt… Or an excuse to cut up a perfectly good shirt. I’m going to have to spill some tea to make this happen.
I have noticed that on Etsy, the truly fantastic clothes often seem to be modelled by fashionable dykes.
4 months after this was first posted I have to customise my show tshirt of the musical I’m in and this is the first place I come and look for inspiration. Thanks Autostraddle :)
I’ve always wanted to do this with a tshirt – http://www.cutoutandkeep.net/projects/cut_tshirt
I think I might try it on a cheap Primark tshirt first, though >.>
Oh how I would love to do this … Any chance of getting the pictures back up as a visual?
Check out this ebook about Cutting T-shirts! : http://creativitee-ebook.com/
It features some pretty cool creations!
Good post. I definitely love this website. Keep writing!
Good information. Lucky me I found your website by chance (stumbleupon).
I’ve saved it for later!
[…] How to Cut Up Your T-Shirt, DIY Style – Cut the sleeves just on the outside of the seam. The fabric will fray but not curl, and your arms will look SUPER INTIMIDATING AND SEXY. Cut the sleeves well into the t-shirt side of the seam. Don’t be afraid to make this cut enormous – you can wear a … […]
I love those ideas and tips!Thanks for sharing x
mypastel-world.blogspot.com
High Quality Silk Screened T-Shirts – Shipped Daily
This is our gift to you, oh beautiful world. Nowhere on the internet will you find such a large variety of quality printed t-shirts at such a ridiculously low price. While other online t-shirt businesses charge three times the price, and deliver one-third the quality, click here to read more ..
I’m NOT spam and I just used this guide in 2k17. So thanks, Autostraddle, for catering to all my needs! :)
I just googled “cut your shirt like a dyke” and this article was the first result :)