Excerpt from Toni Morrison
We are the people of the Internet. We write here, make friends here, learn new things here and hang out here. It’s our home and native land and we like it. But sometimes, just sometimes, there’s something to be said for tangibility; non-Skype eye contact, pen to paper, a hand in your hand. Books especially are things that just can’t be duplicated on the Internet. With blogs and personal websites, we’ve all gotten so used to self-publishing that the idea that we can’t make our own books can be off-putting. But the thing is, we can. Building a book is a test of imagination and patience. First you have to make something worth housing in a book. After all that, you have to carefully measure and cut and sew and glue until you have a structure that’s good enough for your story. I’ve taken some of the planning out of the left-brain side of the project for you by making templates and writing instructions. To get started, all you need to do is download (File > download) the Microsoft Word or the Apple Pages version of the template.
Building a Book From the Ground Up
1. Write your book
Whether you’re printing an actual book, a collection of poetry, a tumblr-in-print, a lookbook or a recipe book, you’re going to have to get your text and photos together first.
2. Format the text
Create a word or pages document with 2.5 inch margins so that you have a 3.5 inch wide space for typing. Paste the text and photos for your book into the document.
3. Divide the pages
The template has enough space of 30 lines of text if you’re using 10 point Baskerville font. If you’re going to use another size or font, set the text boxes in the template to your style and count how many lines fit in each box and subtract one so that you’re sure the bottom line won’t get cut off by your printer. Go through the document and count 30 (or however many lines fit in your custom template) lines, putting a “+” or some other symbol between each group to show remind yourself where the page breaks are.
4. Number the pages
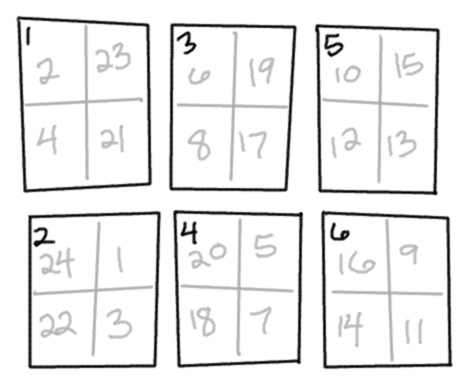
Number the pages so that you’ll know what’s going to be pasted where. Pages 1-24 should be labeled just like that. Pages 25-48 should be numbered as 1b-24b, pages 49-72 as 1c-24c and so on.
5. Paste the text
Copy and paste each group of text (don’t include the number) into the correct page. For example, page 1 should go in the top right box on the 2nd page.
6. Print the book
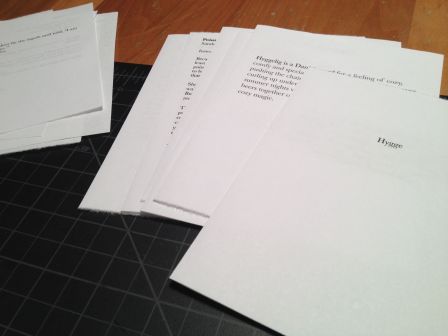
Pages 1 and 2 are the front and back of the first page as are 3/4 and 5/6. To get them to print right, just print the odd numbered pages, then put the printed pages back in your printer and print the even pages.
If you’re using Pages:
File > Print
Layout > Paper Handling
Pages to Print: Odd/Even only
If you’re using Word:
File > Print
Print What: Odd/Even pages
7. Cut the pages
Either fold each page in half along the long side, lick along the crease and rip it or use a ruler and an exact knife to cut the page at the halfway mark (5.5 inches).
8. Fold the pages
Fold each half sheet in half again along the long side, unfold them and then refold to make the creased really crease-y. This is called a folio.
9. Make a stack
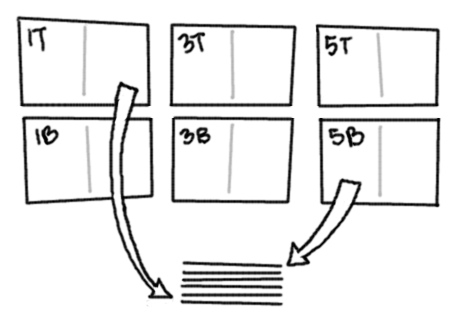
Set up pages 1, 3, and 5 so that they’re facing you (and so pages 2, 4 and 6 are on the table) and stack them on top of each other with the top of page 1 first, followed by the bottom of page 1 all the way up until the bottom of page 5. Guess what? You just made a signature.
10. Sew each signature
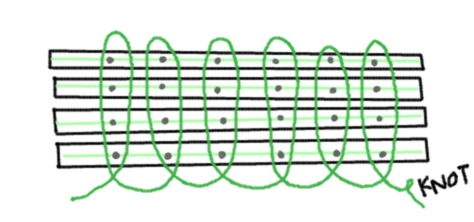
Make 1 inch marks along the inside fold and then poke holes using a safety pin. Now you’re ready to start sewing. Starting on the first hole, sew from the outside to the inside. Loop around from the inside to the outside of the fold and sew from the outside to the inside of the book in the second hole. Go back to the first hole and sew from the inside to the outside. Keep going until you reach the end, loop the thread around the edge of the fold again, and tie a knot on the outside.
11. Sew the signature set
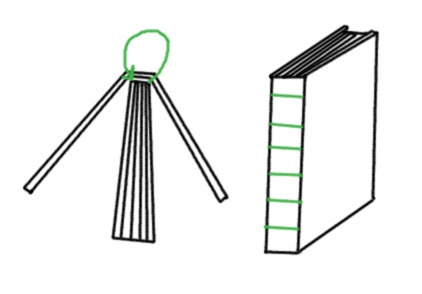
Stack the signatures up in order and sew along the edge. Start at the bottom of a seam and tie a knot. Then sew up, around and back down the seam. Do this along the entire edge of the set and then pull it tightly enough that the signatures stay together but no so tight that they’re pulled open. It’s staring to look like a book now!
12. Plan the cover
Measure the length and width of your signature set. Add a few millimeters to the length, and draw a rectangle that size in the middle of a piece of stiff paper or cardboard. This will be your spine. Measure the width of your pages. Add a few millimeter to that number and then draw rectangles that size on either side of your first rectangle.
13. Attach the cover
Cut out the cover and fold along each side of the spine. Poke holes a inch apart along either side of the spine just like you did for each signature. Sew the signature set to the cover by tying a knot along the first seam, sewing out the cover, along the spine, and back into the book.
14. Decorate the cover
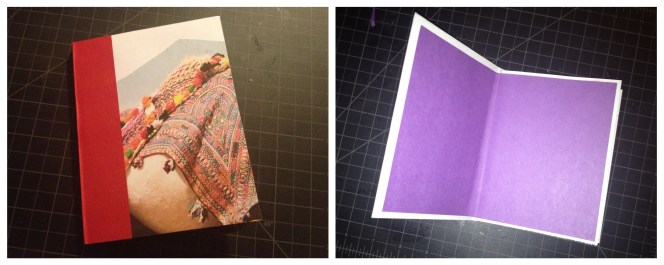
Cut a piece of paper to cover the seam and part of the front and back cover and glue that along the spine. You can glue paper to the front or draw directly onto it. If you don’t like seeing the thread you used to bind the book, you can glue a folded piece of decorative paper to the cover and first (and cover and last) page of the book. I don’t know what this is called, but if you do you should definitely tell me.




I READ THAT ANDREA GIBSON POEM LAST NIGHT
I am going to bind all the books now!
I LOVE THAT POEM.
<3 bookbinding!
the papers between the cover and textblock are called endsheets (which consist of the pastedown and fly)!
yes! the more you know de de de deeee.
Thank you Laura thank you!! I am going to make a book for the Someone Special in my life.
HOLY FUDGEBALLS, I MUST DO THIS!
… I didn’t understand how to do a word of that. FU BRAIN.
Don’t worry, it made no sense to me either. We must be among the uninitiated.
AAH this is fantastic, thanks! Totally trying it this weekend.
Thanks Autostraddle for reading my mind! This is exactly what I needed :)
YES. THIS.
I love that since I decided to make a comic book by hand for my senior project there have been like 3 AS articles about bookbinding. Thank you.
this is awesome.
Oh I like this.
Mmm. Crafty.
there’re called endpapers :)
This is another prove of the sheer amazingness of Laura. :)
Plus the book shown features Danish and hygge (I love Danish, I love hygge, I love books….)
Thank you ever so much, beautiful Laura!
isn’t it just the best word/thing ever?
Just googled what ‘hygge’ is and it’s now one of my favourite ‘no exact translation in English’ words
book of right on, right on
lets put our books everywhere! urban playground sidewalk reading room
I’ve wanted to do this for a long time, but I don’t know what I would put in a book! So far the best idea I’ve had is to hope I have a writer for a girlfriend one day.
They’re called endpapers, I think. Awesome tutorial — it’s going on my to do list.
I’ve never even thought of binding my own books, because like, the copy shop can do that for you, but this looks like fun. Going to put together material this week and try this next weekend. Thanks!
Re: setting up the text… Anyone who’s savvy with Microsoft Publisher might want to try setting up a six-page document with the required number of text boxes and linking them in the order described above. Then you can just copy-paste an entire signature’s worth of text at once. It is fantastic.
Also I guess I could email my file to people if they really want it? It is for Microsoft Publisher, though, which has no Mac version.
I think it’s easier to print as a half a page. You just have to chose how many pages per fold, not sure how many it should be. Maybe 5?
http://office.microsoft.com/en-us/word-help/print-a-folded-booklet-HP003072949.aspx
This literally is the best thing I have stumbled upon inside of the internet so far in my career of being a youth. My world has just opened up a little bit more. gahh
Pingback: Bound and Determined: Coptic Book Binding For The Crafty, Persistent, and Persistently Crafty | Mamoot