

The first rule of quilting is is you do not talk about quilting. Actually that’s not true at all. You should definitely talk about it with anybody who has any idea of what they’re doing. Quilting’s long history means that the best way to figure out this geometric art is by talking to master quilters. When I began, I went to my next store neighbor’s house and she talked me though my problems and gave me tips on things I hadn’t even considered.
When you’ve never sewn anything quilt-like before, the idea of coming up with something from scratch can be daunting. I mean honestly, where do you start? And once you’ve got an idea, how do you know if it’s even possible to get out of your head and onto a blanket? Luckily, there are centuries of grandmas and just generally grand people who have been making quilts and will happily lend their shoulders for us to stand on.
Design Your Quilt
Think In Blocks
Okay, so a quilt is basically a bunch a pretty patterns on fabric, right? Wrong! A quilt is really nothing more than a gazillion rectangles, squares and triangles pieced together. Occasionally you’ll find a quilt with hexagons or even – gasp – circles, but since we’re just baby quilters we’re not gonna go anywhere near those fancy patterns yet.
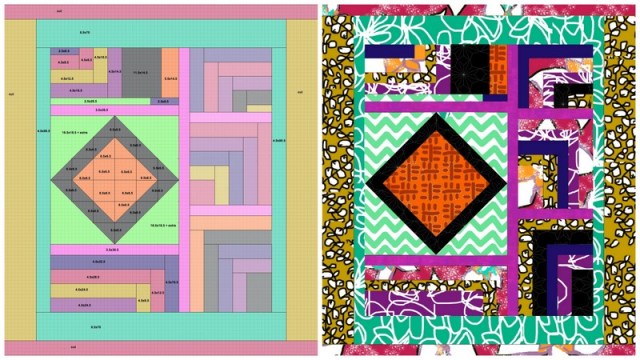
Let’s take a look at a problem I encountered when designing my quilt: a diamond. When I was first drawing it out, turning a square on its side seemed like a really simple variation. But once I started thinking about how I was going to measure and sew all those pieces together, I got lost.
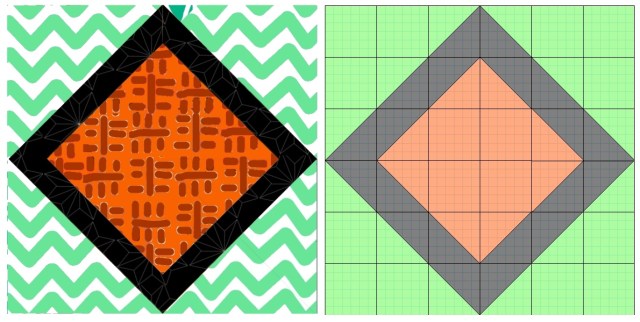
Dividing the image up into smaller squares simplified the math I had to do. Instead of hoping each black border of the diamond was measure right and making myself crazy by sewing on the bias (we’ll talk about this later), all I have to do is think about triangles and squares.
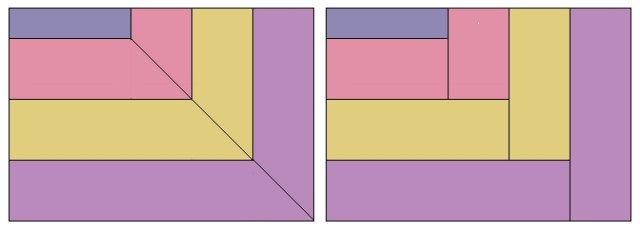
Learning a few traditional blocks can also help simplify your work. When I was initially designing my quilt, I was planning on mitering together the corners in a pair of rectangles to make L-shapes. The problem comes when you try to figure out which piece you should sew first. If you do the corners first, then how to you get them around the smaller square without making a bubble in the fabric? And if you attach a rectangle to the smaller square first, how do you sew to corner in a straight line? As it turns out, all you have to do is give up the mitered corner and make what’s called a log cabin.
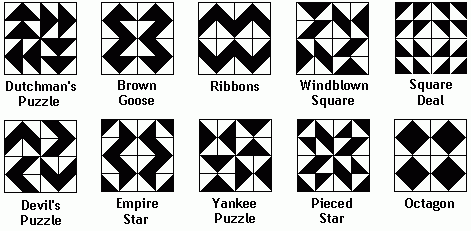
A log cabin is only one of hundreds of traditional quilt blocks. Taking a look at a quilting book or site can help you when you’re designing your quilt.
Find Inspiration
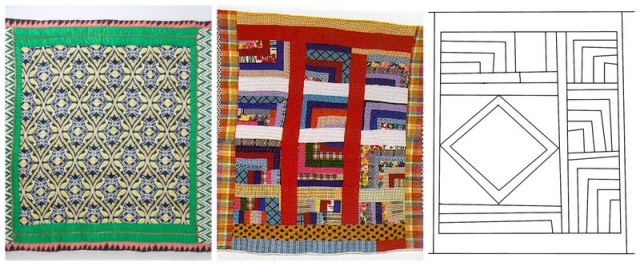
There’s no reason you should have to start at square one (pun intended) when you’re figuring out what looks good where. Take a look at expensive catalogues or head to a folk art museum to see what amazing quilters have already made. I liked the borders and colors from a quilt I saw at Anthropologie and the asymmetry and L-shaped blocks from an Appalachian quilt. Combining their ideas with mine, I drew a rough draft of my pattern.
Measure Your Pattern
In sewing, there’s a saying: measure twice, cut once. When it comes to making a quilt, it’s more like: measure five times, cut once. I planned everything out on paper but later decided to move my sketch to my computer so that I could make changes easier. In order from least to most tech-reliant, here’s how to draft your pattern. You can pick your poison.
Before we talk about the pros and cons of each, one word of advice: seam allowances. If you’ve never sewed before, a seam allowance is the little bit of fabric you add to the sides so that when you sew two pieces together, you don’t end up with fabric 1/4 inch shorter than it was supposed to be since 1/4 had to be eaten up by the seam. 1/4 is a great seam allowance because most sewing machines have just about 1/4 between the needle and the end of the foot, meaning that you can line the seam up with the foot and rest assured that you’re following a straight line. If you’re completely lost right now, just know that we’ll get back to talking about sewing machines and seam allowances in a few days. For now, all you need to know is that you need to add 1/2 inch to the dimensions of each shape (that’s 1/4 on each side of squares and rectangles and a little extra for tricky triangles).
Graph Paper
Graph paper works really well because it’s so simple. Once you know how big your quilt is going to be, draw an outline. Since mine is going to be a duvet cover for a queen size comforter, I decided on 90″x98.” That’s a humungous amount of graph paper, so I ended up making each little square on paper represent 4 square inches. This became a little unfun when I would forget that each one segment of graph paper was really two inches, so I’d recommend finding special graph paper with smaller squares. I promise they make it; my dad has a ton.
Anyway, graph paper is good because it helps you to see how everything’s coming together and keeps you from having to do a whole lot of math in your head to figure out how big each square/rectangle/triangle of fabric will be. It also helps you make sure that any diagonal lines you draw form 45 degree angles. After I drew everything, I went and counted the lengths of each shape, made sure to add that 1/2 inch seam allowance and noted the dimensions inside each shape.
Image Editing Software
Image editing software like Photoshop or Seashore works just like graph paper, with the added advantage of being able to undo any mistake you make. It also makes it easier to move lines around, test out different color palates, and keep track of what you’ve cut out and sewn. Just drop in a graph paper image on a lower layer and draw on top.
Apps
There are really fancy programs you can buy to help you make your quilts, but there are also plenty of nice little apps that can make your project go smoother. Quick and Easy Quilt Block Tool has a dictionary of quilt blocks and lets you know how many of each type of block you’ll need. Quiltfab does that same thing, but is free and also helps you calculate how much fabric you need and is full of tips for construction. Quilter’sAppP lets you check out what different color combination might look like in your pattern.
Coming Up Next
Next time, we’ll being talking about choosing colors, buying fabrics and rounding up all the materials you’ll need to start assembling your quilt.


Comments
I’ve never thought about using Photoshop to design a quilt! Actually, I’ve never thought about designing one at all – I’ve only used patterns in books and such. what a neat idea!
Wow that’s so cool. I just made a quilt from old t-shirts a week or so ago. It only took 6 days of hard work and it is now my most treasured blanket.
laura you make me want to do things
This is so cool! Looking forward to the next instalment.
I made a quilt for my nephew when he was born. I have an idea brewing to make a quilt that lists every electrical job I have ever done.
My great-grandmother is ex-Amish, and so I grew up with lots and lots of quilts from her, my grandmother, my aunts, and my mom. They’re so great, and are so expensive to buy, so it’s been the one thing from her culture I wish I had picked up on. This is so handy, and a reminder that I need to at least attempt this!
Also, how cute and so gay would it be to have a queer quilting circle? In Amish culture, quilting is a hugely communal thing, something that all the women in the community get together to do. Reclaiming that with some queers would be rad.
i sew! i’ve made a quilt! this is an exciting thing!
I feel like such a lo-fi quilter now! I just draw a messy design, kinda throw everything together, and arrange the pieces around on my floor until I like them. I should probbbably look into graph paper.
Sewing sharp corners is a little tricky, but if you really want to do it, it is possible and can look very nice. It helps to do a stay stitch just outside of the seamline at the corner of each piece before you sew the two together. When sewing the corner, don’t just pivot your fabric at the needle and start sewing the other side of the corner like this \/; put a couple of stitches in there to blunt the corner a bit, so it looks more like this \_/ (probably a horrible explanation, sorry). Then trim your seam allowance fairly close at the corner to remove bulk and release the seam (not doing this is why sometimes you’ll get a bubble). The stay stitches should prevent fraying. Sometimes I will go back and throw a few hand stitches in there to secure the corner further.
Also, often if I want to add a tricky area to a quilt (like a giant pieced star or a circle) I will applique it on with zig-zag stitches, rather than try to seam it to everything around it.
I’m a quilter and a math teacher, so allow me to contribute free online graph paper: http://incompetech.com/graphpaper/
Invaluable. If you’re a quilter or math teacher, that is . . .
Love reading this and am excited for more!