

HAPPY PRIDE MONTH!! It’s that time of year where everything’s coming up rainbows, all the DJs in the clubs are fire, and you’re basically guaranteed to have an awkward run in with an ex at an event. Yaaaaas! Hopefully between the partying this month there’s also reflection happening around the history of pride and the fierce activism of Marsha P. Johnson, Sylvia Rivera, Stormé DeLarverie and Miss Major Griffen-Gracy that led us here today. Although I don’t love the corporate washing and QTPOC exclusion that often accompany Pride, I do love the energy and celebration of the season. I love being surrounded by queer joy and people living and loving unapologetically. Seeing all the happiness, strength, and pride present in in the LGBTQ community is also a great reminder of how far we’ve come, and what we continue to fight for. Back to the topic of celebration though, I think we all know that where there’s a celebration, there’s cake, and where there’s cake there’s generally a bunch of people putting off leaving the party because, in the wise words of Rihanna, they want that cake cake cake! In the case of rainbow cakes, that wait is usually not at all worth it. The majority of them look majestic but taste like chemicals and sawdust rolled in sugar. We deserve better! This is Pride! I’m tired of beautiful but mediocre cakes being invited to our fabulous parties. I’m also pissed about the recent SCOTUS ruling in favor of that homophobic baker and the future implications it has for the treatment of LGBTQ folks by emboldened bigots. Given all this, I felt now was a better time than ever to make a big, bright, beautiful AND delicious, gay af rainbow cake to truly take pride in. A mouthwatering five-layer fuck you to the haters. You don’t need a bigot-owned bakery to bake you a cake so gay the Supreme Court wouldn’t back it up, you can do it yourself!
I really hope you do, because this cake is amazing and I’m so so SO proud of this recipe. Writing cake recipes is HARD y’all. Generally my recipes have a lot of room for customization because I like allowing people to put their own spin on things, but this one is not like those. Each ingredient has to be precisely the one listed in exactly the amount listed or you’ll be headed toward a Pinterest fail edition of this cake. Also, I know I’m missing blue. I would’ve had to buy new cake pans or do significantly more work to figure out the ratios to add a layer of batter to this recipe and didn’t want to do either since five is already a whole lot of layers! I think we’ll survive. None of that will matter once you’re happily eating this dreamy vanilla cake with layers of more vanilla in buttercream frosting form, topped off with rainbow sprinkles for the perfect crunch in each bite. It tastes like my best memories of childhood birthday parties. Specifically that sweet spot between eating the cake and running around excitedly on a sugar high before the crash and inevitably being dragged away from the party for a nap. The only difference is now I welcome the nap with open arms. I know making cakes is a process, but there’s nothing like the smiles on people’s faces as they take the first bite of cake, and the fact that this one is filled with queer pride and activism makes it that much more worth it.
Tools you’ll need:
Hand or stand mixer
9 inch cake pans
parchment paper
offset spatula (recommended but not necessary)
space in the fridge for the cake to chill
Cake Ingredients:
3 3/4 cups (423g) cake flour
3 3/4 teaspoons baking powder
1 teaspoon salt
1 stick (113g) unsalted butter, room temperature
2 1/4 cups (450g) sugar
1 1/2 teaspoons vanilla extract
2/3 cup canola oil
3 large egg yolks
2 large eggs
3/4cup buttermilk
one standard pack of GEL food coloring (absolutely do not use liquid, it will ruin the batter)
rainbow sprinkles!
Frosting Ingredients:
4 sticks (452g) unsalted butter, softened
12 cups (3lbs/1536g) powdered sugar
2 teaspoons vanilla extract
1/3 cup half & half
Directions:
1. Preheat the oven to 350° F. Lightly coat two (or up to five if you have multiple) 9 inch cake pans with butter, dust them with flour, then line the bottoms with parchment paper cut into circles to fit the pan.
2. Add the flour, baking powder, and salt to a medium sized bowl. Whisk well to combine then set aside.
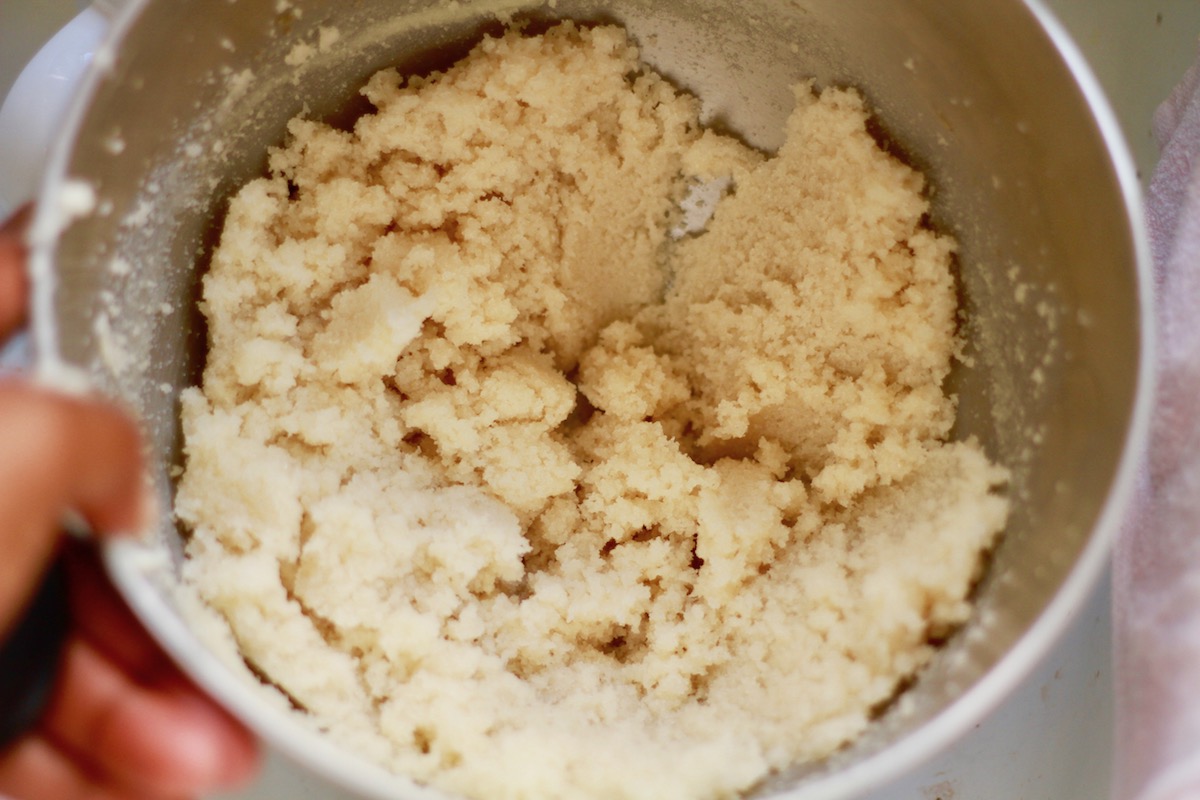
3. In a large bowl, cream together the butter and sugar on medium speed with a stand mixer (paddle attachment) or hand mixer for 3-4 minutes on or until fluffy and similar to the texture of wet sand. Next add the vanilla and once that’s mixed in, add the oil and blend everything together.
4. Blend each egg yolk in one at a time, then add the eggs one at a time as well.
5. Add half of the flour mixture into the wet ingredients and mix on low speed. Once incorporated pour half of the buttermilk into the bowl and mix. Repeat with the rest of the flour and buttermilk and blend just until everything is incorporated.
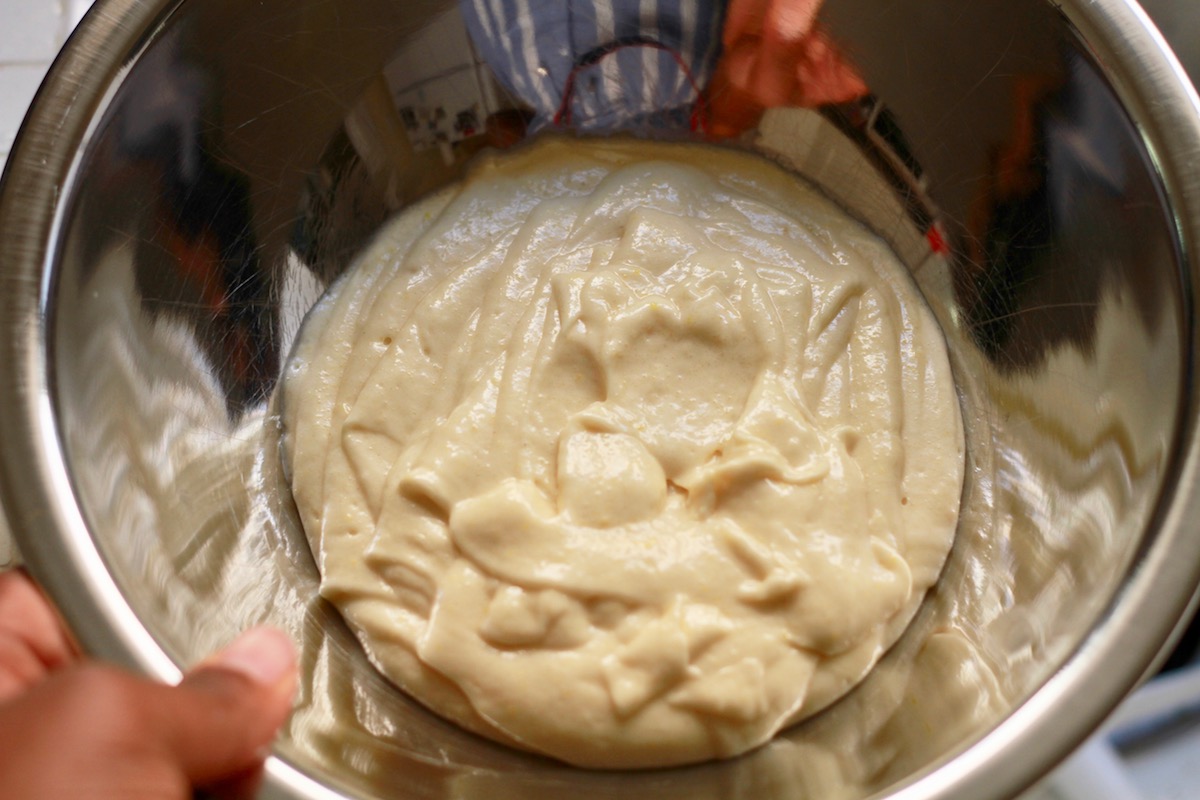
6. Depending on your style you can now either divide the batter into five separate bowls to make the colors, or use one bowl and rinse it between. Either way, you want to divide the batter as evenly as possible so that your layers are all the same size. If you have a kitchen scale, you’re aiming for 300g (give or take a few) of batter per layer. If you don’t, its about 1 1/2 cups of batter each, maybe a little less. 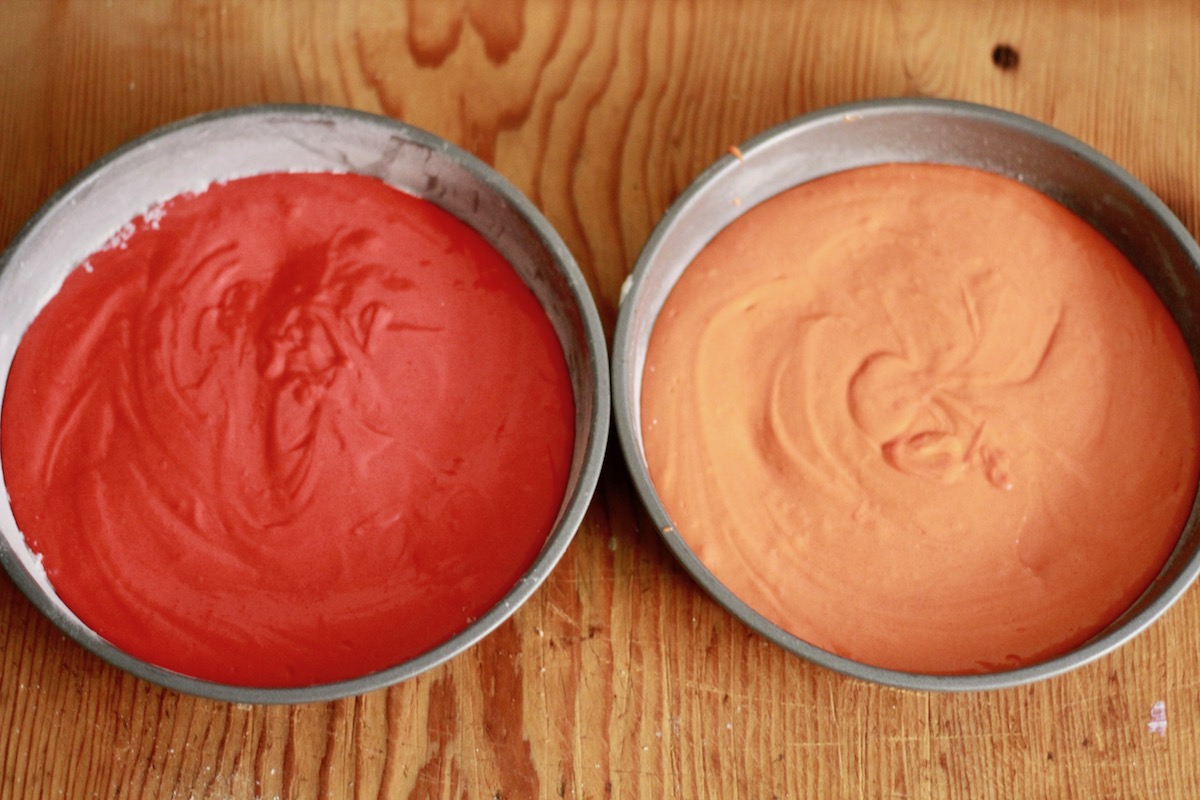
7. Once your batter is divided, mix in the food coloring in the following amounts: Red = 3/4 of a teaspoon red gel. Orange = 1/2 teaspoon red gel, 1/4 teaspoon yellow gel. Yellow = 3/4 of a teaspoon yellow gel. Green = 3/4 of a teaspoon green gel. Purple = 1/2 teaspoon red gel, 1/4 teaspoon blue gel. If you’d rather have a blue layer than a purple layer, use 3/4 of a teaspoon blue gel! Once the coloring is mixed into your batter, pour each color into its own prepared baking pan and spread it out evenly across the pan. If you’re using two pans like me, you’ll bake two colors at a time. 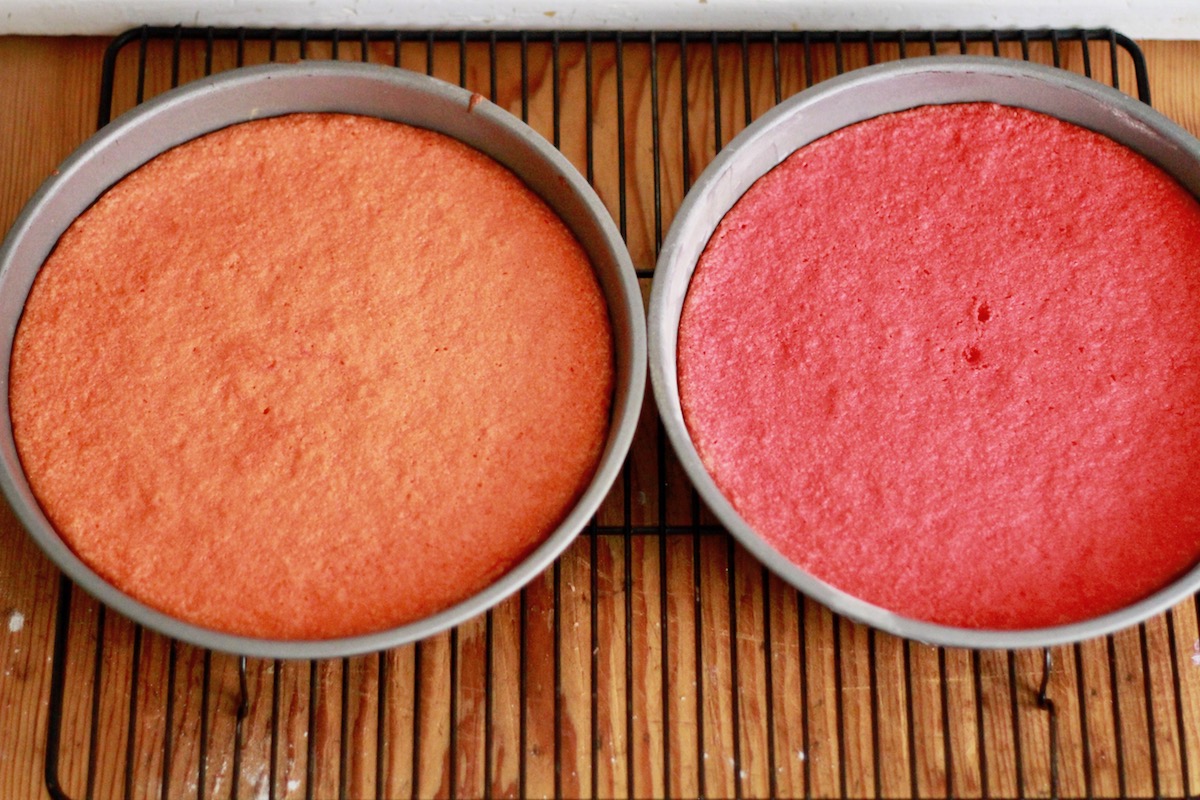
8. Place the pans in the oven and bake for 15-20 minutes. It’ll depend on your oven so keep an eye on them starting at 15 minutes. You don’t want to over bake the layers and dry out the cake! You’ll know they’re ready if you poke one with a toothpick and it comes out without any wet batter stuck to it. If you are doing this with one pan at a time, the cake should be ready in 15 minutes. Remove them from the oven when they’re ready and allow to cool in the pans for five minutes. Transfer the cakes out of the pans and onto a baking rack. If you are re-using the same pans now is the time to wash them with cold water, reapply the coats of butter and flour and parchment paper, fill them with the next round of batter, and repeat the baking process. Do this until all the layers have been baked, keeping in mind that you’ll have one pan for the last round and it will need less baking time!
9. Allow all the cake layers to cool COMPLETELY, no exceptions, otherwise all your frosting will melt off the cake when you try to add it and you will be very very sad. 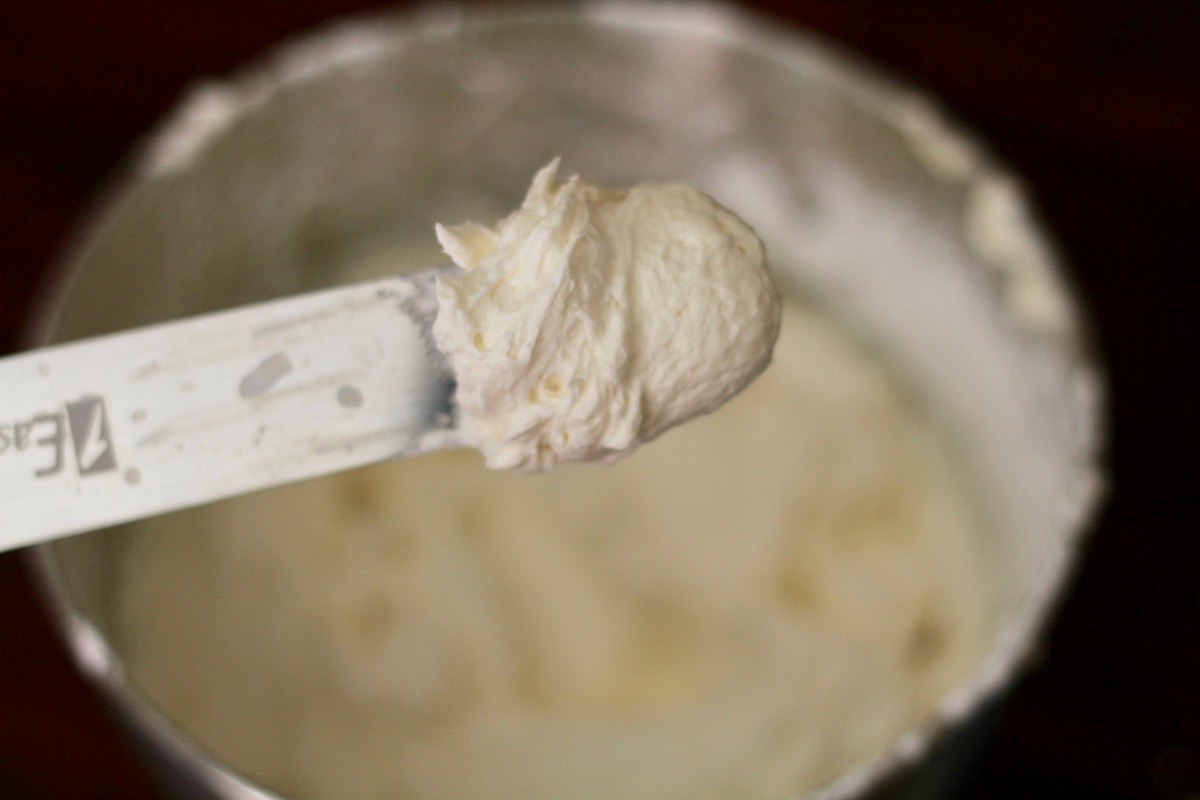
10. It’s frosting time! If you’re using a stand mixer, switch to your whisk attachment. Place the butter, half & half, vanilla, and 10 cups (2.5lbs) of powdered sugar in a large bowl and whisk together starting on low then up to medium speed for about a minute. Next add in the rest of the sugar and mix until there are no lumps, everything is fully blended together, and…well, it looks like frosting!
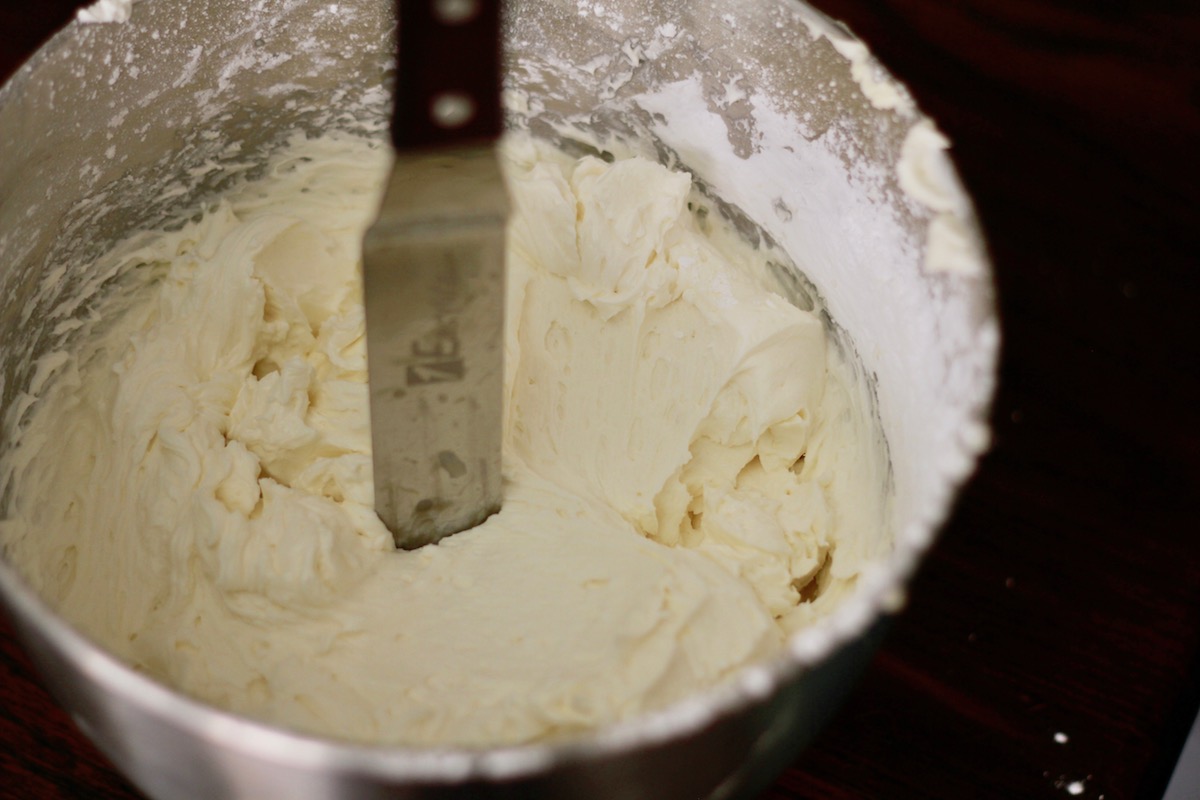
The frosting should be thick enough that a spoon or spatula stands will stand straight up in it, but not too thick to spread easily. If your frosting is too thin, add more powdered sugar, or if it’s too thin, add more half & half a tablespoon at a time until you get the right consistency. I’m pretty generous with my frosting cause…why not?! This makes a little more frosting than you might end up using which is okay because you can freeze the extra for later or get creative and maybe finger paint someone with it to occupy your time while you wait for the cake to cool. Just a suggestion! Baking is sexy, never forget that.
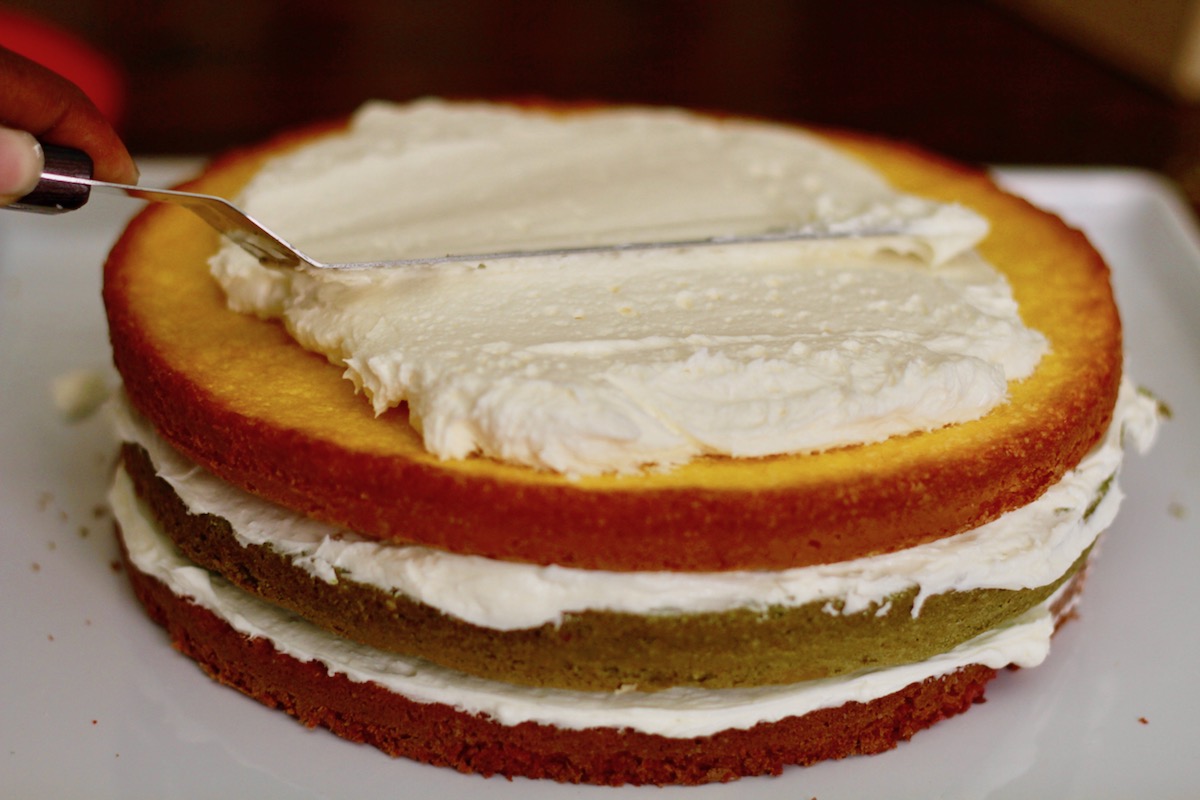
11. Alright, your layers are fully cooled, and your frosting is ready, it’s time to assemble this beautiful rainbow made of cake. Start by putting a little smudge of frosting onto the dish you’ll be icing the cake on to prevent it from sliding around while you work. Lay the bottom (purple or blue) layer on top of this, scoop 3/4 cup of frosting on top, and spread it into an even layer across the cake. This is easiest to do with an offset spatula, but rubber spatulas and big spoons work too! Once the frosting layer is done, place the next layer of cake on top, and repeat the frosting step. You’ll repeat these steps with the remaining layers of cake, and stop once you get to the last/top/red layer of cake.
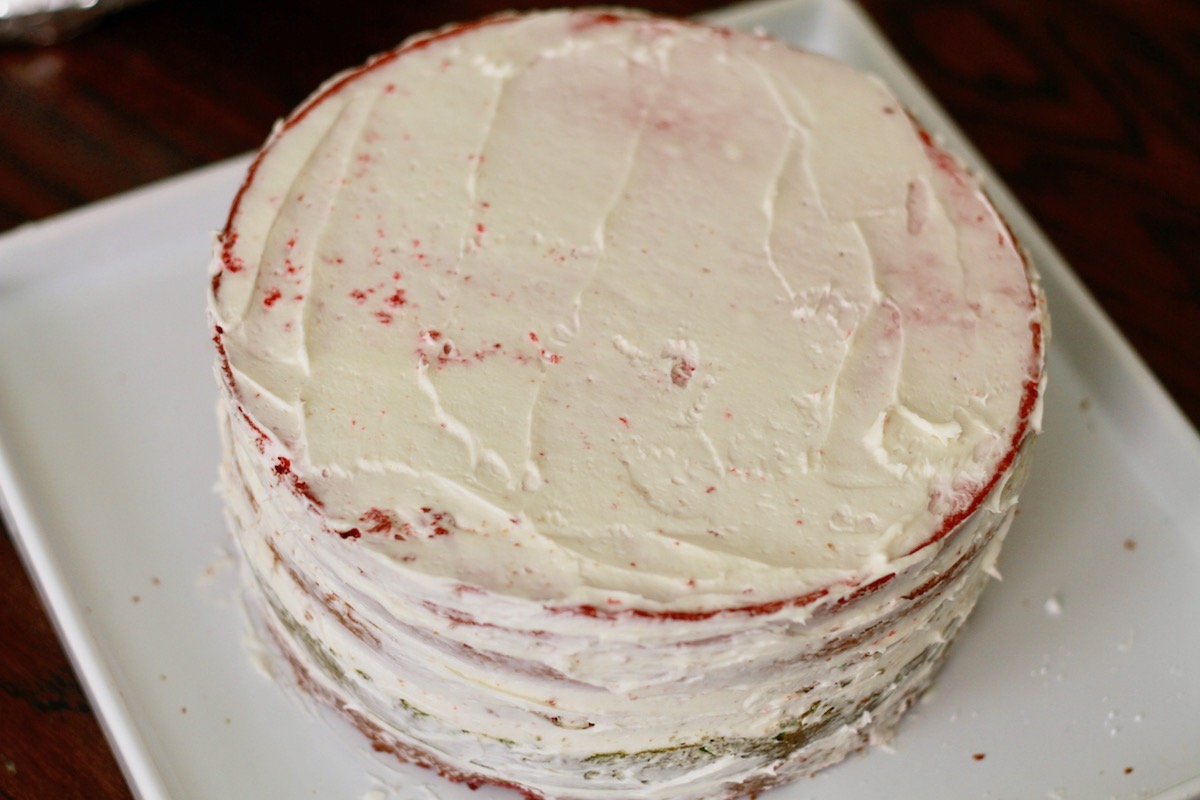
12. Once your top is on, you’ll need to a very thin later of frosting to the entire cake. This is called the crumb coat. It seals the cake and prevents crumbs from flaking off and messing up your flawless frosting application later on. Take a little frosting at a time from the bowl and apply this thin layer all around the top and sides of cake, then place the whole thing in the refrigerator for 20-30 minutes. 
13. When the crumb coat is set, its time to frost the rest of the cake! Add as much of the remaining frosting as you’d like until the entire cake is covered in a nice, even layer of delicious buttercream dream. 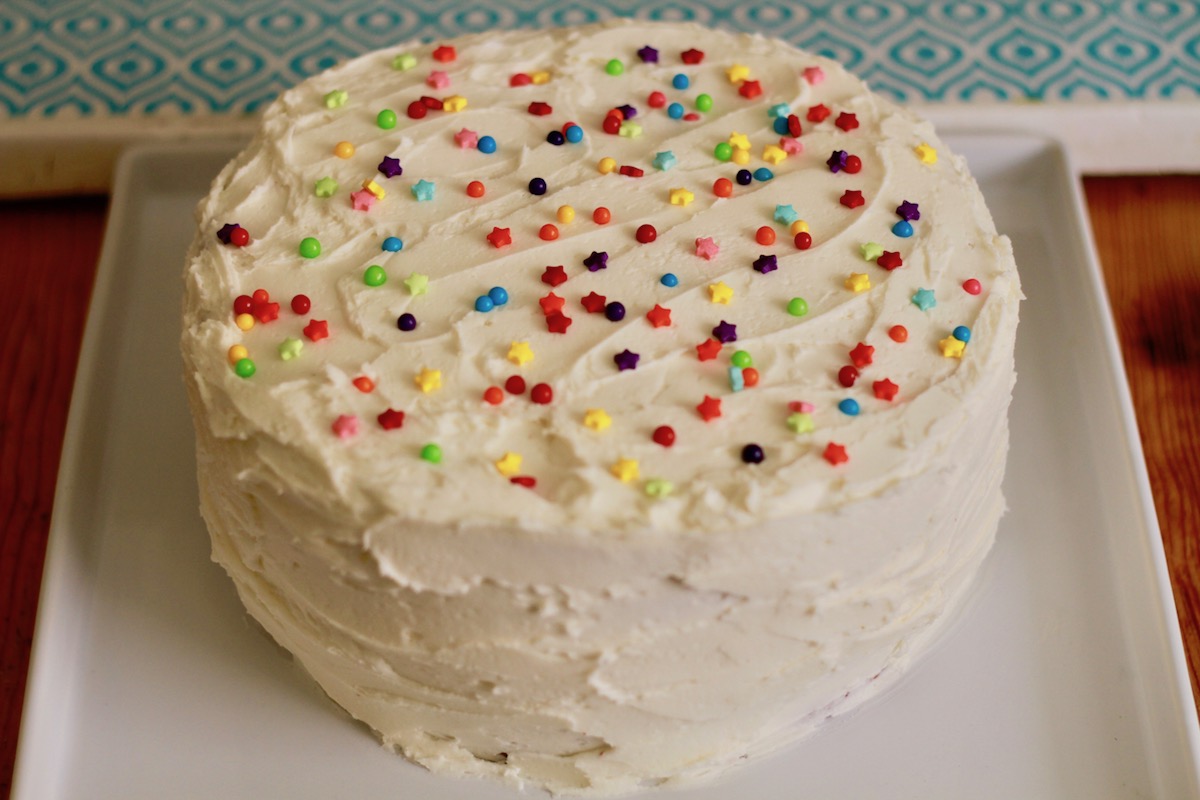
14. LAST STEP! I hope you’re proud of yourself for how far you’ve come. Grab those rainbow sprinkles and top your cake with as much decorative queer pride as your heart desires.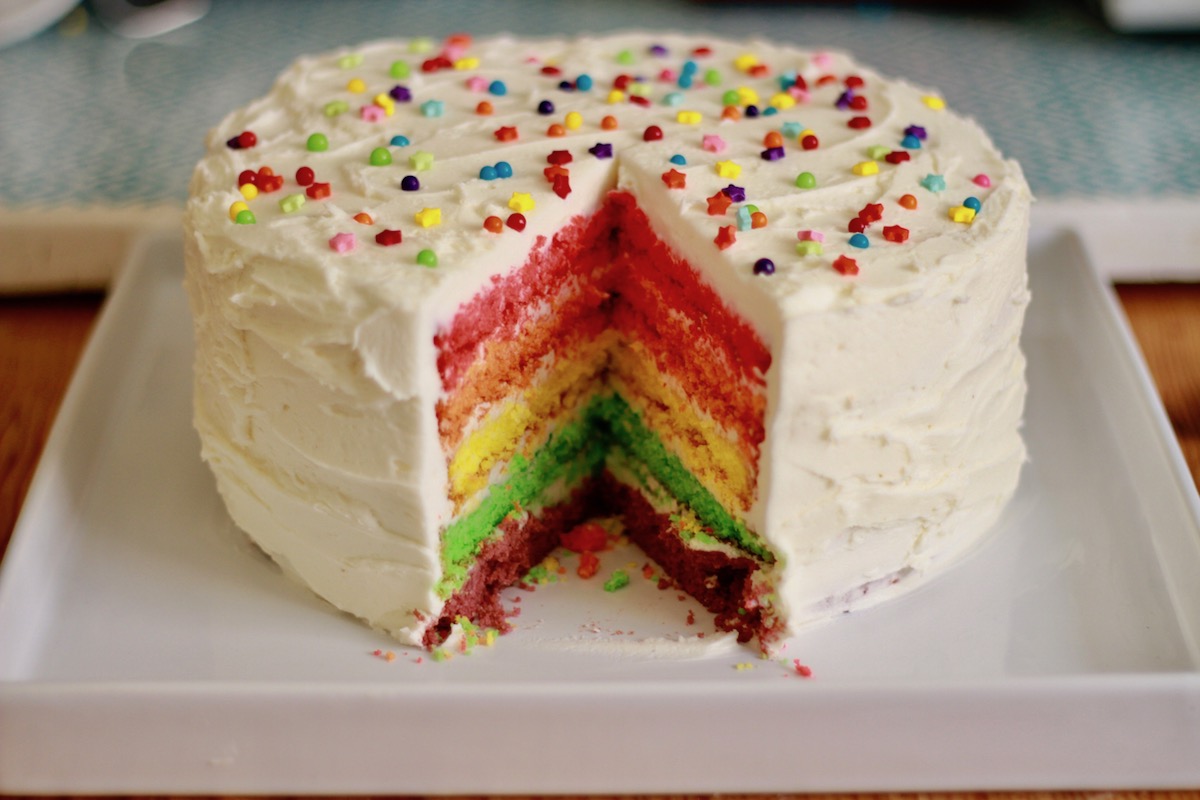
15. Cut a slice, and pretty pretty please post it to Twitter or Instagram and tag me (@reneicespieces) so I can get WAY to hype and proud in your comments! 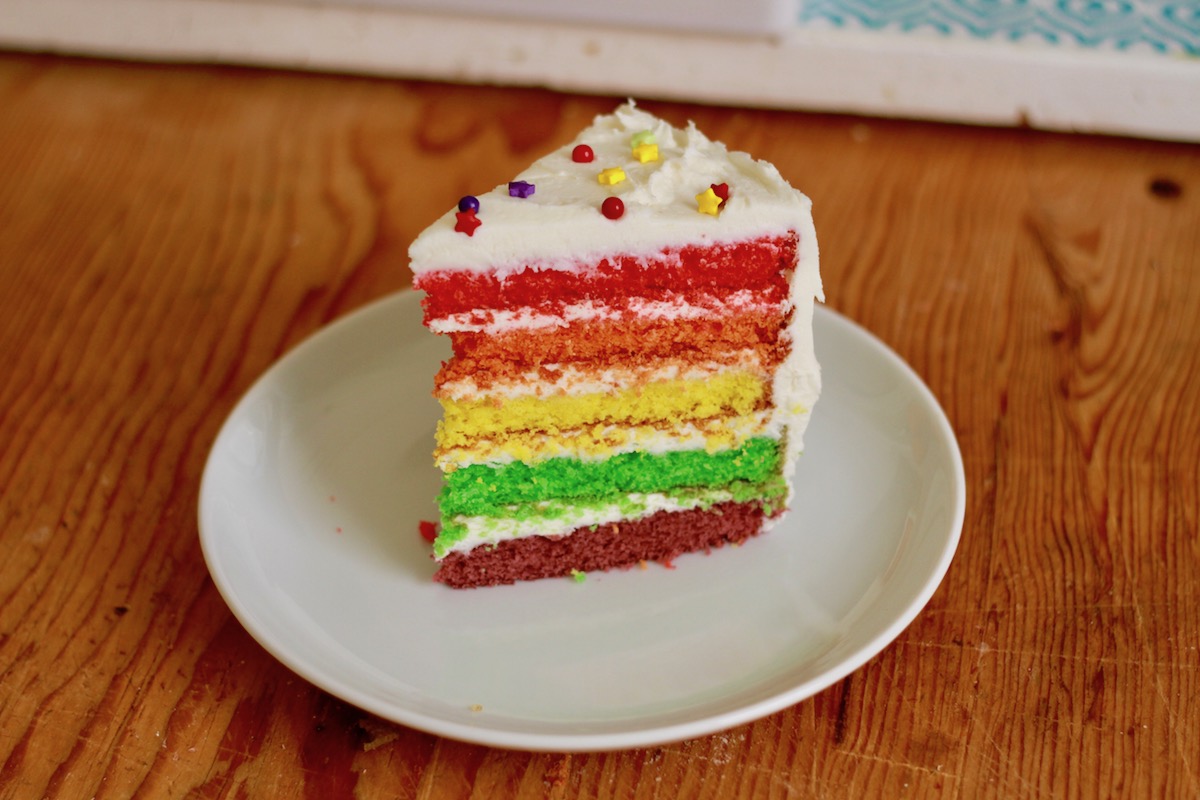
Alright, now have your cake, eat it too! Share it with friends, and make the world prouder and gayer one bite at a time.
Happy happy pride month, I love and adore you all.

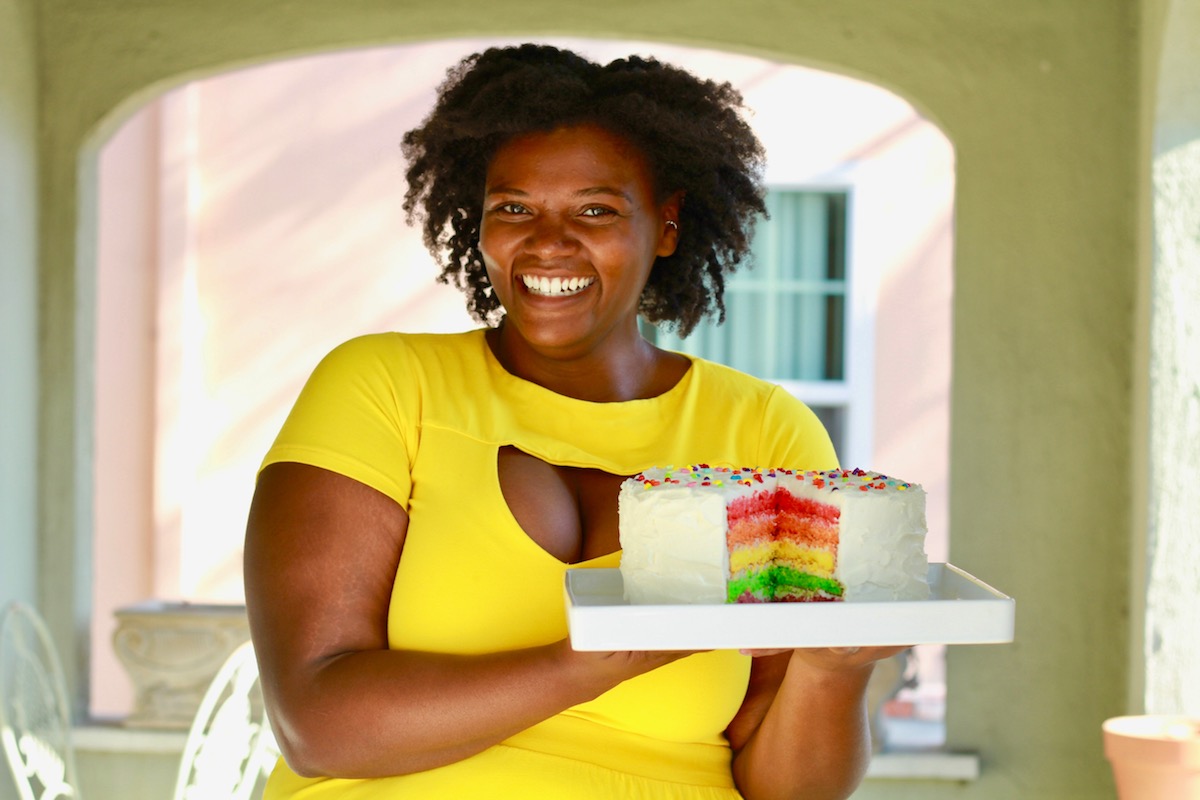
This cake is sooo beautiful! Love the final photo of you triumphant with your cake.
And I learned something – I didn’t know about the crumb coat.
RENEICE. Everything about this is perfect. Everything. Thank you for continuing to add wonderful recipe after wonderful recipe!!!
Wow! I have neither the cake tins nor the patience to make something that beautiful. Well done!
I did make vanilla rolls and turned them into a gilded bi pride cake, though. C+ for effort?
That looks amazing. ???
OMG! The last shot of you holding that cake Reneice!! I LOVE IT SO MUCH
You might say that it takes the cake ;)
this cake and reneice are everything
just wanted to say it is so! accurate! that most rainbow cakes taste like sawdust!! thank u for being brave enough to TELL THE TRUTH ABOUT THIS IMPORTANT ISSUE (and also solve it)
Ah yes the practical, logical way to make an identifiable rainbow cake using layers of cake instead of layers of batter like my bitty baby baking self did many a year ago.
That frosting recipe has me fanning myself.
What a beautiful cake! And the recipe sounds amazing too!
I’m going to attempt this on Saturday! @renjc102 — roughly how tall is this cake? Trying to find a box for transportation