

Does it feel like spring where you are? I hope so, because it finally feels like spring here in New England and I’m very excited about it. I work from home, and tend to turn into a bit of a recluse over the colder months, but I am feeling much more interested in being social now that things are warming up. Having people over is the best way to be social, in my opinion, because you get to hang out with friends and/or family but you don’t actually have to leave your house! It’s a win-win.
Whether you’re hosting a dinner party, having some friends over to watch a movie, or “hanging out” with your crush, being able to dim the lights is a great way to help set the mood. (Sidebar: do people still say “hanging out?” I’ve been with my wife for a over a decade now, so please advise.) DIY electric work can seem really complicated and overwhelming, but I’m here to tell you that it’s not as scary as it looks. I have now installed two dimmer switches in my apartment and lived to tell the tale. Ready? Let’s go.
What you’ll need:
- A new dimmer switch. You can find them for as low as $6 at Lowe’s, or check out the selection at your local hardware store.
- NOTE: Make sure to check your dimmer switch packaging to find out what kind of lightbulb you need. The first time I installed a dimmer, I did not have the right bulb and I spent several minutes thinking I messed everything up. I didn’t though, so that was nice.
- Flat and/or Phillips-Head screwdriver. Depending on your switch and plate, you might need one or both.
- Small pliers. Needle-nose pliers are my go-to for wiring. Mine have a wire cutter built in, which you probably won’t need for this project, but it’s nice to have.
- Electrical tape. This is another item you might not need, but it’s good to have a small roll of electrical tape around the house.
1. TURN OFF THE ELECTRICITY. If you only remember one thing, I hope this is it: please don’t get electrocuted. To turn off the electricity, first you have to find your fuse box. Usually it’s in the basement for a single family home and in a hallway if you live in an apartment. Once you find it, open it up and figure out which fuse controls the power for the room you’re working on. If the fuses aren’t labeled, you can just guess and switch fuses off and on until the right light goes off. Which is what I did.

2. Take off the front plate and unscrew the switch from the wall. If your home is old, like mine, this part can be a real pain in the ass. I had to chip away a little plaster with my screwdriver and use some elbow grease to unscrew my switch. You can do it, though. I believe in you.
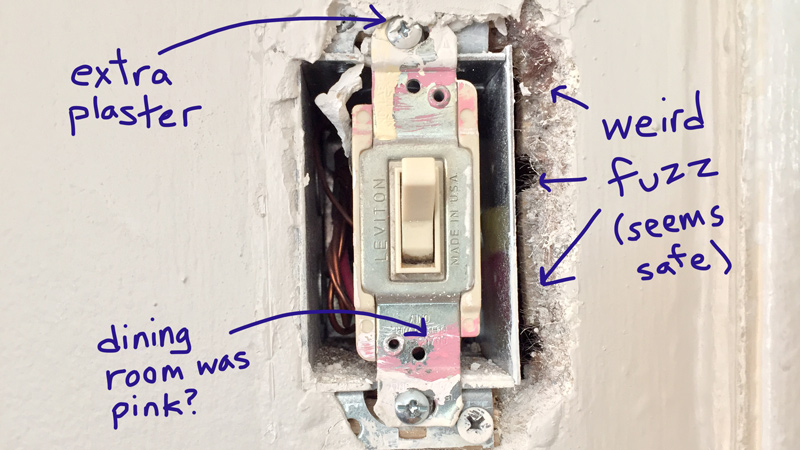
3. Pull the switch out and look at the wires. Don’t be afraid to give the switch a good tug if the wires are bent or stiff. You don’t want to rip the switch out of the wall, but you definitely want to be able to see all the wires. The number of wires you have is going to depend on the type of circuit. A single-pole circuit (just a regular light switch) will have three wires, while a 3-way circuit has one extra wire. A 3-way switch is when you have two switches that operate the same light (2 switches 1 light, if you will) and before you ask, yes — that is the official and real name of the circuit, and yes — it makes me laugh every time I see it.
Everyone’s wiring is going to look a little bit different, but there are a few important consistencies:
- The common wire: This will either be marked “common” or it will be connected to the switch by a different colored screw (usually either black or copper).
- The ground wire: This is usually a bare copper wire with no insulation — though it may also be green.
- The other wire(s): These don’t really matter very much for what we’re doing actually, but they’re there and they will need to be connected.
- NOTE: If all your wires look the same, you might want to tag the common wire with a little piece of electrical tape so you don’t lose track of it.
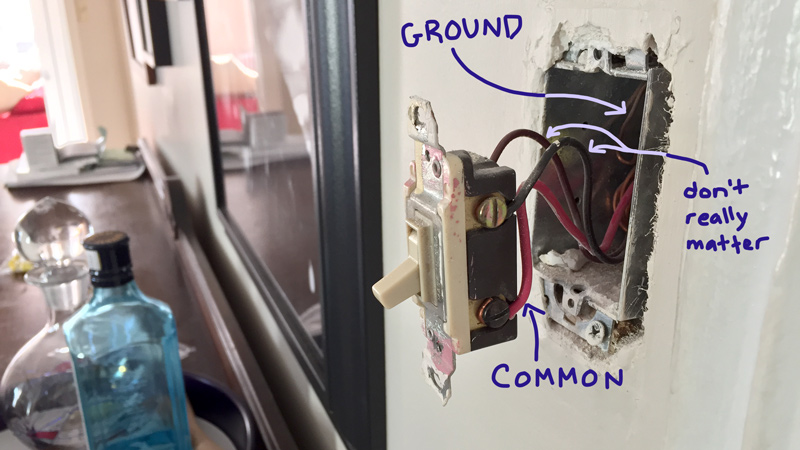
4. Disconnect wires from the old switch. Just go ahead and loosen the screws on the switch until the wires are loose. The wires will probably be hooked around the screws, so you just need to unhook them and they should come off easily.
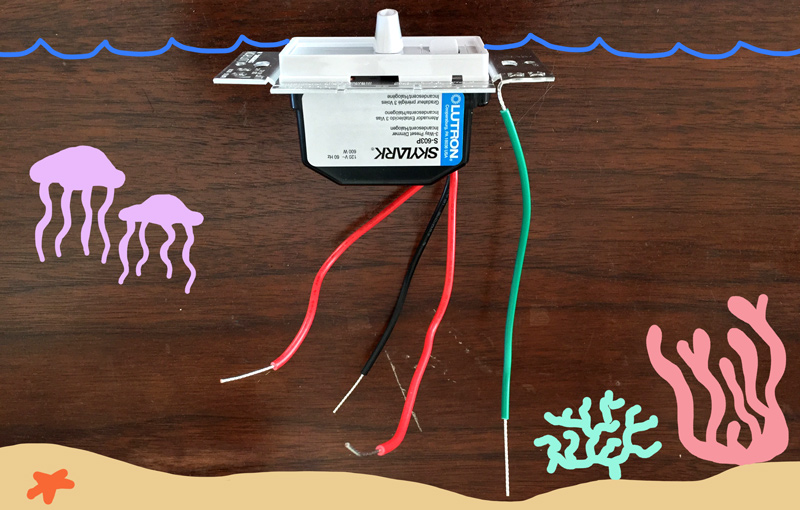
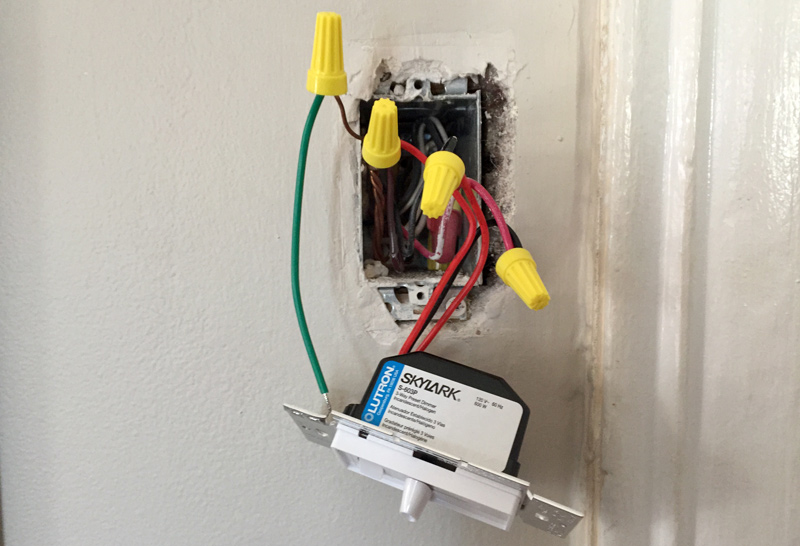
5. Take a look at your new switch. Depending on the type of switch you bought, there will either be screws along the sides or there will be wires sticking out. If you have the former, you’ll make the new connections by hooking your wires on and simply tightening the screws. If you have the latter, which is what I had, you will have to twist and connect the two sets of wires and then screw caps on (which should be provided). More on that later.
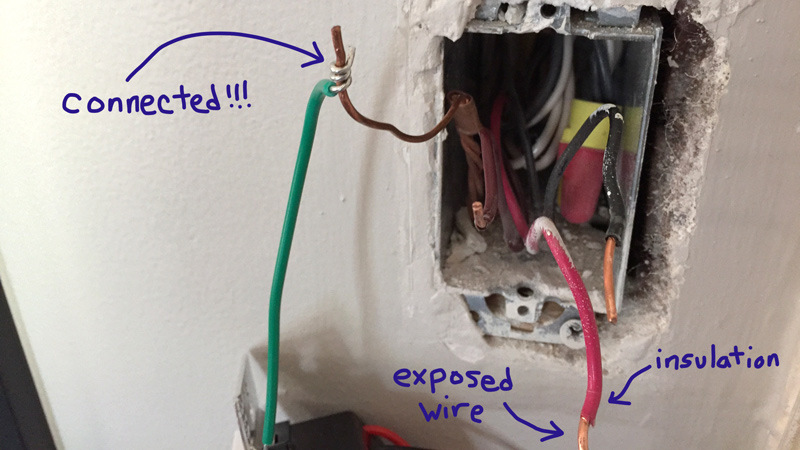
6. Make your new connections. Check your packaging for this one — it should be very clear about where the wires need to go. Connect the ground wire first, and the common wire second. The extra one (single-pole circuit) or two (3-way circuit) wires will fill in the open gap(s). If you are connecting wires, you just need to twist them together — pliers can be helpful here if the wire is stiff. If your wire isn’t exposed enough to connect, you can use wire-cutters (which are often built into pliers) to gently cut through the insulation.
7. Stuff all those wires back into the wall and screw in the new switch and plate. This part can be kind of tough if your wires are long. Honestly, I just kind of crammed them in as best I could and pushed the switch into the opening until I could get the screws started. The wire connections should be quite strong, so you don’t have to worry about dislodging them.
8. Turn the electricity back on and test out your new dimmer switch! Hey, you did it! (Hopefully!) And next time you have people over, be sure to casually work your dimmer switch installation into conversation to properly impress friends and loved ones. “Oh, here, let me just turn down the lights,” you’ll say, like it’s no big deal, “It’s a 3-way circuit, by the way, you know how those go — extra wires to deal with. Good thing I’m a professional.” 10/10 will probably maybe amaze and astonish.


Comments
Love the ocean exploration machine!
This was also a very informative article, such a cool topic to read about here on Autostraddle!
I can confirm that I am amazed and impressed every time you dim the lights.
Aw shucks, thanks buddy
All it takes is a few milliamps to stop your heart. So turn off the electricity.
Buy a circuit tester so can check to see if you have turned off the right fuse.
Remember this, thinner wires means more resistance so stronger bulbs can cause a fire when it melts the thin wires caused by too much amperage from the bulbs.
If you rent an apartment ask your landlord to do it or have them approve of the change so you don’t violate any problem.
Good call – I always hang on to the old stuff just in case I need to switch it out later.
Great topic. I recently DIYed my own light/fan switches, and have many home improvement projects ahead. Would love more like this.
“The common wire: This will either be marked “common” or it will be connected to the switch by a different colored screw (usually either black or copper).”
LOL yeah, unless your house was built by assholes (like my house was), in which case there will be no labels or differentiation of any kind. Also, you wish you could pull the wires out, but tough noogies, they only left you about half an inch to work with.
On a happier note, I also approve of the splice caps (just screw them onto the twisted together wires and they hold like a champ!). Way better than the little sleeve-like “butt splices” that let go of the wire with the faintest of tugs, no matter how hard you crimp them.
Oooof that sounds not fun! Always exciting to see what you’re going to find in an older house.
What’s grey and crispy and hangs from the ceiling? An amateur electrician.
Danielle already said, but get a circuit tester and make sure the wire and everything else is dead. It is always a good idea not to rely on the circuit breaker being shut off, but to double check that it is!
If you have a really old house, make sure insulation is safe. If any wiring smokes you smell that burning smell, call an electrician. Sometimes the really, really old houses have wiring that isn’t up to code and not every home inspector is a good one. Apartments can have this failing too.
Just always double and triple check everything!
This sort of wiring is really easy once you get the hang of it. It can be a lotta fun!
I would be afraid to go into your house. I shuddered at every illustration. Be safe, please, and don’t encourage people to start wall fires. Please learn ho to wire switches in properly.
Hahahaha, ouch. It’s a good house, Rachel :(
Fun fact: the fuse box in my old apartment was painted shut and impossible to open. Fortunately I never needed to access it, but that was just one of the reasons I moved out of there.
Wow, that’s the first time I’ve ever heard of that happening – glad you got out!
After reading this yesterday, all I could hear last night was the faint buzzing of my fixture- I failed to install an LED dimmer and managed to forget about it until this article popped up. Back to the store, I guess.
The buzzing is the worst, I cannot stand it.
This might be the push I need to try to figure out exactly why my most useful kitchen light isn’t working after I gave up once a bulb change did nothing.
As long as you’re taking it out and replacing might as well get one of those wifi or bluetooth enabled so you can dim from your phone.
I love how you label your images and I wish all instructions for all things came with little “I believe in you” breaks.
I loved the crap out of this. Can all how-to’s be this way?