

Welcome to the sapphic table, a series of (hopefully!) unfussy seasonal recipes for your farmers market, your CSA bounty — or your grocery store. Today we’re making s’mores brownies to celebrate the last week of summer.
We were due for a failure.
I am not a professional food blogger. I’m — at best — someone who learned how to cook the same way that a lot of people in their 30s learned how to cook, by reading other food bloggers sharing their lives online. I miss that style of writing, to be honest, and as its faded away while morph into Internet 4.0 or whatever generation of being Very Online faces us these days. I love being in the kitchen, I love cooking, but to create, test, and photograph recipes for work? Who am I kidding?
I started off with the safest bet I could think of, a four-ingredient asparagus tart using pre-made puff pastry that takes about 15 minutes to throw together but took me a week to write and photograph. Then came the a little over one-hour strawberry chocolate “just because I can” cake (that took over a day to photograph alone!), and slowly I started to believe in myself. I thought maybe I could do this. Cobbler. An open-faced Mexican black bean sandwich. Maybe a decade of watching other people cook was going to pay off…. And then came the s’mores brownies.
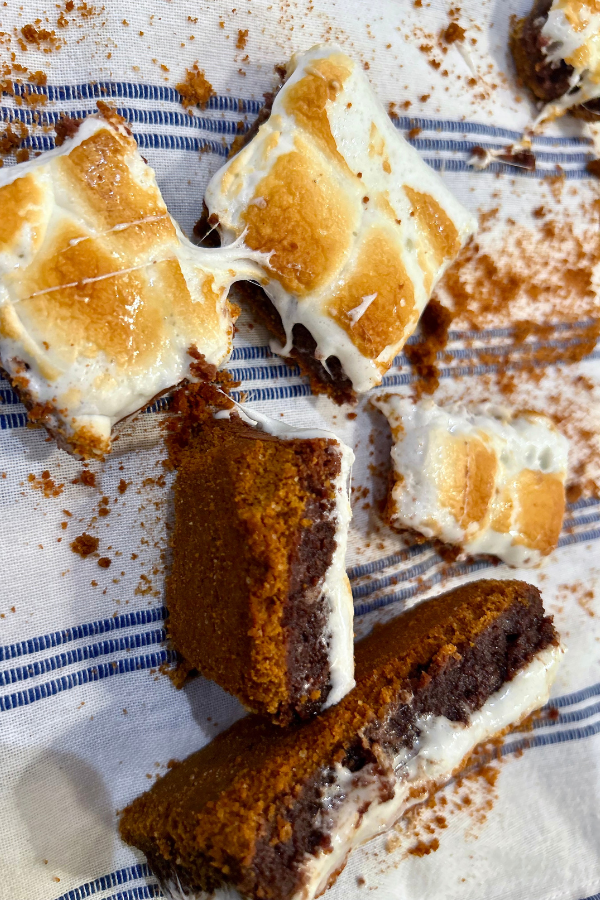
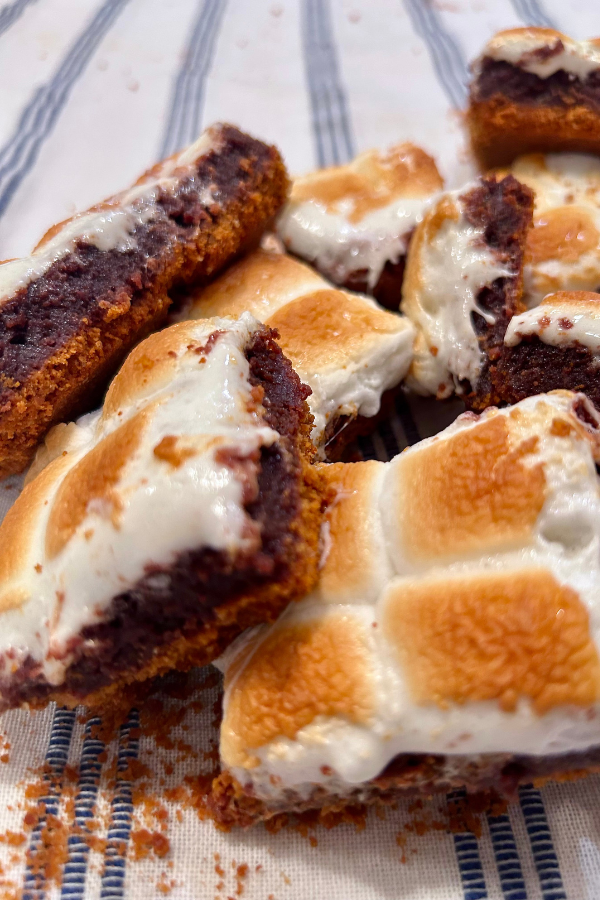
The idea started simple enough, after all s’mores + brownies is enough of a sell that I don’t think I have to spend a long time describing them here for you to already be on board, right? Three perfect layers: a toasted graham cracker crust, a warm unbelievably chocolate-y brownie, and melted caramelized marshmallow just this edge of dripping down the sides. How else should you spend the last week of summer?
The graham cracker was my first mistake. I lost track of time and it came out just this side of too toasted (especially to withstand another two trips to the oven for the brownie and marshmallow layer each). The brownies simply… would not cook? And I’m talking about a brownie recipe that I have perfected for at least 12 years — the brownies I bake “casually” to impress third dates and new friends, my back pocket recipe — they would not solidify when it mattered most.
The marshmallows are when I almost gave up. They broiled perfectly, gold and melted at the edges, but slicing into them left everything — my fingers, my shirt, and once I took off my shirt my literal bra — covered in a sticky, sugary mess.
But then I ate one. And humming out-loud in my kitchen to no one, I ate one more. I staged this gooey mess of brownies for this article’s photoshoot, certain they were the worst photos I’d ever taken, and — whoops! — two of them fell over, so clearly I ate those as well.
Life is not what’s always expected. Sometimes you will flat out fail. And sometimes, if you’re just lucky enough, those failures will be a beautiful, sticky, chocolate three-layer perfection that you couldn’t possibly see coming.
These s’mores brownies are loosely based on a recipe from The Kitchen, with a few notable exceptions. I lowered the cooking time for the graham cracker layer, to account for it grand total of three trips into the oven. I’ve swapped the brownie recipe out completely for Smitten Kitchen’s favorite brownies (also, my favorite). And I recommend cutting the marshmallows open before broiling them, so they best adhere to the brownies for easiest cutting. Enjoy!
S’mores Brownies
Serves 9 to 16, depending on how you cut them
Ingredients for S’mores Brownies
Ingredients for Graham Cracker Crust
6 tablespoons unsalted butter, melted and cooled
1 1/2 cups graham cracker crumbs (see *note)
2 tablespoons granulated sugar
1/4 teaspoon salt
Special Tool: Parchment Paper
Ingredients for Toasted Marshmallow Brownies
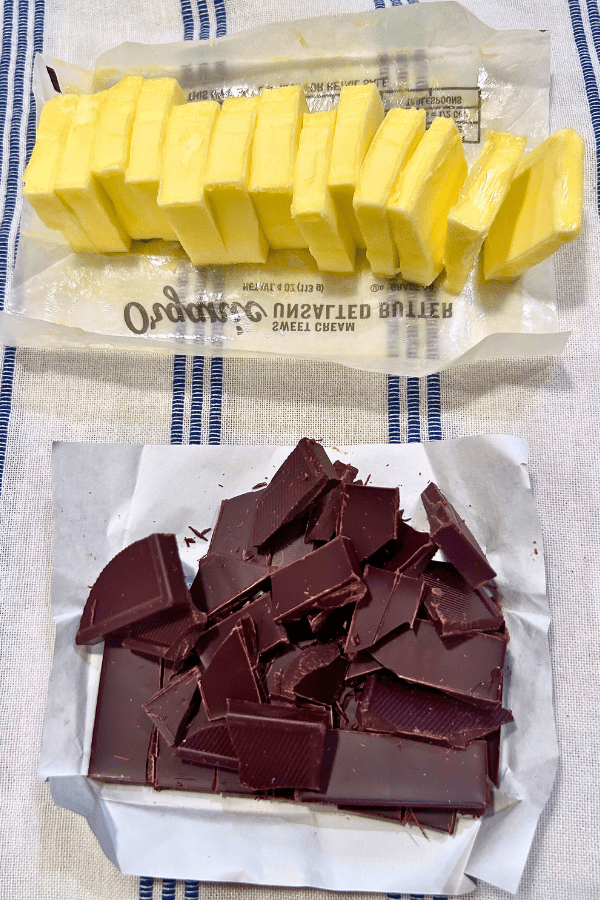
3 ounces unsweetened chocolate, roughly chopped
1/2 cup unsalted butter
1 1/3 cups granulated sugar
2 large eggs
1 teaspoon vanilla extract
1/4 teaspoon salt
2/3 cup flour
1 10-ounce bag large marshmallows
*Note: Graham Cracker Crumbs? The most old school solution for making your own graham cracker crumbs is still the best method, which is to pile a bunch of graham crackers into a ziplock bag (or reusable bag, if that’s your jam) and then roll over and whack the hell of it with a rolling pin or hammer, until crumbs form. Keebler also says boxed pre-made crumbs, and those work just as well.
Directions for S’mores Brownies
Preheat the oven to 325 degrees. Line an 8×8-inch pan with parchment paper, set aside.
In a medium bowl, mix together the graham cracker crumbs, sugar, and salt. Pour in the melted butter and stir with a spoon until all the crumbs are evenly coated with butter. Pour the crumbs into the lined brownie pan, and use your hands or the back of a spoon to press firmly along the bottom into a tight, even layer.
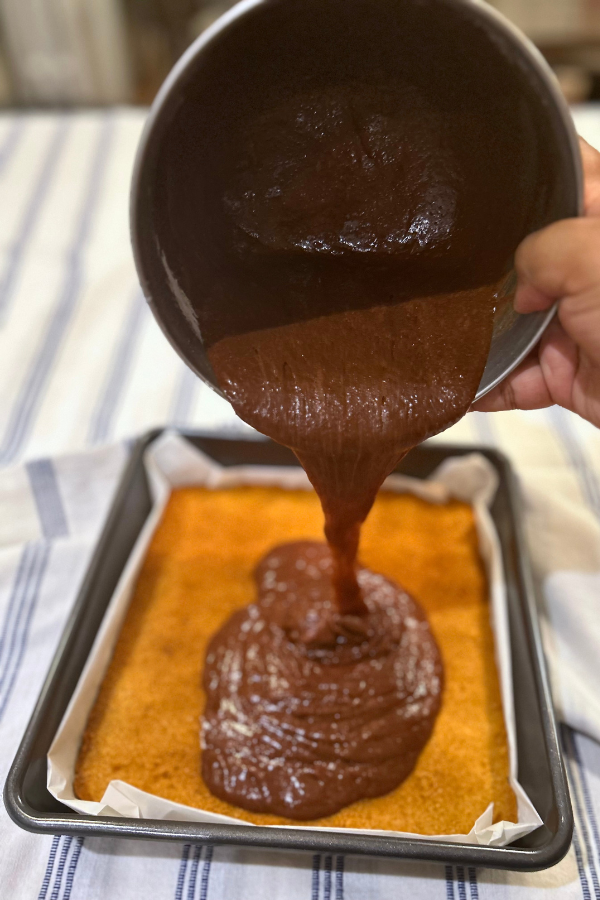
Bake graham cracker layer for 15-20 minutes, until solid and golden brown (if it’s slightly toasty, no worries, it adds to the s’mores vibes). Remove from the oven, and set aside to slightly cool. Raise oven temperature to 350 for brownie layer.
While graham cracker layer cooks and cools, prepare brownie batter.
In a medium dry saucepan over low heat, melt chocolate and butter together until only a couple unmelted butter or chocolate bits remain. It’s key that the pan be bone-dry to start, otherwise you risk the chocolate seizing up as it melts — though with the butter serving as a buffer, that really shouldn’t be a concern. (You can also melt butter and chocolate together in the microwave, microwaving in 30-second bursts and stirring, though surprisingly for a microwave, I find that process to be more fussy!)
Take saucepan off heat, and continue to stir until remaining bits are melted together. Pour butter/chocolate mixture out of saucepan and into a medium bowl.
Whisk your sugar into the butter/chocolate mixture, then eggs, then vanilla and salt. Stir in flour with a spoon until it just disappears.
Pour brownie batter over cooked graham cracker layer, gently spreading it out until it makes an even second layer. Bake brownies for 25 to 30 minutes, or until a fork inserted into the center comes out batter-free (a few moist crumbs is expected with brownies, but you shouldn’t have wet batter clinging anywhere, you know what I mean!).
Remove from the oven, and set aside to slightly cool. Now it’s time to prep the marshmallow layer.
Using a sharp knife, cut marshmallows the long way down the middle. Arrange marshmallows, cut side down, in a close grid over the brownies, keep going until they make an even layer with little-to-no brownie showing underneath.
Turn the oven to broil. Place the marshmallow-covered brownie pan in the oven and broil for 1 to 2 minutes, until the marshmallows are melted and light brown on top. Don’t go anywhere! Watch this process carefully (if your oven light, like mine, is broken — you can even do this process with the oven door ajar if needed), those marshmallows will go from “nothing happening here” to “burned fire hazard” in a blink if you aren’t careful. It should take about 1 minute for golden marshmallows to up to 2 minutes if you prefer a more charred take. Once the marshmallows are your desired color, take the brownies out immediately.
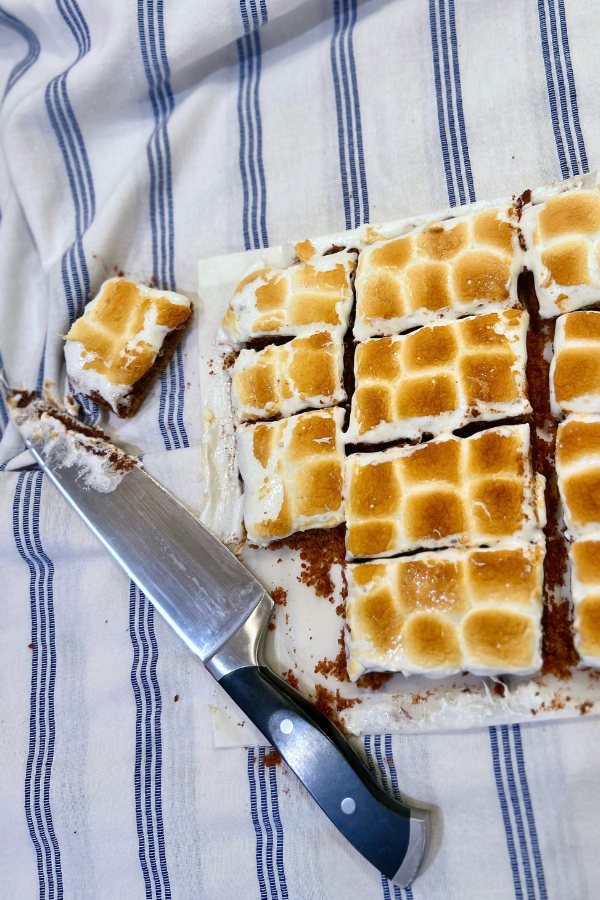
Whew my friend, you have almost made it! You are nearly there! Most brownies you would let cool completely for an even cut, but in this case (ironically) the marshmallows cut easiest while still in a mostly hot and melted state. So here’s what happens next: first, you are going to let the brownies rest in the pan for about 5-10 minutes, you want the brownie still warm but solid enough that you can lift them by their parchment paper onto your counter or a cutting board without them falling apart. Lift carefully, and if they feel a little stuck, run a knife along the edge of the pan to loosen any stuck marshmallow.
Once you have the brownies on the cutting board, carefully peel away parchment paper from the sides. Using the biggest ass knife in your kitchen (you are right now thinking, no Carmen couldn’t have meant that knife, but I did. Use that knife!), slice your brownies to your chosen size. They will be gooey, so you’ll want carefully wipe your knife wit a wet paper towel between cuts.
Serve as a warm gooey mess, and I dare you not to smile.


Comments
A version of this is my recipe for the summer too! I use the S’mores pie recipe on sallysbakingaddiction, but sub plain digestives for graham crackers because Britain. I made it for my fourth of july potluck and all the Brits (s’mores not a concept) were losing it.
This seems like a great version to try – the one problem with the pie is that you have to heat the knife before slicing, but pre-slicing brownies would make this even easier to serve!
the joy is in the imperfections! thank you for letting us in Carmen!
This is a great recipe to read while waking up ! Instant sugar rush and I haven’t gone anywhere near my pantry yet. I can’t wait to try this.