Welcome to Shibari 101, your chance to learn the building blocks of Japanese rope bondage! Today we’re doing single and double-column shibari ties. If you missed it, check out the introduction for history, rope basics and safety.
Single- and double-column ties are the foundation for many more complicated shibari ties, but they’re also fun on their own. Whether you plan to use these shibari ties alone or turn them into something else, mastering these two ties is extremely important. Once you’ve worked them out, practice them over and over until you can do them without even thinking.
Single-Column Shibari Tie
A single-column tie is probably the most common shibari tie. A column is a thing you’re tying: a leg, a waist, a chair rung, a bed post. Below, I’ll demonstrate on an arm. Make sure your bottom takes off any wrist jewelry/watches first.
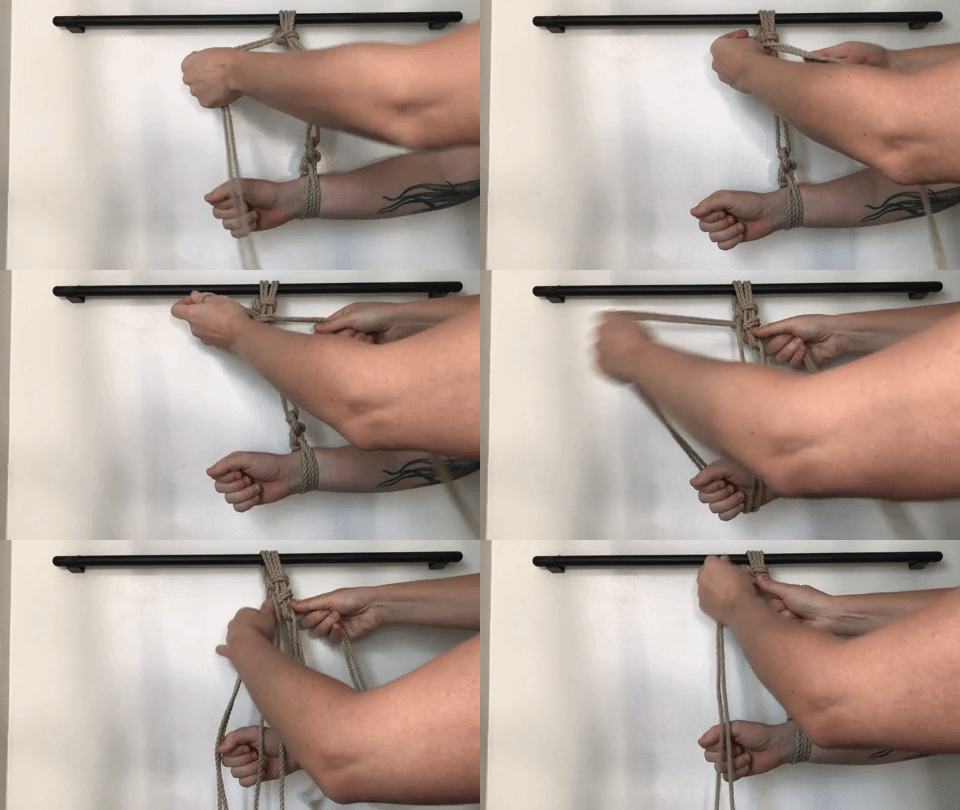
First, find the bight (center) of your rope. Wrap it around the wrist (above the joint) twice, leaving room for a couple fingers to slip between the rope and the wrist. Cross the bight over the working ends (the two ends of rope opposite the bight).
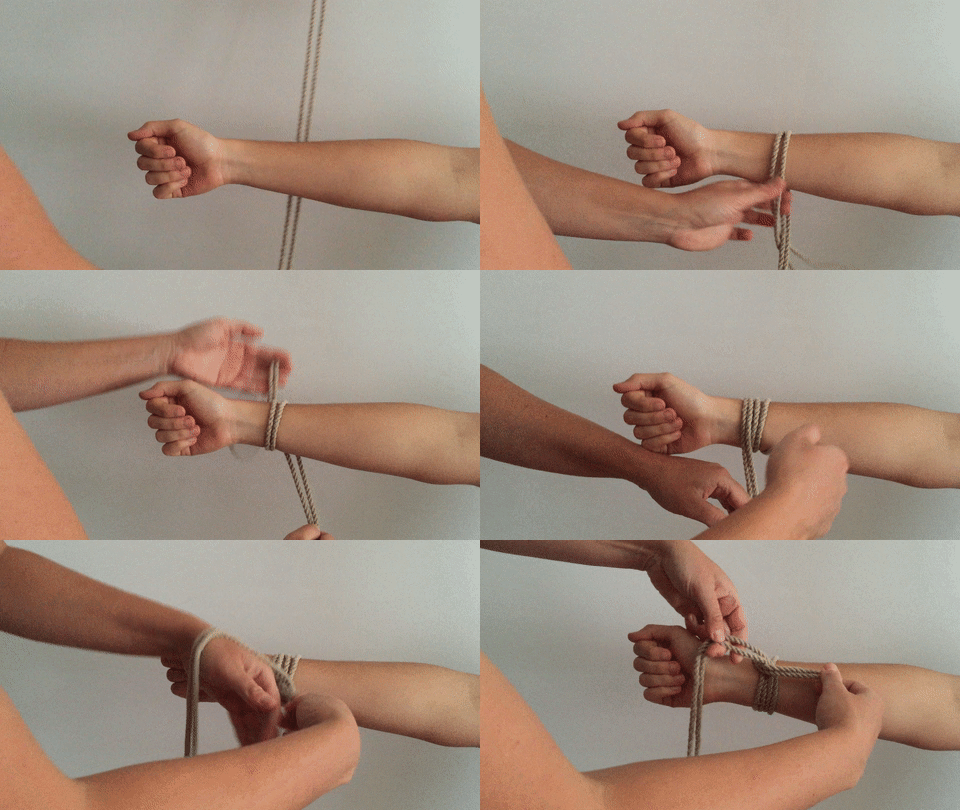
Tuck the bight underneath all the ropes. It’s better to always reach under and pull rope instead of pushing it through because it’ll retain its lay (twist pattern) better and not get out of shape.

Make a loop with the working end and pull the bight through. If the result does not create a knot and just falls apart, try bringing the bight through the other side.
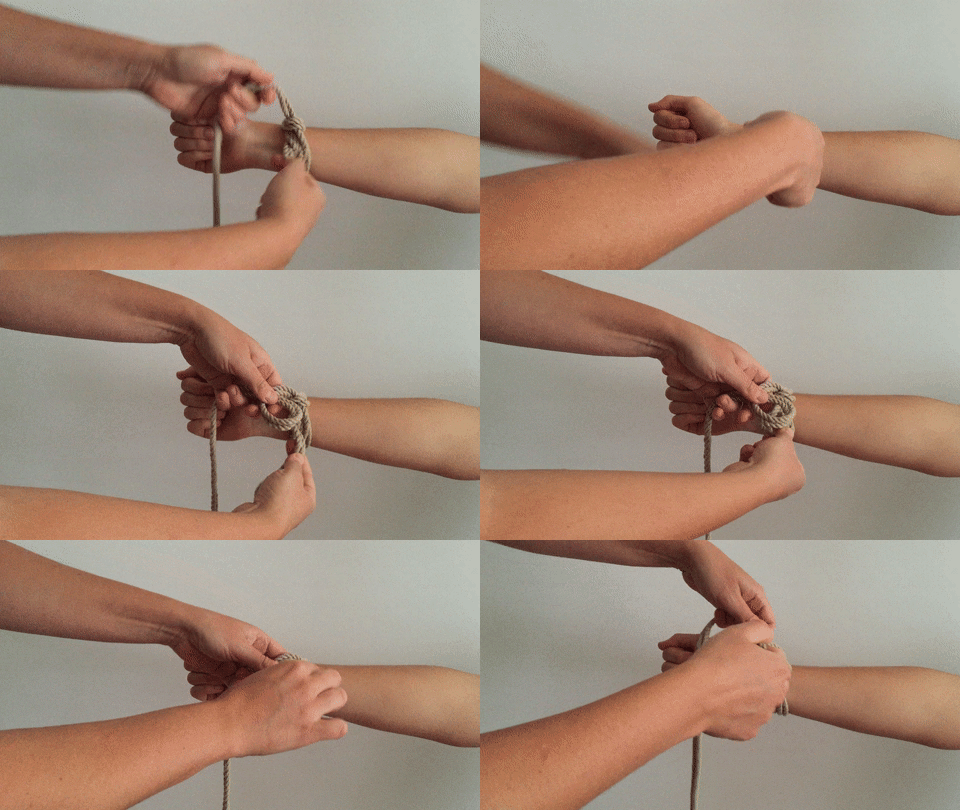
Create yet another loop and bring the bight through again. Pull tight on the knot — it shouldn’t tighten on the wrist at all, and you should still be able to slip a couple of fingers between the ropes and the wrist. That’s it!
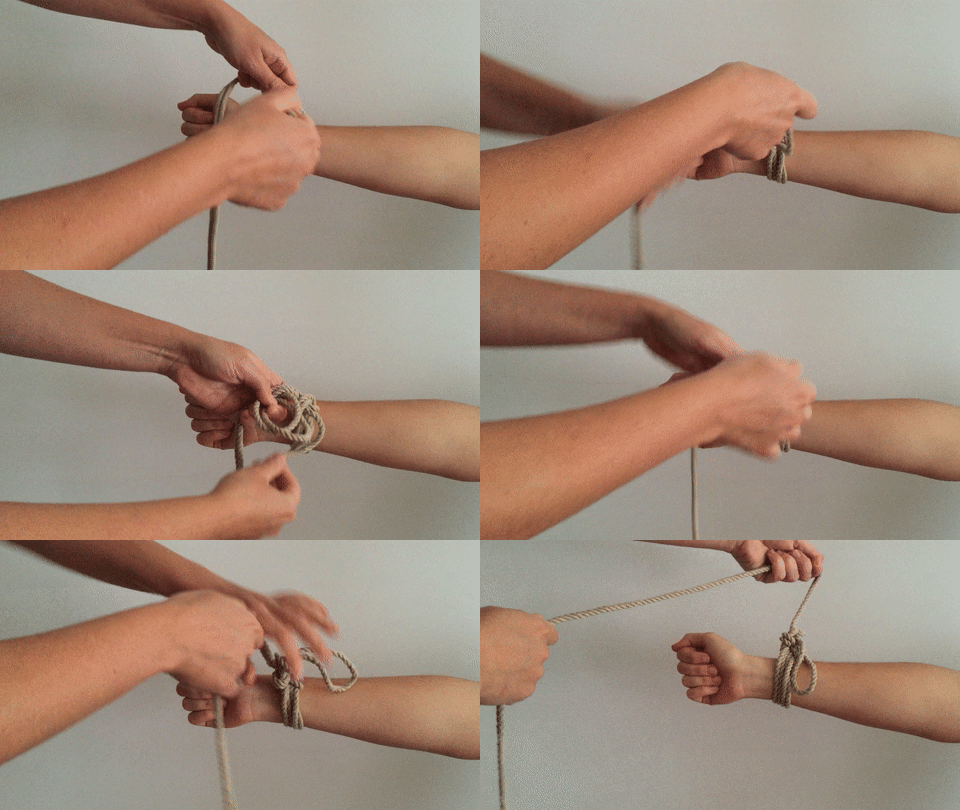
Remember:
- There should be room to move the wrist within the shibari tie, but not enough to slip the hand out of the tie. You should be able to slide a couple fingers underneath the ropes.
- There should still be some length of bight left, to keep the knot from coming undone. It’s better to have a bit too long of a leftover bight loop as a beginner — you can work up to having it look trim and perfect after you master the tie.
- The four ropes along the wrist should not twist or overlap each other, as this would create too much pressure in one spot.
- The tie isn’t at the very end of the wrist but instead is a couple inches up from the hand and the knot is on the outside of the wrist, not on the sensitive inner wrist, to reduce chances of nerve damage.
Using The Bight As A Pulley
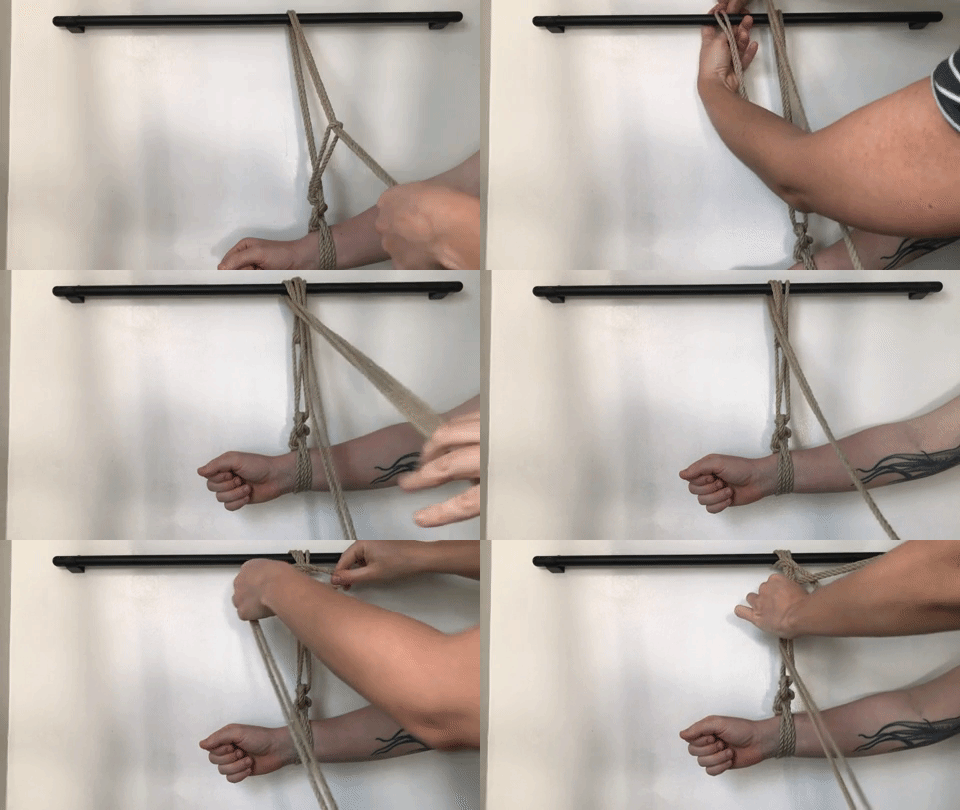
You can also use the bight as a pulley system to secure your bottom to something else in a safe way that doesn’t add any excess pressure on the ropes around the wrist, the knot, or the wrist itself. This is not a safe way to hold weight, so if you do tie overhead, make sure your bottom holds up their own weight and doesn’t hang from their wrists, which could cause serious nerve damage.
To use the bight as a pulley, first wrap the ends of your rope through a hardpoint (typically a hook or loop in the ceiling you can tie to), or around a bed post or whatever else you can think of, and then come back and thread the rope through the bight, then back through or around your point and tie off all the ropes together in a double half hitch.

Double-Column Shibari Tie
A double column ties two columns together. I’ll demonstrate here on two wrists, but you can tie a wrist to an ankle, an ankle to a chair leg, a wrist to a thigh, a wrist to an upper arm with the arm folded, rendering the arm unable to be used, or an ankle to an upper thigh with the knee bent.
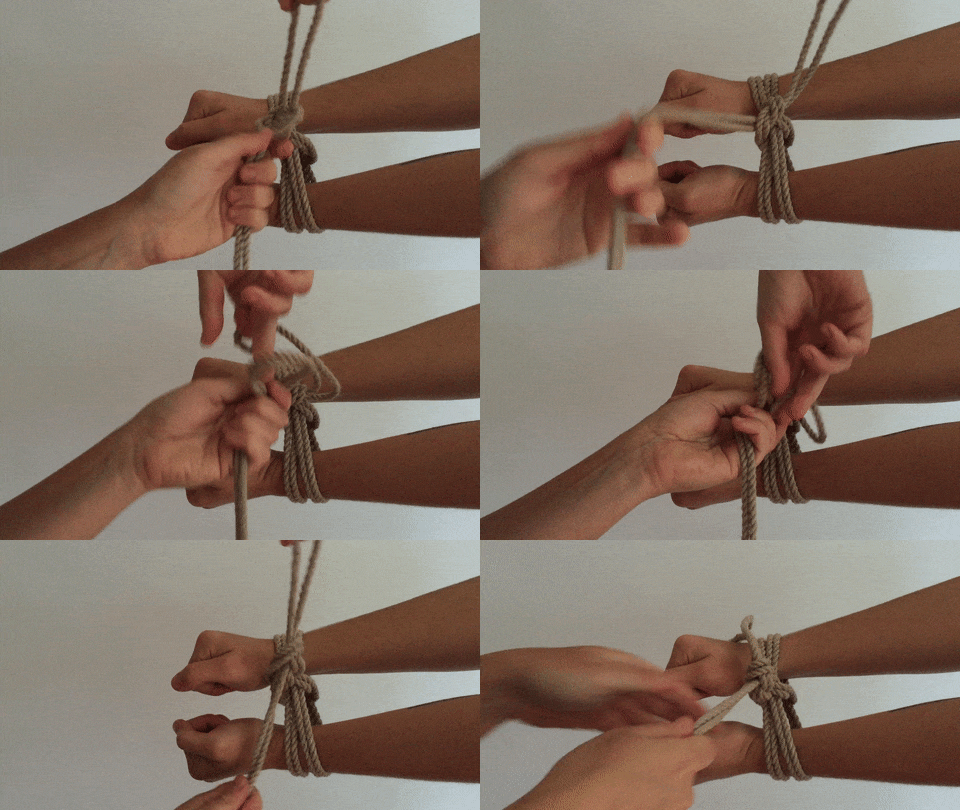
Start by finding the bight or center of your rope. Wrap it around both wrists twice. Make sure to leave a lot more slack on your bight than you did for the single column tie.
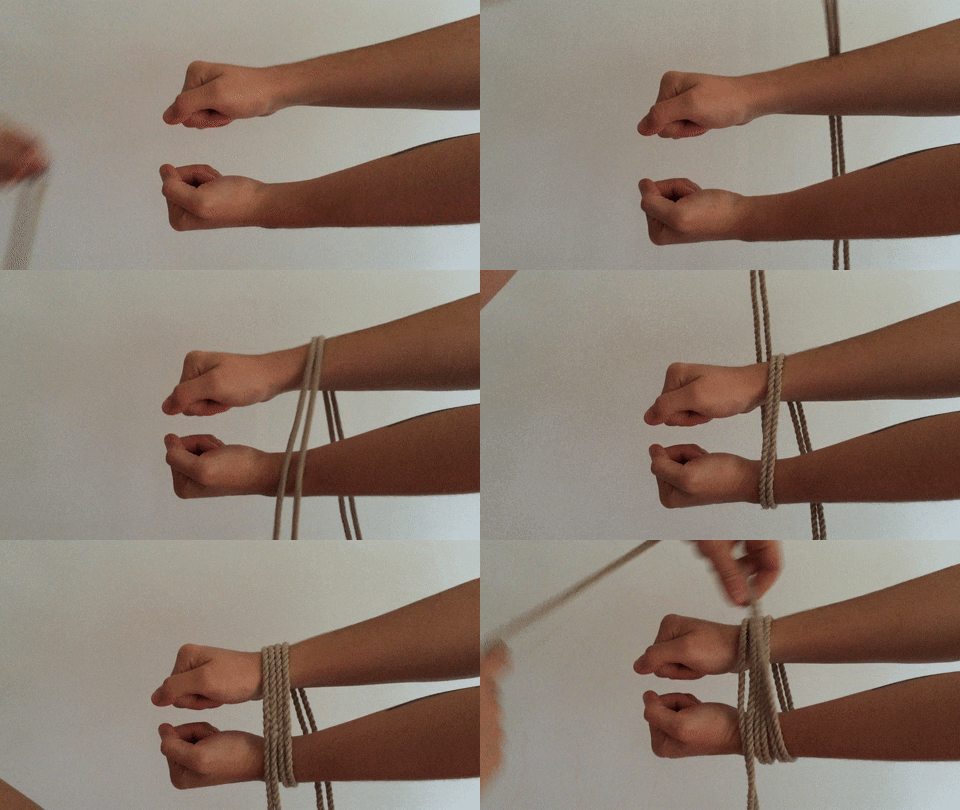
Cross the bight over the working ends at the top and center of the wrists. Pass the rope through the wrists and behind both sets of the ropes and then back to the front. Unlike the single-column tie, which just wraps the bight under the top set of ropes, the double-column tie wraps the bight over both the top and bottom sets of ropes. The rope goes between the two columns, over both sets of ropes, and back up again.
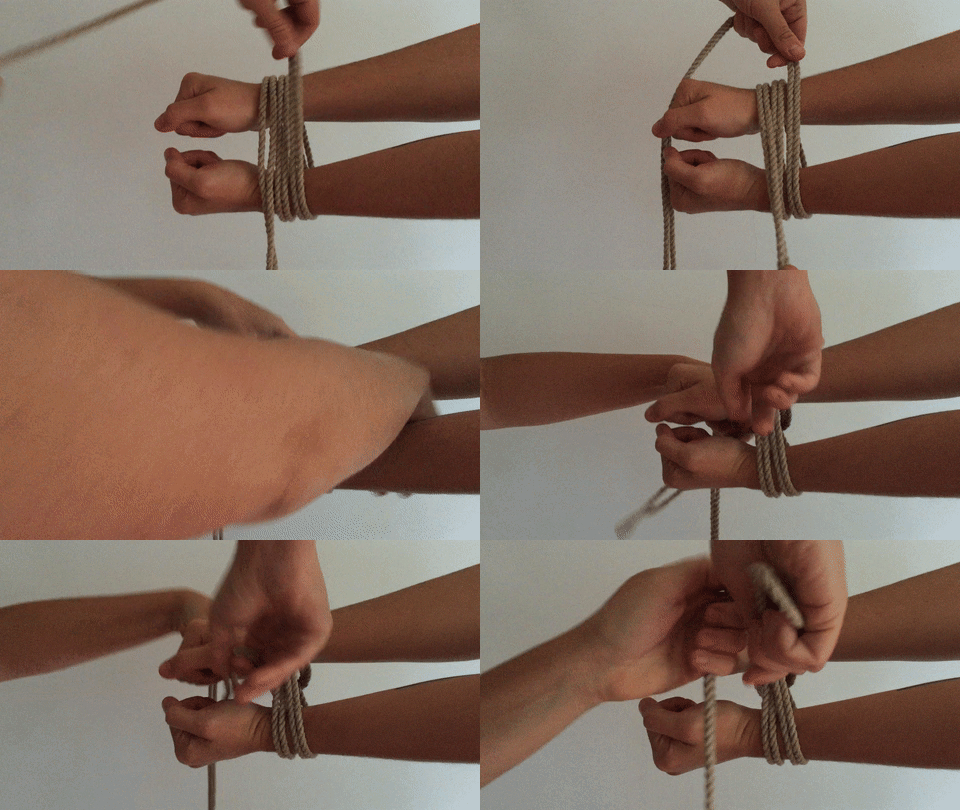
Make a loop with the working end and bring the bight through. If it does not create a knot and just falls apart, try bringing the bight through the other side.
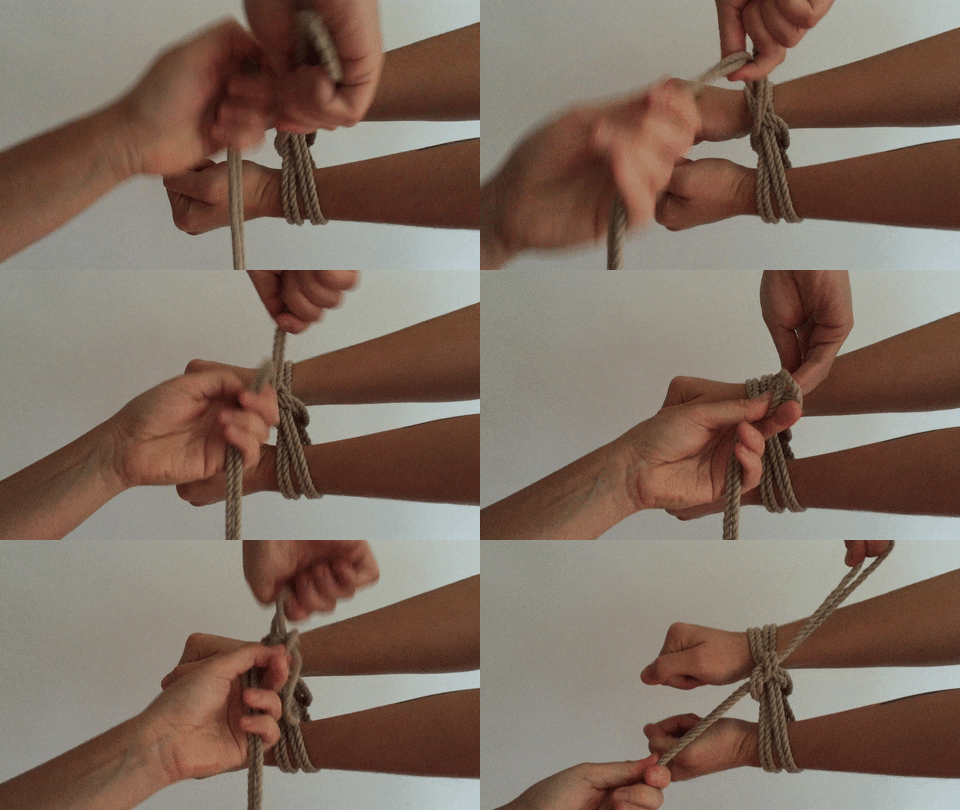
Create yet another loop and bring the bight through again. Pull tight to lock the knots. The knot should not tighten on the wrists at all, and you should still be able to slip a couple fingers between the ropes and the wrists, but not so loose that the hands can slip through.
Practice, Practice, Practice!
Practice your single and double column ties over and over again, on chair legs or your ankles, until you no longer think about it and can do it automatically. It’s very important to get good at both of these before moving on to more complicated ties.


I cannot thank you enough for these resources! I know the basics so I haven’t learned anything new here but I would have loved to read this article when I started getting familiar with hemp ropes. Which brings me to this: do you have any good book to recommend re: learning shibari?
I have a few which will be listed on the final post in a few weeks! In the meantime, check out Miumi-U Teaches Japanese Shibari. Miumi-U is Japanese and trained extensively in Tokyo. Her ties are excellent, her book is beautiful and more advanced.
I love the gifs!!
Thank you!
These really are the best pics and descriptions of single- and double-column ties that I’ve ever seen.
And yep, practising on your leg and a chair’s – classic stuff.
Really nice work.
Great instructions but the demonstration gifs are too quick and hands are too in the way.
Thanks Man
Great instructional video especially for us beginners. But they need to be slowed waaaaaaaaay down, or add the ability to pause or change to SLO-mo….something. They’re just too fast, especially for some of us more, ahem, mature students.