My mom is a crafter. She has been making things with her hands for as long as I can remember. I come from a family of crafty folks. My grandma sewed dresses and dolls for my sister and me when we were little. She taught me to crochet and made my favorite stuffed animal (a spotted deer named “Reindeer”) a blue sweater he still wears. For several years, my mom and grandma ran a county craft store out of the barn-turned-apartment-turned-storefront adjacent to my parents’ house. There was a wooden sign at the end of our driveway that advertised the shop. My parents were also both public school teachers and my mom taught first grade, so our house was filled with arts-and-crafts supplies. I dabbled as a kid, making stamped cards and beaded jewelry with my mom, collecting a vast collection of thread for friendship bracelets, braiding keychains out of neon boondoggle. However, I never took to it as much as I took to books. Writing ended up being my art, but I have my mom to thank for encouraging creativity and giving me lots of opportunities to express it.
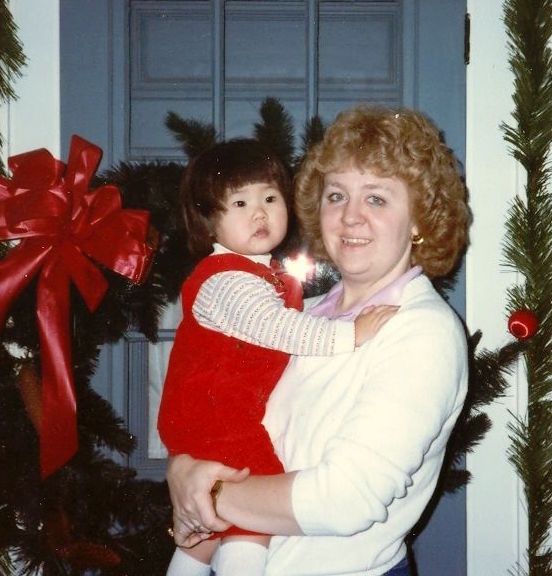
Me and my mom, 1984 (my first Xmas in the U.S.).
So my mom is an actual expert in crafting with kiddos. She did it with my sister and me and she did it in her classroom for over three decades. I knew she’d have great ideas, much better than mine, which would be, like…glue some popsicle sticks together and tie a string around it. Here are the three holiday crafts we decided on. (She sent me at least a dozen ideas.) They range in skill level from really, really simple to mostly simple. As my mom jokingly said I should title this post “If [KaeLyn] can do this, a kid definitely can!” I hope you will share them with your kids or your partner’s kids or your nieces/nephews or your friends’ kids. Or just do ’em yourself! They’re festive fun for adults, too!
Cinnamon Applesauce Ornaments
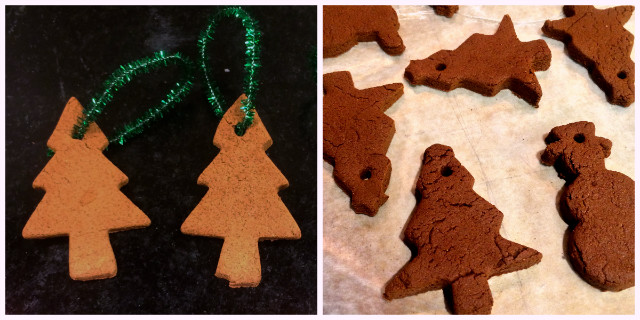
You can cut them into any shape you want! Like cats! I made cat ornaments. I also made a couple funny-looking bunnies.
This is the “hardest” craft and it’s pretty simple. I love that it uses inexpensive supplies and is something you can do with really little kids or older kids. As long as the young’ens have the dexterity to squish dough around in their hands and use cookie cutters, they are old enough! Just be careful with the dry cinnamon and don’t let kids get a mouthful of the stuff. (It can be dangerous if ingested and aspirated dry.) Also, don’t let kids or adults eat these ornaments. They are not edible. I repeat. DO NOT INGEST THESE GLUE ORNAMENTS.
This recipe makes approximately three dozen ornaments.
Bonus: These will make your house smell amazing for days!
Dough Ingredients
1 cup of cinnamon
1 cup of applesauce
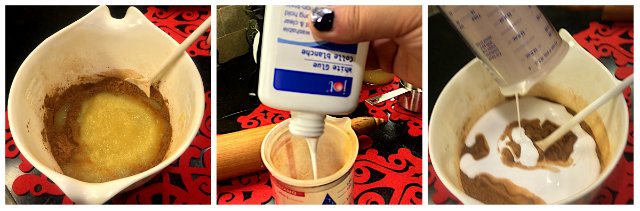
1/3 cup white craft glue (like Elmer’s, though an off-brand will work fine)
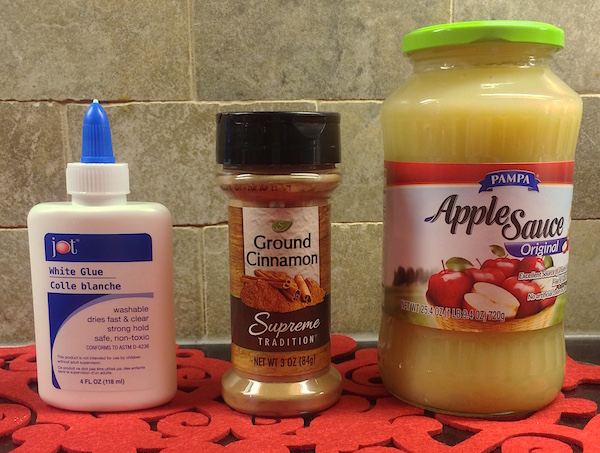
You may need multiple bottles of glue to get 1/3 cup. This bottle came in a 4-pack.
Other Supplies
1 cup of cinnamon for dusting rolling surface
Rolling Pin
Cookie Cutters
Drinking straw
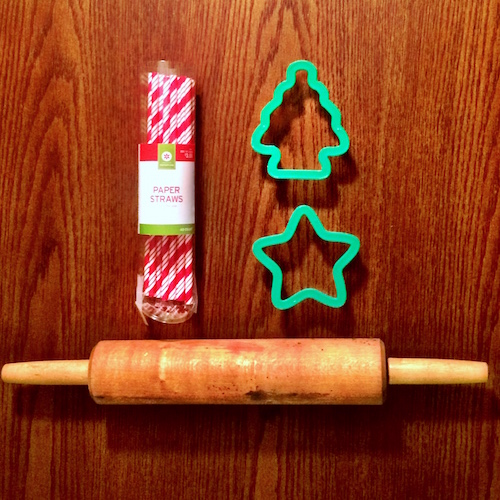
You don’t need fancy straws. These are leftover from a Holigay party. Regular plastic straws are great, maybe preferable.
Instructions
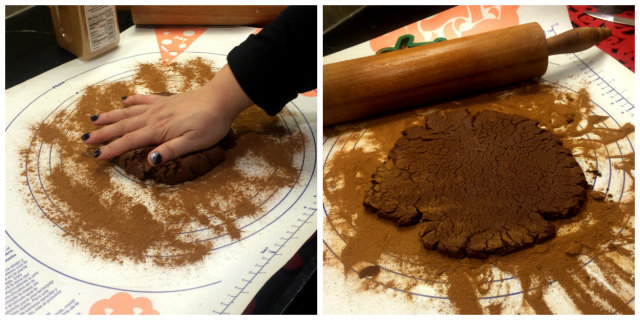
Carefully mix the cinnamon, applesauce and glue. If working with little kids, you should do this for them. The cinnamon gives off a big cloud of dust until it’s mixed into the wet ingredients.
Mix until a dough forms. Work it into a ball with your hands. Add more cinnamon if it is too sticky-wet. Keep working it with your hands. The consistency gets better the more you knead it. This can be a fun thing to delegate to a kid or do with them. The final consistency should be similar to cookie dough.
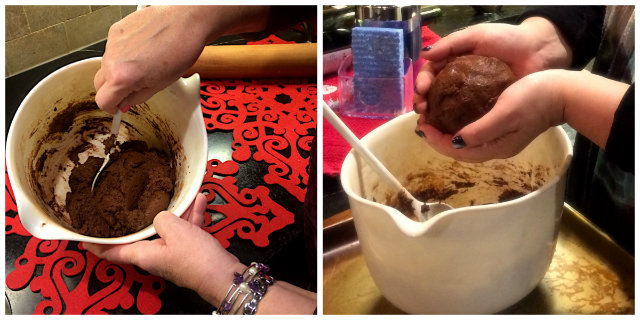
Dust a clean, flat surface with cinnamon to prevent the dough from sticking and keep your ornaments looking pretty. Take a section of the dough, about 1/4 to start with, and roll it into a ball with your hands.
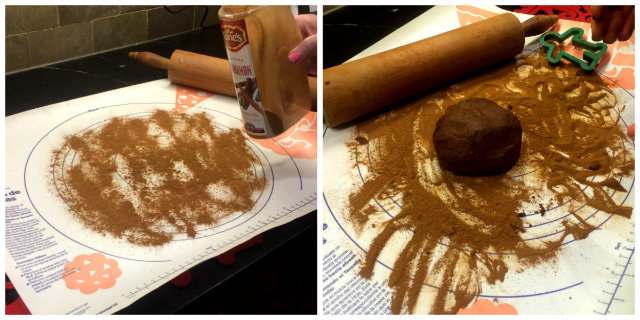
Flatten the dough with your palm. Roll it out evenly to the desired thickness. We rolled ours to about 1/3″ thick, which is pretty thick. W’ve made thinner ones in the past. The thicker the dough, the longer the ornaments will take to dry, so keep that in mind. This is also our first roll-out, as we continued to work with the dough, the consistency got even better and had less “cracking” on the surface.
Take your cookie cutters and tap them a few times in the loose cinnamon powder to coat the edges and prevent sticking. Then cut those shapes out! This is the super fun part!
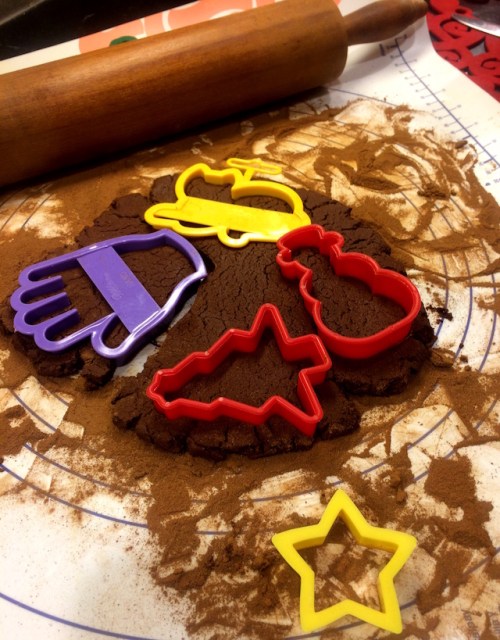
Cat!
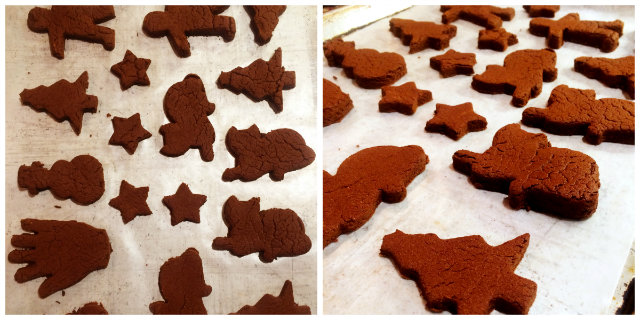
Carefully lift each cutout and place on a cookie sheet. Step and repeat until you have used all the dough. My mom lined them with wax paper to prevent sticking because she’s thoughtful like that.
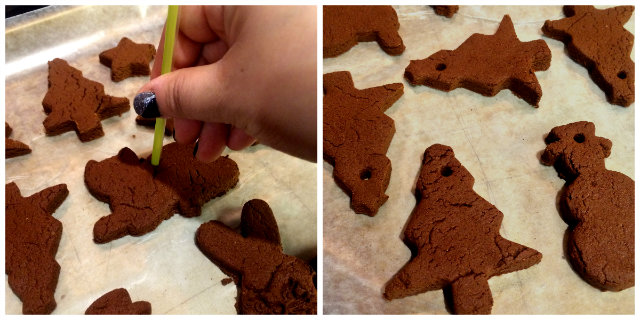
When you have all your cutouts ready to dry, take a straw and use it to poke a hole for hanging in each ornament. Push the straw in, wiggle it a little, and the center part of the hole will be pushed up inside the straw. Ta-da!
That’s it! Put them in a safe place (and instruct your family or housemates not to eat them). Let them dry for several days, flipping them over once per day. When they are completely dry, you can use pipecleaners or string or ribbon or whatever you want to hang them. You can decorate them any way you want or just leave them plain. Fabric paint, the kind that comes in a squeeze bottle with a small tip, can be used to look like piped icing.

My mom made these with the students in her class every year and gave them a baggie full to take home. Kids will take pride in making these pretty, delicious-smelling ornaments to give as gifts or put on the tree!
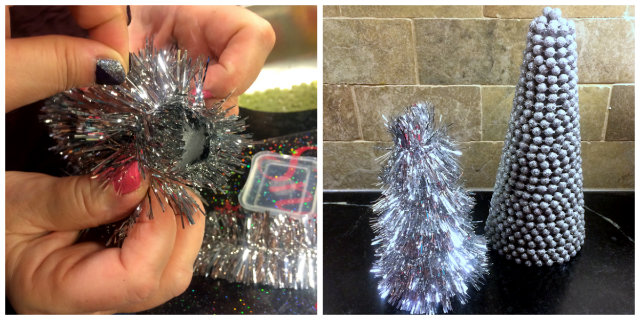
Sparkly Ribbon or Tinsel Trees
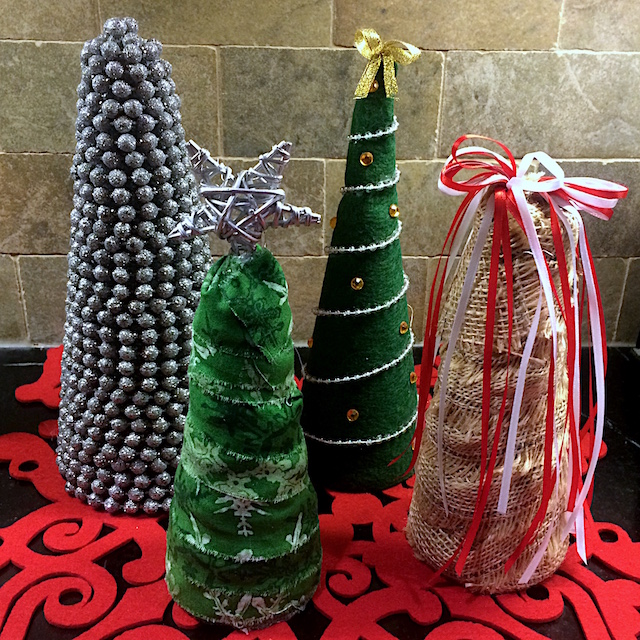
These trees are so cute and you can make them in a gazillion different ways! My mom has even made fancy ones with black velvet to use as jewelry display/storage. This is a cool craft kids will enjoy helping with that doesn’t take a lot of time for short attention spans. Because it uses pins, it is definitely one you need to do together and it’s probably not appropriate for toddlers or younger. As my mom says, “It builds motor skills!” and it’s appropriate for school-age children who are able to push the pins in (with your supervision). Older kids could even make this craft on their own. We’re going to make two versions, ribbon and tinsel-covered.
Supplies
Styrofoam cones (any size, we used 6.9 inch x 2.9 inch)
Ribbon or Tinsel (or fabric or whatever you want)
Small Pins
Scissors
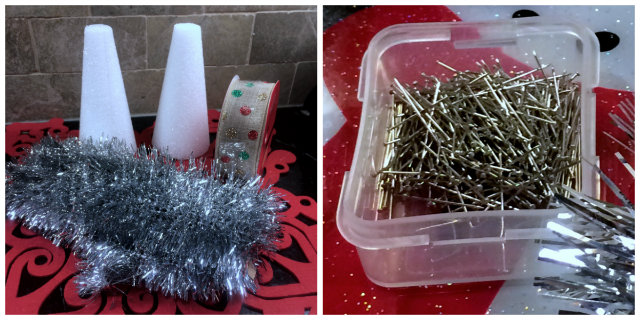
These are two pictures because we forgot to put the pins in the first picture! Just pretend it’s all in one beautifully curated shot, OK?
Instructions
Let’s start with the ribbon-covered tree. Wide ribbon or wide fabric strips are easier to work if the small hands your helper has are still learning how to be precise with the pins. Wrap the bottom of the cone with the ribbon. Put two pins in the ribbon at the corners of the end to secure the ribbon to the cone. Then, slowly turn the cone, slightly moving the ribbon up with each turn and securing the ribbon every inch or so with more pins.
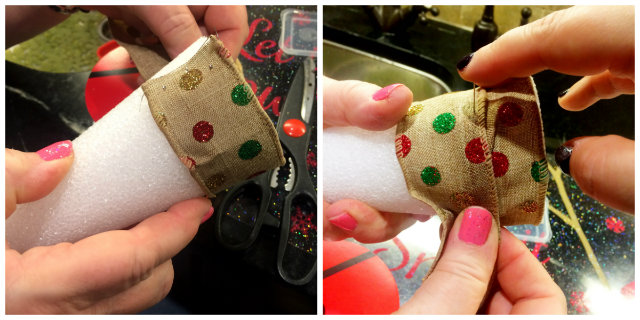
Keep turning and pinning until you reach the tippy- top of the cone.

Cut off a small square of ribbon (or fabric) to cover the tip of the cone. Pin it over the tip of the cone, putting pins in through all four corners of the square and any ribbon that is sticking up. We found this easier to do with two sets of hands, one holding the square down, one pinning.

Finally, finish wrapping the tree by wrapping up to the tip, then the ribbon will naturally start angling down. Cut the ribbon and pin the loose edge to the back of the tree. You’re done!

Let’s do a quick tinsel tree. It’ll be much the same, except you have to pin more precisely to catch the thread at the center of the tinsel. Hold the tinsel at the flared base of the cone and pin the end in a couple places. Turn and pin your way up the cone.
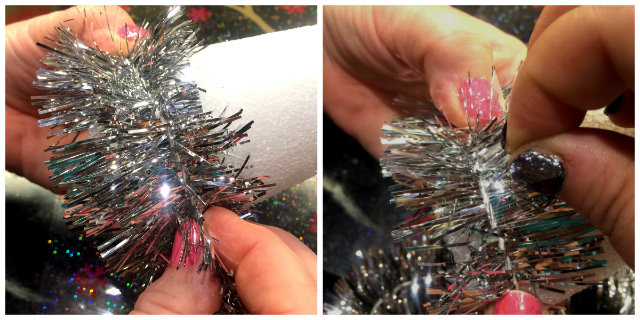
When you get to the top, just wrap the tinsel up to the very smallest part of the cone. Because it has volume, you don’t need to cover the top of the cone. The tinsel will hide the uncovered tip. Cut and pin the loose end and you’ve got it!
A few of these in different sizes would make a pretty display for your wintery decorating. You can finish them however you want, by pinning or glueing a tree topper to the top or adding little ornaments. Let the holigay spirit be your guide!
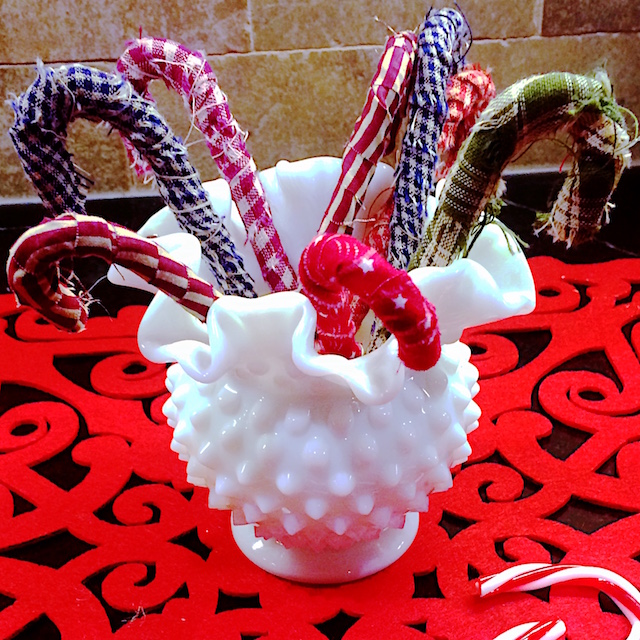
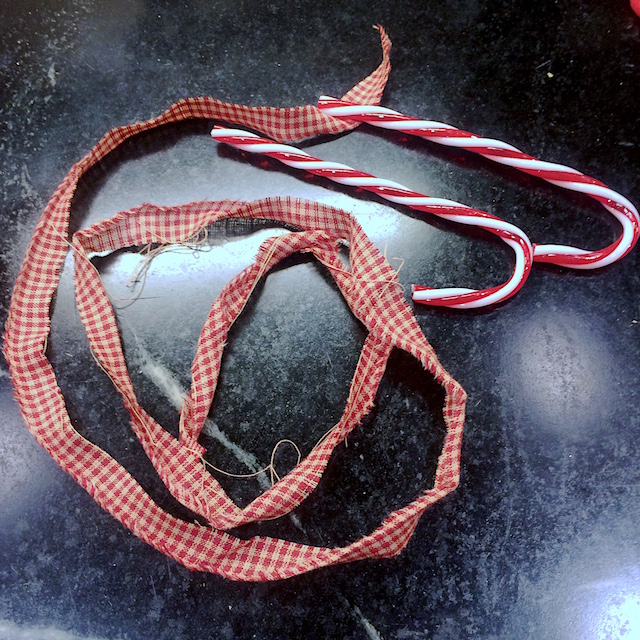
Pretty Fabric-Wrapped Candy Canes
A great way to upcycle your old flannel shirts into holiday decorations.
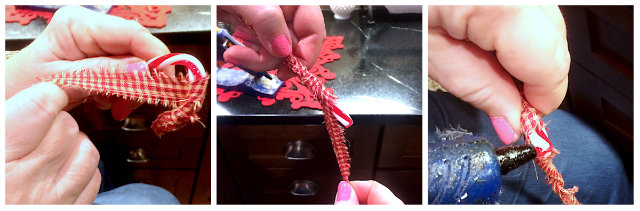
These are stupid easy. It seems silly to even write a tutorial, they are so easy. Kids can do most of the work here. You just need to operate the glue gun or show an older kid how to use it.
Supplies
Ugly plastic candy canes (you can find these at the dollar store or on Amazon for $6.38 for a dozen)
Fabric strips
Glue gun
Not pictured: glue gun. But I think you can figure out what a glue gun looks like.
Instructions
Cut your fabric into strips by cutting a two-inch slit at one end and ripping down the length of the fabric. This creates a kitschy frayed edge. Also, ripping things is something kids like to do. OK, so I’m just going to write this all up in one paragraph because it’s that easy. Put a drop of glue at one end of the candy cane. Press the end of the fabric strip to the glue and hold for a couple seconds. Then, wrap the fabric tightly around the candy cane until you reach the other end. Put a drop of glue at the other end and press the fabric down. Cut off the excess fabric. That’s it!
Make a bunch of these and tie them into a bouquet with ribbon. Hang them on a tree. Stick them into your holiday centerpiece. Make them for party favors. Or just make fun ones in different colors and patterns for yourself!

Me and my mom, festive adults having festive fun together!
Whaddaya think? Is my mom a cutie or what? I hope you’ll make some of these with the small humans in your life or with the grown humans in your life! I’ll never be as crafty as my mom, but I do still love sitting down and working on a project with my hands. It is the most relaxing thing! What kind of simple and/or kid-friendly holiday crafts are you making this year?

Yay! I love all of these, and I’m definitely making the cinnamon ornaments! Your mom is great!
They smell so good!
Wow ok, so I know I’m PMSing because that first picture of you and your mom when you were little is ACTUALLY SO CUTE I TEARED UP. Lookit your little overalls!!!
Secondly, I work with kindergartners and thusfar this holiday season we’ve made a snowman face whose carrot nose points to the number of days left until Christmas, a holiday wreath made out of paper plates and tissue paper, and a bell ornament made from plastic cups and glitter, which I will be finding in my hair/clothes/shoes/entire life until next Halloween.
The cinnamon applesauce ornaments are riiiight up my little ones’ alley, we’ll definitely be making those next week!
I love your kid crafts! So cute! I hope they like the ornaments. My mom says she gave the kids each a little ball of dough to work with their hands when she did it and they loved it!
I’m not PMSing and I almost teared up at that photo too!
Oh my gosh, the way you bookended this post with those photos made my heart grow three sizes!
We are cuties! Even 30 years later, still cute!
I’ve been dying to put biscuity style decorations on the tree for ages. My mum got all weird when I showed her this because she is convinced someone would try to eat them (her kids are 23 and 24!) I’m gonna make some while she isn’t looking.
DO IT. Really, don’t let them eat them, though. I mean, I guess it wouldn’t kill them, but………
Ok, you and your mom are so darn cute!
We are!
I’m like nth person to mention you and your mama, but y’all have same haircut and it cracks me up. Early’s 80’s lady edition bowl cut. xD
I definitely had that outfit *and* that haircut as a toddler. Haha.
Great craft ideas and the most adorable photos!