Happy Back-to-School season! Even though I finished school some time ago, I still get excited around this time of year. For me, September will always feel more like a new beginning than New Year’s Day. I don’t know if it’s like this where you live, but here in Boston September 1st also means that everyone and their mom is moving. Specifically, it means Allston Christmas and U-Haul trucks getting stuck on Storrow Drive and convincing friends to perform several hours worth of manual labor in exchange for beer and pizza.
If you’re moving this fall, one way to help ensure that you get a full security deposit back from your landlord or management company is to repair any obvious issues in the apartment. In this month’s This Queer House, I’m going to take you through one of the easiest cosmetic fixes — patching small holes in your walls — and talk about a few other ways to leave your apartment looking as un-beat up as possible.
What you’ll need:

- Spackle – I happen to just have Vinyl Spackling, but if you are either impatient or new to the process you might want to check out the kind that has Dry Time Indicator. It goes on pink and dries white, so you don’t have to worry if it’s ready to sand or paint. (I have some feelings about why they made the “easy version” spackling pink, but I’m not going to get into that right now.)
- Putty knife or similar tool – I used a 5-in-1 tool for this and it worked fine.
- Sandpaper – You definitely don’t want to use sandpaper that’s too rough – between 100-150 grade should be good. (I used 120, if you were wondering.)
- Painting supplies (optional) – If the wall wasn’t white (or close to it) to begin with, you’re going to want to paint over the patch.
What to do:
1. Assess the damage. I’m going to illustrate how to fix any hole or gash that is approximately half an inch or less in diameter (basically just about any kind of nail or screw hole). If you’re looking to patch something larger, skip down to #5 for some more information about that.

No, *YOU* made a hole in your wall just to repair it for a DIY column.
2. Apply spackle and let dry. If the hole is on the larger side, you might want to apply one layer of spackle to fill it up. Then let that dry and apply a second layer to make it is fully covered. If it’s just a small nail or thumbtack hole, one layer should be fine. Make sure to apply the spackle thick enough to cover the hole, but keep in mind that the thicker the bump the more you are going to need to sand it down to even the wall out. Don’t get too wild with it, is what I’m saying. Check the packaging for any exact specifications in terms of drying time and temperature/moisture restrictions.
Applying the spackle.
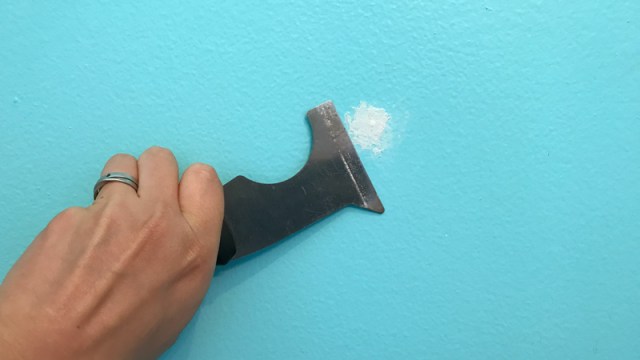
3. Sand the surface down to match the wall. Be gentle and use your fingers often. (HEYO) But seriously, no need to apply a ton of pressure right off the bat because this stuff should sand really easily. As you’re sanding, run your fingertips across the wall to check for smoothness.

After sanding.
4. Paint patch to match wall color. (optional) There are a lot of variables for this step. If the walls are close enough to white, you can probably get away with not painting over the patch. If the walls are dark or vibrant and the patch is really obvious, I sure hope you have the exact paint (or at least know the exact brand/shade) that was used in the first place. If not you can try to match it, but that’s a real gamble and you might end up having to paint the whole room.

I bet you can’t even tell where the hole used to be! I put arrows to help you, don’t worry.
5. What do I do if I have larger holes in my walls? For anything bigger than about a half an inch or so, you’re going to want to add some extra stability before you spackle the hole. A ton of different brands sell kits with instructions that should have you covered up to about 6in or so in diameter. Basically, you just apply a self-adhesive fiberglass patch over the hole and then cover it all up with spackling (multiple layers, letting each layer dry between coats). In this case, you do want to use extra spackling and cover an area larger than the patch by a few inches. That way as you’re sanding, you can gradually feather the edges to meet the wall and make any slight bump less obvious.
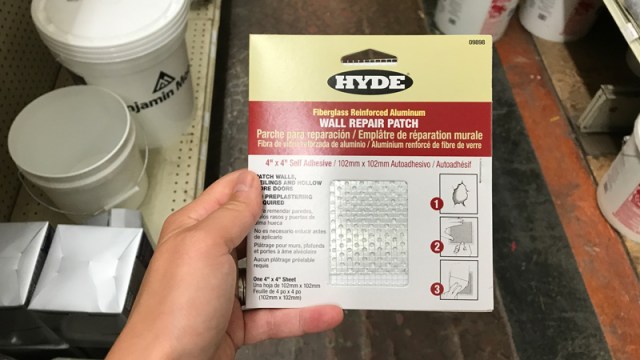
I almost bought this, but then I decided I did not want to create a several inch wide hole in my wall.
If the hole is bigger than six inches, what are you even doing in your apartment? I am not equipped to help you with that.
Other staples for when you’re moving and you want your security deposit back:
- Magic Eraser – Listen I wanted to hate this product, but it actually is fucking magic. Use this on any aggressive stains in your apartment and no one will know how many parties you had.
- Wood stain pencils or markers – These can come in handy for any obvious scrapes or scratches on wood floors that you didn’t notice until you moved the furniture.
- Trim paint – If the paint matches (or is very close to matching), you can touch up any obvious scrapes or chips without re-painting everything.
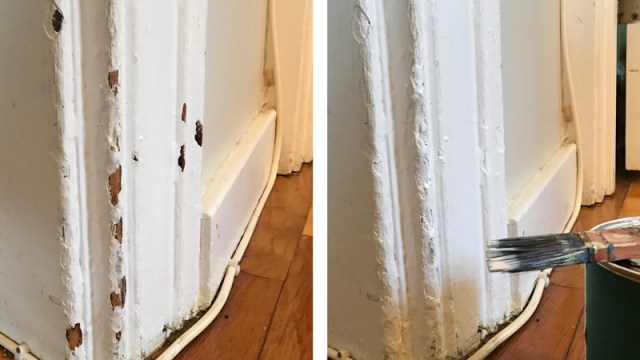
Before and after one really quick/semi half-assed paint job. Looks a lot better with almost zero effort!
Well there you have it, fellow queer renters. I hope these tips help you get back your full security deposit whenever a U-Haul is in your future.

What an apropos article. I am surrounded by boxes and have to be out of my apartment by the end of business on Thursday.
What a good article! Saving it for next time I move, so I don’t end up filling huge holes in the skirting board + walls with blu rack and painting over it in a desperate attempt to hide them (somehow, it worked! But I feel kind of bad now that I’ve met the actual landlady- who is really nice- rather than just the letting agent, who is awful.)
*blu tack
Wow, this is the most relevant article to my life pretty much ever.
(I know pretty much every apartment in Allston and the general Boston area has virtually identical damage, but man, that doorway reeeeeeally looks like it could be out of one of the buildings I used to live in.)
((September 1 is the fucking worst holiday and my current landlord is being a jerk lately and I am so sick of being treated as an irresponsible child tenant when I am nearly 30 and have left every apartment I’ve ever lived in in this city in far better shape than when I moved in. ))
But also, so much yes on magic erasers. The generic versions (I mostly get up & up from Target) pretty much work the exact same way and they are ALSO the best for cleaning bathtubs and tiles that scum up easily as well as completely disgusting ancient kitchen floors that no amount of mopping can brighten.
I used to use a pink-to-white nail hole filler (came in a tube, lived next to the caulk at my then-local hardware store) that also worked really well for small jobs – I don’t know if the reason it applies pink has something to do with the specific type of dye? But yeah, it worked almost annoyingly well and matched our stark white walls better than any other formulation I tried.
Filling holes with spackle is one of the easiest home repairs to do, and yet no one seems to know about it, leading people to use all other manner of insane things to fill holes instead (like freaking toothpaste). This article is truly a public service.
Perfect timing for this article given the dime-sized hole I just ripped in my spare bedroom (apparently Command Hook weight limits aren’t just suggestions) and was wondering about how to patch it given that it’s bigger than the usual nail hole I would just spackle over. And I agree, Magic Erasers are definitely magic, and they’re also just melamine foam that you can buy for cheap in bulk on Amazon.
Moving out of my place a month ago, I had SO MANY command hook/adhesive spots to patch up. Not all my fault, and most related to improper removal, but I’m a little more cautious about my use of them now. I tried to perfectly match my paint by bringing a chip into the hardware store. But it ended up being a little to bright and noticeable, however much better than no paint at all.
Wonderful article! You’re completely right, the Magic Eraser really is a miracle worker in cleaning around the house, no matter the mess. There is one drawback with generic ones though, on top of them falling apart easily, you stay away from cheap melamine sponges made in China (available online or in some discount retail stores). These melamine sponges have been tested and may contain dangerous chemicals left behind in the residue.
My name is Bob Maranto, I am the president of SpongeOutlet.com. The raw material for our Eraser Sponge is manufactured by the largest chemical company in the world – BASF – in Germany. The product is called Basotect and is the same material used in the Mr. Clean Magic Eraser™.
We have been producing melamine sponges for over twelve (12) years at our facility in Western New York. Our sponges are exclusively sold online for as little as Twenty Nine ($0.29) cents each (as much as 80% lower than the Magic Eraser) – and shipping is free in the United States.
I love that this is almost spam but actually totally relevant. I also love that it reads in an informercial voice. HI BOB THANKS FOR THE INFO.