Hello and welcome to This Queer House, a monthly column where you and I can walk together through the sometimes scary world of home improvement. I’ll answer your questions, take you step-by-step through DIY projects, and generally help you to be handier in your everyday life. You might be thinking to yourself, “Wow, that sounds great! But why should I listen to this clown?”
Dear reader, here are my qualifications:
- Completed a semester of high school woodshop in 2003 (I think I got an A)
- Was a member of the City Year Civic Engagement team 2010-2011 (We built picnic tables and painted murals at pretty much every public school in Washington, DC)
- Successfully installed a dimmer switch last year and only almost electrocuted myself one time
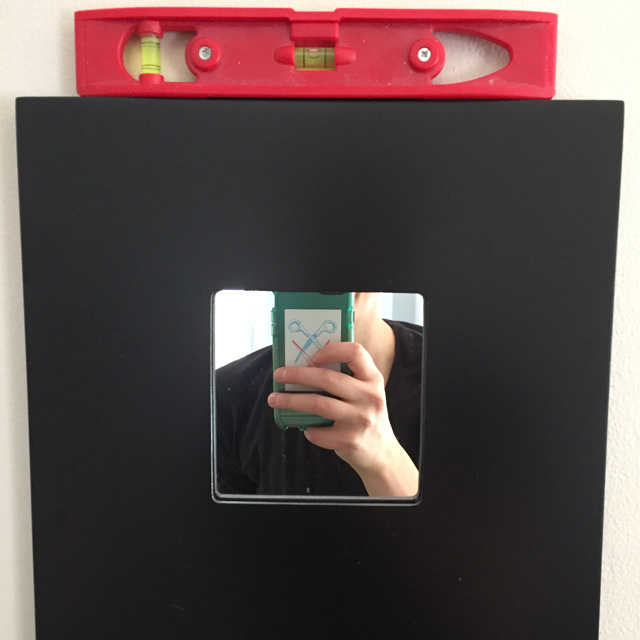
- This outfit:

I mean, come on.
Wynn recently made A Butch’s Guide To Your First Toolkit. It’s great; you should check it out! So let me show you what’s in my toolbox and then we’ll get to our first project: hanging stuff on the wall!
What’s in my toolbox?
In general, I am not a proponent of any particular brand of tools over another. My toolbox has been built up over the years from a combination of things my dad passed down to me and whatever cheap new or used tool I needed at the time. I have found that you can make most any project work even when you don’t have the ideal equipment; you just have to be creative with what you have.
+ Hammer: Obviously, it’s necessary for hanging things on your wall (or removing old nails from the previous tenant), but it has many other uses! One of my favorite alt-uses is to pound a nail into a wall or other surface and then take it out so you have a starter hole for a screw. It’s like a drill replacement, basically.
+ Screwdrivers: Flat head, Phillips head, Multi-bit. The Multi-bit is mostly handy for if you ever lose either your flat or phillips (not to name names cough me). Also, there are a bunch of options for bits! Like so many that you will probably definitely never use them all, but you’ll be secure knowing they’re there.
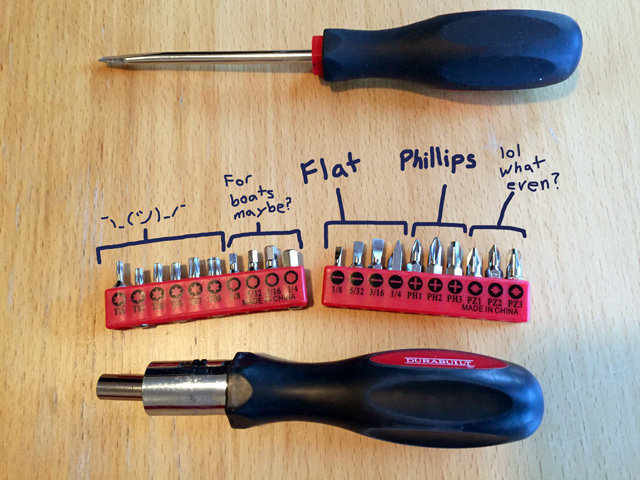
Top: regular flat head screwdriver, Middle: look at all those bits (The bits! The bits!), Bottom: multi-bit screwdriver.
+ Level
+ Measuring tape
+ Pencil: ABM. Always. Be. Markin’. Seriously though, measuring and marking are often the most important parts of any project. More on this later.
The holy trinity of wall hanging projects, pictured here in front of the gallery wall I used them on.
+ Ladder: Obviously this won’t fit in a toolbox, but having a step stool or small ladder is handy. In a pinch, though, you could just stand on a chair or table (but please be careful and don’t get mad at me if you fall).
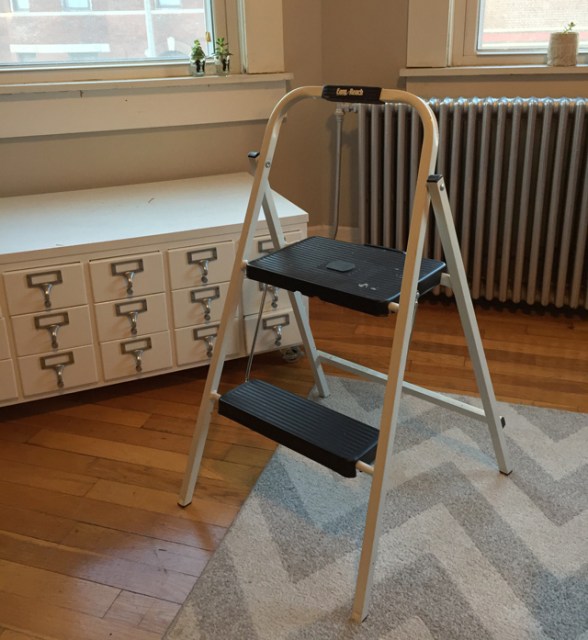
We call this our “Steph stool” in my house, because my wife is named Steph and she’s pretty short. (Steph not pictured)
+ Pliers: There are lots of different types of pliers, but I am partial to the needle-nose variety as a good first purchase if you don’t have any heavy duty projects planned. Pliers, in general, are really handy for removing old screws that have been stripped. Also, try to find some with wire cutting capability built in if you can.
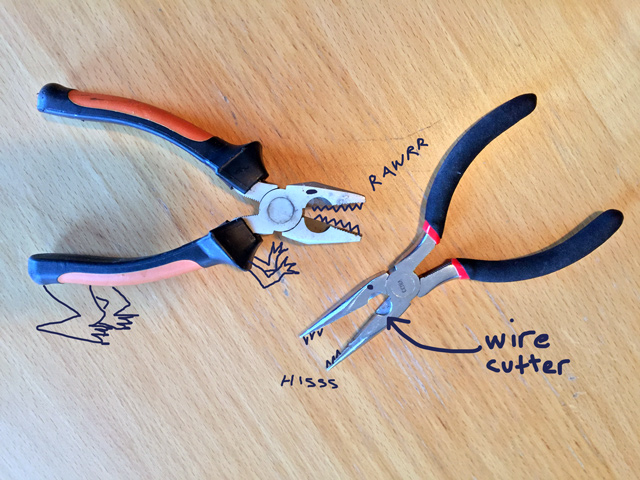
Lineman’s pliersaurus v Needle-nose plier-croc: coming soon to Syfy
+ Wrenches: I have a standard set and an adjustable wrench (which I can’t find), but you can definitely get away with either/or. To be honest, I don’t use wrenches a whole lot so I’m not sure why I have so many?
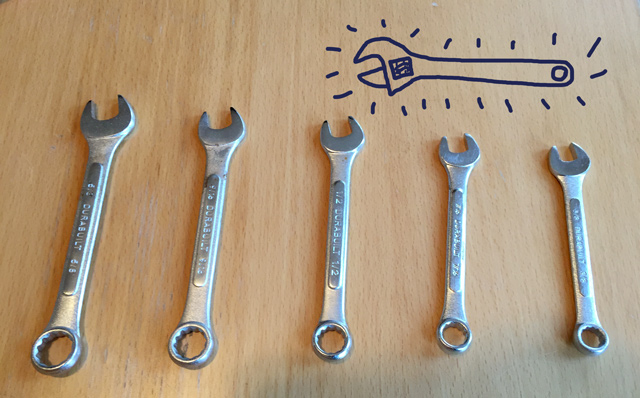
This is my standard set of wrenches and I drew you an adjustable one too so please use your imagination.
+ Sandpaper of varying grains: Sometimes you have to make things smoother. You want to be smooth, right?

SUPER FINE. GET IT?
DIY Tutorial: How to hang things on your wall
Since this is our first project, we’re going to start off with something fairly simple: hanging multiple objects on a wall with even spacing. I’ll be using some super cheap mirrors from Ikea, but the basic concept will work for most any wall decorations you could possibly want.
1. Make a plan. This is a good first step for all DIY projects, to be honest. Have you ever heard the phrase “measure twice, cut once?” It is a thing for a reason. For this particular project, my plan involved taking measurements of the mirrors and the wall space, and then making some simple calculations to figure out the spacing.
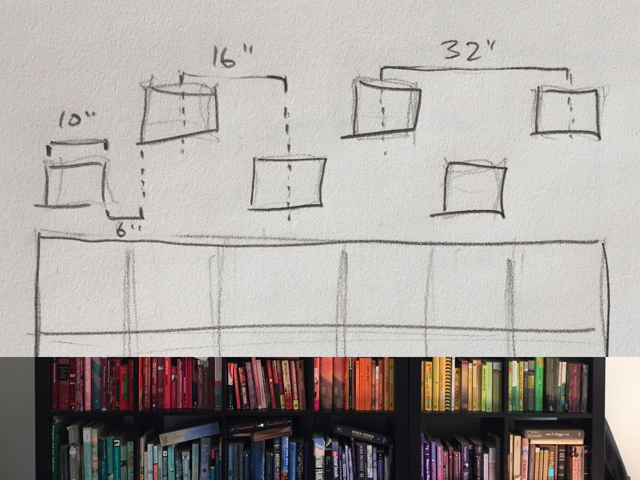
My quick sketch of how I wanted the mirrors to look above our bookshelf.
2. Measure and mark the wall. I happened to be starting off with a wall that had a very old nail sticking out of it. I tried half-heartedly to remove it, but that thing has probably been there since about 1942 and is covered in multiple coats of paint. Luckily, it worked out fine to use the existing nail as the starting point for one of my mirrors. Using a level to keep things straight, I measured out from the nail 32 inches in either direction (the distance between mirror center points that I came up with in my sketch). I also double-checked the alignment by measuring up from the bookshelf and confirming that my two new marks were the same distance up the wall.
3. Hammer time! Before moving on to measure the bottom row, I decided to put up the top three mirrors and make sure everything was looking good.
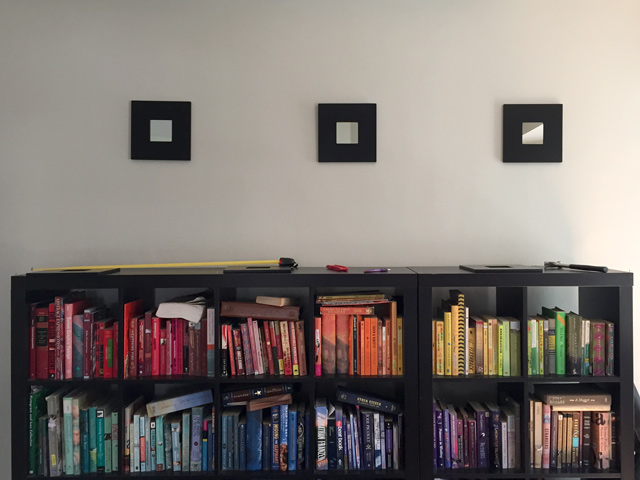
Wooooaaaahh we’re halfway there.
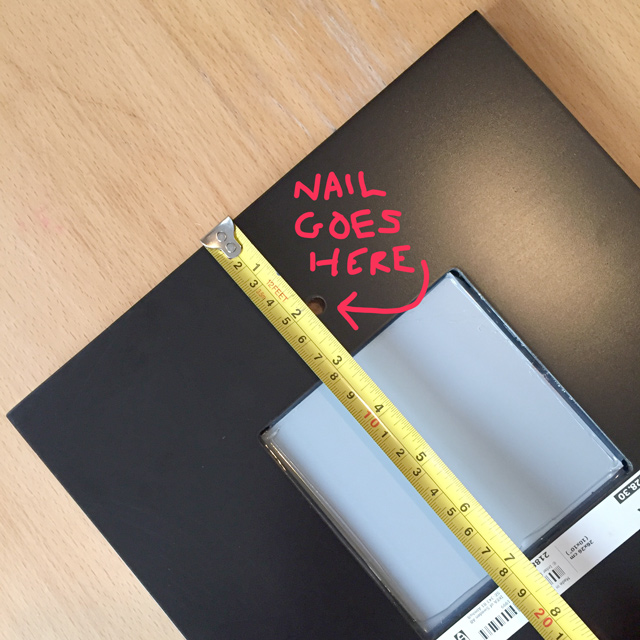
4. Measure and mark the wall, part 2. I wanted the top edge of the bottom row of mirrors to share an axis with the bottom edge of the top row, so I had to do a little extra measuring. First I checked the distance between the top edge of a mirror and where the nail for hanging goes (about two inches). Then, I marked the halfway point between two of the mirrors already hung up on the wall to ensure everything would be centered and spaced well. From there, I measured down toward the bookcase about two inches to account for the space between the top of the mirror and where it would hang from the nail.
5. Throw the plan out the window (sometimes). In this particular case, I ended up calling an audible on my original plan and only hanging five of the mirrors. The placement of that existing nail threw things off, and I was going to have to move the bookshelf way off-center of the wall to hang all six mirrors. There’s a good DIY lesson to be learned here: plan your project thoroughly, but be willing to be flexible.
6. Finishing touches. The very last thing I did was use a couple of cut up Command strips (which is just double sided tape, basically) to ensure the frames would stay level. Like I said earlier these are cheap mirrors with only the one nail hole, so they aren’t super stable. Having to constantly adjust them would’ve driven me crazy, so I used a level and stuck them onto the wall.
A level: the only type of straight I can get down with.
And that was it! The whole thing probably only took me about half an hour or so, but I have a lot of experience hanging things up so don’t stress if it takes you longer. Just take your time, measure early and often, trust your instincts, and you’ll be a pro at hanging stuff in no time.
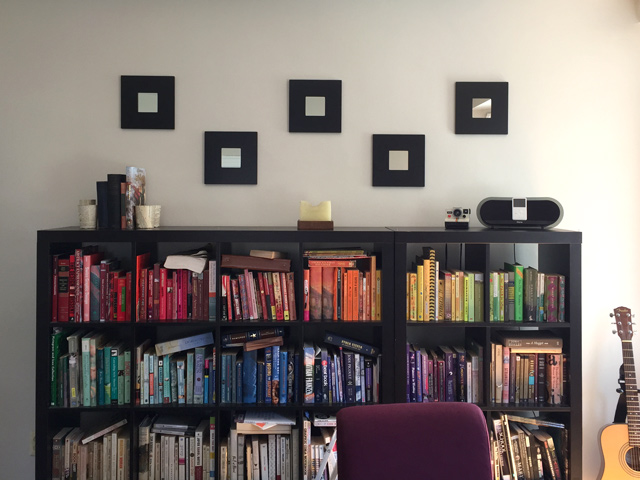
Ta da!
Do you need advice on a DIY project? Let me know about it here in the comments, by email ([email protected]), or on Twitter and I’ll do my best to help you out in a future column. I have rented apartments my entire adult life, so there is a limit to the level of project I can take on (no kitchen demolition, for example, no matter how badly I want to). The plus side of this is that I have a lot of years of experience creatively, but not permanently, altering spaces, so don’t be shy.

Yes! I’m so excited to see this post! I am (slowly) expanding my toolset as I take on different home projects (and have a lot planned for summer!), but if it weren’t for my girlfriend, I would honestly have no idea what tools I need for whatever project I’m taking on. I’m learning though, and excited to see what this column brings :)
Stoked for this series! I have a very sparse toolkit and knowledge of how to use it, so I welcome the opportunity to learn more.
Those “for boats” bits look like Allen keys, which are useful for bicycles and Ikea furniture (and probably other things too but those are the only ones I know). I’m so excited that I know a tool thing to share on a post about tools!
Also, 10/10 handyqueer outfit.
just read “I have a very sparse toolkit” and thought we were talking about my emotional state today
I recommend a stainless steel 1.5-inch spoon and a large format tub of ice cream.
10/10, will follow this advice
Can you talk about drywall anchors when hanging pictures? When we need them, how we use them…. I was surprised that wasn’t included! Thanks.
Good point! I didn’t include anchors here because these were the cheapest, lightest mirrors on the face of the Earth (I think). I’ll be sure to include an anchor discussion in an upcoming column, though, thanks!
Thanks for this Jenna! I can’t wait to learn from you!
This is rad! Can you talk about shelves and studs? I am afraid of and confused by both.
Yes! I am so psyched for this column! I, however, have solid concrete walls so I can’t hang anything without one of those command strips.
I think the bits labeled pz1, pz2, and pz3 are pozidriv?, which I think most people encounter when dealing with ikea furniture. Not having pozidriv bits is why a lot of my ikea furniture’s screws are stripped.
Ahhh this is going to be so interesting and useful! My dad recently bought me a full toolkit (as if I wasn’t a big enough stereotype as it is!) but there are a lot of things that I just don’t know how to do! Looking forward to the next one :D
A friend needed to borrow some tools for her bicycle last weekend, and we ended up using those interchangeable hex bits from a ratchet set that my Dad gave me for Christmas a couple of years ago. When she saw my toolbox and overflow cardboard box of more tools, she joked that it should have been a hint (I just came out a few years ago), but somehow it wasn’t – whether because my Dad gave me most of them, because it just seemed a very Girl Scout-like way of being prepared, or because I also have large boxes of craft materials and knitting supplies!
I still need to get a level though – I thought I had one, but last time I had to hang a picture, I couldn’t find it and had to make do with a finicky app that I later deleted. It did make my phone look rather butch, though. Whether I myself am butch, I don’t know, but my phone sure was!
This makes the random bunch of tools I stole from the engineering faculty seem inadequate.
I ended up accidentally giving myself a full toolbox a couple of years ago when I was building my first computer, because kind of went over the top on what I bought cause I had no idea what I would need… Best accident ever!
I’m excited for this new column!
YES to this article! Also in your outfit shot you forgot to credit that bomb ass queer hair. My partner and I bought a home 2 years ago and as many of you 2 x female disproportionate earners know “I ain’t got money for skilled trades people”. Recently, I have learned how to replace the wax ring on my toilets, bought a snake and snaked my toilet, refinished windows, re-sealed windows for leaks (California got some RAIN) and various minor home owner pop ups. I knew it was getting serious when the woman at Home Depot said “oh, you’re back” and the men in the parking lot asked me if I was a professional painter and for my card. Please help with electrical !
I already love this serious! In my house we have “Amy stool” because my wife is named Amy and she’s pretty short.
i was raised on HGTV marathons and weekend-warrior home improvement projects by my roofers-union dad and equally handy mom so i am VERY excited for this column. knowing how to fix and build shit is one of the best skills you can have and also a very effective way to impress a gal.
also, only slightly relevant but y’all will appreciate this, my sister (bi) is currently building me (lez) a toolbox in her woodshop class. if that’s not queer lady solidarity i don’t know what is.
THAT OUTFIT THOUGH! <3
I am the only one of my friends who has a toolkit. This leads to many a joke about my "lesbian toolkit" and wanting to borrow "my big tools" but there you go. This would be less awkward if half the tools weren't bright pink but there you go.
I don’t want to be a Debbie Downer, especially since I think this column is a very cool idea, so I hope this comment comes off in the constructive criticism tone it was intended.
I feel that this article would have been much stronger if it addressed, even briefly, the fact that people might hang things of varying weight on varying types of walls. I get that it’s a super easy intro most likely intended to make basic tools seem less scary for someone who’s never used them, but maybe just add a disclaimer about the specific circumstances when hammering a nail into the wall is an feasible and appropriate way of hanging something, precisely because it’s aimed at people who don’t have experience hanging anything.
I’m looking forward to future instalments!
V excited for this columnn!
My favorite tool is the vice grip. I’m sure I’m using it wrong, but I use it all the time. It’s like really butch pliers – it locks!
Home Depot has a great starter tool kit for $20 bucks. It includes all the tools mentioned in this article, plus a lot more.
I bought this for my wife and I after we got married because we have a small apartment. One day we hope to have more professional tools and a workshop for her. But for now, this kit has everything we’ve ever never needed, except a drill.
http://www.homedepot.com/p/HDX-Homeowners-Tool-Set-76-Pieces-H76HOS/203552669
This is great! Excited to see what pops up in this column in the future.
I’d add vice grips as a necessity (depending on what work you might be doing, and how often there’s an extra set of hands to help, two sets are great), and a roll of gaff or duct tape.
And for fellow Canucks out there, a Robertson screwdriver is also a must as well.
yesss to This Queer House series!