Welcome to This Is How We Do It, a series wherein we’ll be discussing projects both inside the home and out and explaining, you know, how we do it.
Canning is one of the best and easiest ways to preserve food. Jams and jellies are just the start; you can preserve almost anything using home canning methods, provided you prepare the food properly. Canning also overlaps with other preservation methods. You can add flavor and preserve food by pickling it, then get a much longer shelf life by canning it in the pickle brine. Learning how to can at home is essential, if you want to save some of the bounty of summer to enjoy in the winter. Canning still feels far away and quaint to most people, like a lost art that died out in our grandparents’ generation.
Most of my canning knowledge comes from just a few books. Canning for a New Generation by Liana Krissoff has been a wonderful source of info. If you are at all interested in canning, buy this book. Her recipes are great, and she organizes them by season, which is helpful when you’re trying to integrate canning into a local food lifestyle. She also emphasizes natural ways to make jellies (as opposed to using boxed pectin), which I appreciate. Ball’s Complete Book of Home Preserving is another great resource to have around. The recipes are not quite as good, but there are a ton of them. I mainly use the book as a way to generate ideas. Plus, it never hurts to have the original bible of home canning lying around. If you want to know more about anything I describe in this post, these books are the best place to start.
How to Not Die of Botulism
There are two basic canning methods: boiling water canning and pressure canning. Most people use the boiling water method at home because it’s easier, it requires less equipment, and it usually gets the job done. Pressure canning is useful for processing lower-acid foods, if you don’t want to get botulism. More on that in a second.
Both canning and pickling preserve food by creating environments that don’t suit the bacteria responsible for spoilage and decay. Those bacteria require oxygen, moisture, not too much acid, and moderate temperatures. Of those four variables, canning mainly relies on a lack of oxygen to inhibit bacterial growth. When processing jars, you submerge them in boiling water. As the jars heat up, the contents expand and the air in the top of the jar is forced out through the lid. When you take the jars out, the food cools and retracts, creating negative pressure in the jar. The pressure seals the lid to the top of the jar, which prevents air from getting back in. The end result is a vacuum. Bacteria cannot grow in the anaerobic environment, so your food is safe until you open the lid.
A lack of oxygen takes care of bacteria, but there are still bacteria spores to deal with. Spores are only killed by very high heat, and they thrive in anaerobic environments. Left alive, Clostridium botulinum spores produce the toxin responsible for botulism, a horrible paralytic disease. To prevent botulism, you have to kill the spores with either heat or acid. Unfortunately, boiling water canning cannot get the jars hot enough to kill the spores. So when using the boiling water method, the final mixture has to have a ph level below 4.6, acidic enough to kill botulism spores. Most fruits are already acidic enough, and vegetables can get there when they are pickled with vinegar. Any modern canning recipe that calls for boiling water processing will have already calculated the ph levels. So you only need to worry about ph if you are using an old recipe or untested recipe.
If you want to experiment with recipes or you want to can a low-acid food (like non-pickled veggies), pressure canning is the way to go. It’s the same process as the boiling water method, but you do it under pressure. Water boils at a higher temperature under pressure, so you can reach the 250 degrees Fahrenheit required to kill botulism spores. I don’t own a pressure canner (yet), so the recipes in Preserved will focus on the boiling water method. But if you want to learn more about pressure canning, the National Center for Home Food Preservation has some good info!
How to Can with Boiling Water: Apple Butter Edition
Boiling water canning is easy. All you really need are some jars with two-piece lids, a big pot, tongs, some water, and of course food to put in the jars. If you want to get fancy (and have fewer injuries), I recommend buying a few extra supplies. At the very least, get a jar lifter, which is a pair of funny shaped tongs to help you take jars out of boiling water. After pouring boiling water on my arm a few times with my homemade version (tongs plus rubber bands), a real jar lifter was a revelation. Canning kits are also great, if you want the whole setup. The smaller versions come with a jar funnel, a jar lifter, a magnetic lid lifter, and several other tong-like things I haven’t figured out yet. The larger set includes a gigantic canning pot and a rack for the jars. This stuff is helpful, but not necessary.
To demonstrate the basic canning process, I’m going to use an apple butter recipe based on one from “Canning for a New Generation.” Because it’s so simple to make, apple butter is a perfect way to try out canning for the first time. Try this recipe with local apples; they are still available in most parts of the US right now, and almost any apple will give you a great tasting apple butter. You can enjoy it all winter and spring long, spread on toast or put into oatmeal.
The first step in any canning recipe is to make whatever delicious thing you’re going to put into the jars. To make this apple butter, you will need:
+ 6 pounds of apple, cored and cut into 1-inch chunks
+ 2 cups of either apple cider or water
+ 1 1/2 cups of sugar
+ 1 1/2 teaspoon ground cinnamon
+ 1/2 teaspoon ground cloves
+ 1/2 teaspoon ground allspice
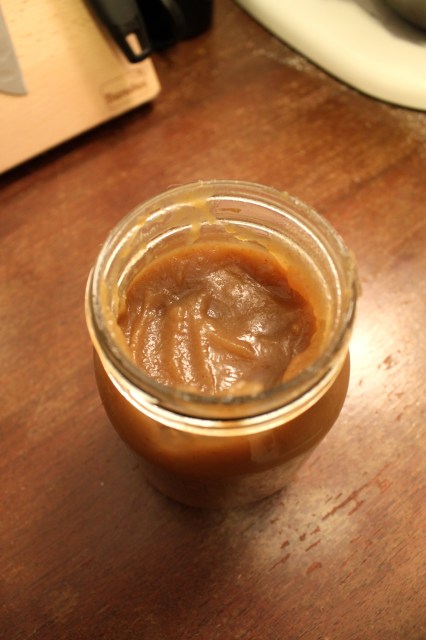
The recipe yields 3 pints of apple butter, so you can cut down the recipe if you need. The difference between apple butter and apple sauce is caramelization, so you the mixture needs to be cooked for a while. Liana Krissoff recommends using a slow cooker, which is by far the easiest method. First, put the apple chunks and the water/cider into a stock pot. Bring to a boil over high heat, stirring occasionally, for 30 to 40 minutes. The apples should break down quickly, and the peels will separate. Then strain the mixture to remove the peels and give it a smooth texture. I used a nylon straining bag, but you can also use a fine seive or strainer. If you want, you can also puree the mixture using an immersion blender to make sure it has a silky texture.
Next, put the puree into a slow cooker. Add the sugar and spices. Set the slow cooker on low, and the let the mixture cook for 9 to 12 hours. Don’t put the lid fully on the pot; you want some liquid to evaporate. Stir every now and then. When it’s done, the mixture will be a dark brown, and it will taste like, well, apple butter.
If you want to make this on the stove, it’s a bit harder. Put the puree back into your stock pot. Add the sugar and spices. Bring it to a boil, then turn down the heat and let it simmer for several hours. You will need to stir this stuff quite often, maybe every 5 to 10 minutes. The bottom will burn very quickly if you aren’t careful. It’s finished when the mixture is dark brown and relatively firm.
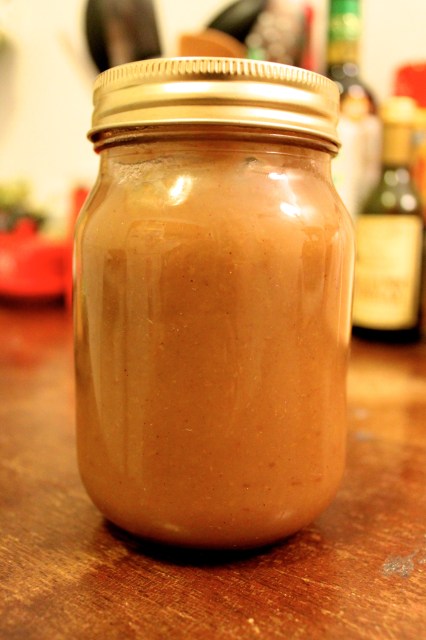
Now you need to prep for canning. Fill your canning pot with water, enough to cover the tops of the jars by an inch when they are submerged. Put your clean jars in the water (make sure you have enough jars to hold all your apple butter). Bring to a boil. Keep the lids in a bowl, to the side. When the water is boiling, ladle a little bit into the bowl to sanitize the lids. Pull the jars out with a jar lifter, pour the water back into the pot, and place them on the counter.
Boil the apple butter again (you may need to transfer it back to the stove from the slow cooker). Ladle the hot apple butter into the jars. You need to leave only about a 1/2 inch of airspace at the top. Wipe off any apple butter that got on the rim of the jar. Then place a lid on top, and screw on a ring just until it starts to tighten. If you overtighten the lid, or if you don’t fill the jars enough, then they won’t seal properly!
Once all the jars are full, put them back in the boiling water. Make sure there’s about an inch of water on top of the jars. Boil them for 10 minutes (err on the long side, a few more minutes won’t hurt). Remove the jars, and set them on the counter. Don’t disturb them for at least an hour. As they cool, you may hear the lids pop. After an hour, check the lids by pushing on the center. If you can pop the jar lid up and down, then it didn’t seal. Put that jar in the refrigerator and start using the apple butter. The sealed jars can sit out overnight to cool, and they will be stable in your pantry for the next few months!

I did not know the thing about the pH having to be a certain level, but now the whole world (or at least pickles) makes so much more sense!
I just read through this whole thing even though there’s no way I’m going to can/store canning equipment in my tiny kitchen. *Sigh* I’ll do it someday when I have a bigger apartment and it’ll be glorious.
Thank you!! I made apple butter the easy way ( crock pot for 10 hours) and had no idea how to seal them! They are boiling right now! Apple butter makes a nice and cheap Christmas gift!!
I’m going to make the heck out of this over the weekend. Any apple suggestions?
Making your own is definitely the tastiest way, but the time…
Oh my gosh, I’m totally doing this this weekend. Thank you for this!
This is so cool!
I am so trying this month.
Nice through instructions! I follow our old FDA canning guide very closely.
There are two bushels of apples sitting on our porch, waiting to be processed this weekend.
Wow apple butter looks so easy, who knew!
Canning and Perserving with Ashley English is a good book too, she has some nice reference charts included. The Ball Bible is particularly great for the instructions in the front and reference materials in the back.
Sarah! I’m a canner living in Chicago, too! I’m mostly done canning for the season, but if you want a canning/bread baking/farming buddy, I’d love to meet up!
this looks perfect and i want to can everything now.
I just canned applesauce this weekend. Tempted to get more apples for apple butter…
I also had my first canning disaster yesterday. I turned what I thought was the burner for the canner on high and walked away (it takes forever to heat up) but it turned out I’d turned on the back burner with the pot of jar tops and it boiled dry and melted the sealing compound! What a stink.
ME TOO :( 30 years of canning and it happened this year. You are right, the smell went through the whole house. I hadn’t poured the water in yet and turned it on. Didn’t take long to almost ruin my pan.
Can I pressure can my apple butter? If so, what settings do I use on my fresh tech canner?
I think because you’re hot packing the apple butter, you’d be better off using the water bath. You might stand the risk of over-cooking the food using the pressure cooker. But hey if you can set the temperature on that Fresh Tech canner, you might be all right. I’d set it for 212F (water boiling point).
I cooked my apples for 11hrs. In crock pot, put my apple butter in jars while still hot, jars sealed right away. Do I still have to boil them? I put them in the cabinet.
According to the food safety guidelines I’ve read, the heat and time that it remains hot enough are what kills bacteria etc so it is safe to eat for a long while later.
You also have to either cook it longer or at a higher pressure according to your elevation.
Using an immersion blender is by far the best method. It will blend the peels and the apples perfectly. My recipe does not call for Allspice. I’ll have to try that next time