The first rule of quilting is is you do not talk about quilting. Actually that’s not true at all. You should definitely talk about it with anybody who has any idea of what they’re doing. Quilting’s long history means that the best way to figure out this geometric art is by talking to master quilters. When I began, I went to my next store neighbor’s house and she talked me though my problems and gave me tips on things I hadn’t even considered.
When you’ve never sewn anything quilt-like before, the idea of coming up with something from scratch can be daunting. I mean honestly, where do you start? And once you’ve got an idea, how do you know if it’s even possible to get out of your head and onto a blanket? Luckily, there are centuries of grandmas and just generally grand people who have been making quilts and will happily lend their shoulders for us to stand on.
Measure, Mark and Cut Your Fabric
Ironing
Before you even think about measuring or cutting, you need to iron the fabric you’ll be working with. Trying to mark a straight line on un-ironed fabric is next to impossible and we’re trying to keep this quilting adventure as painless as it can be. Go ahead and iron, I’ll still be here when you get back.
Measuring
It’s a good idea to do a little planning before you start cutting your fabric. I like to go through and figure out how to best fit the different shapes on my fabric and mark them all before I start cutting so that I’m absolutely sure that I’ll have enough of each color. Don’t forget that you can always splice bits of fabric together to make bigger pieces.
Remember when I said we’d revisit seam allowances when we got to construction? Well, it’s that time. Like I said before, a seam allowance is the little bit of fabric you add to the sides so that when you sew two pieces together, you don’t end up with fabric 1/4 inch shorter than it was supposed to be since 1/4 had to be eaten up by the seam. 1/4 is a great seam allowance because most sewing machines have just about 1/4 between the needle and the end of the foot, meaning that you can line the seam up with the foot and rest assured that you’re following a straight line. When it comes to triangles, though, seam allowances get a little messier because, well, geometry. I find the best way to do it is to cut triangles that are way bigger than you need; it’s way easier to cut the resulting square down to size than it is to try to fit a tiny square into a big hole.
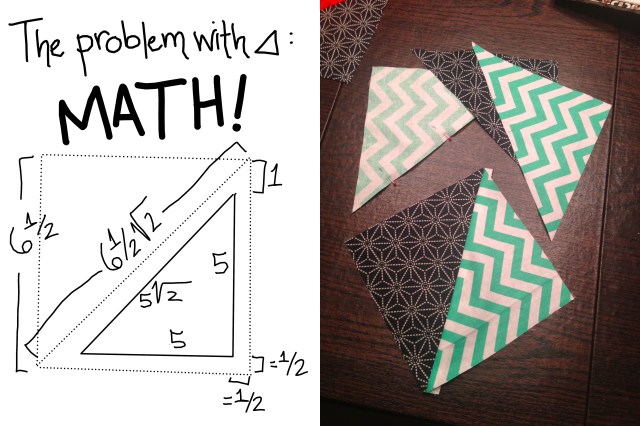
One more hot tip before you dive into measuring: make sure your lines are at right angles. There’s nothing more frustrating than measuring 90 inches of what was supposed to be an eight-inch wide piece of cloth only to discover that – surprise! – those eight inches somehow shrunk to five by the time you got to the other end. I mentioned a few ways around this in the materials portion, but just to reiterate, a t-square, a quilting ruler or a plain old square piece of cardboard or plastic will get you out of this dilemma.
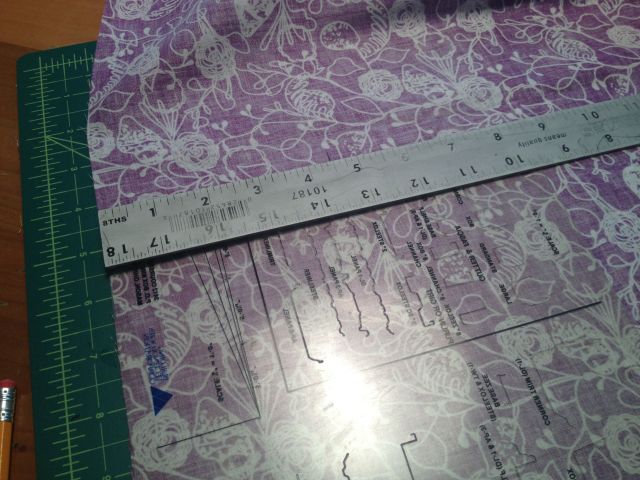
This piece of clear plastic keeps my lines at a 90 degree angle
Cutting
Although I like to measure all in one go, I wait until I need a piece to cut it out. This keeps me from sewing the wrong piece in the wrong place because, as much as I love seam rippers, you really haven’t known boredom and discouragement until you’ve ripped out 86 inches worth of seams. Don’t forget that you have options for cutting. Rotary cutters are awesome for long strips while scissors work fine for little pieces.
Quilters, Start Your Sewing Machines
Planning
The general idea when it comes to quilting is to start small and get bigger. Pick a block out of your design and start there. I went with one of my log cabins because I had a lot of them and because I wanted to get my feet wet before I embarked on my diamond fandango.
Pinning
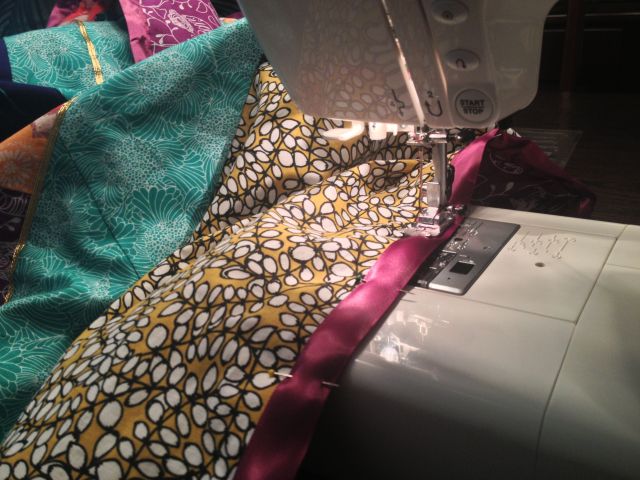
Any experienced seamstress/seamster knows that you always pin the good sides together when you’re getting ready to sew. They also know that a little reminder never hurts because at some point in a project, ennui will set it and they will accidentally pin their fabric together wrong.
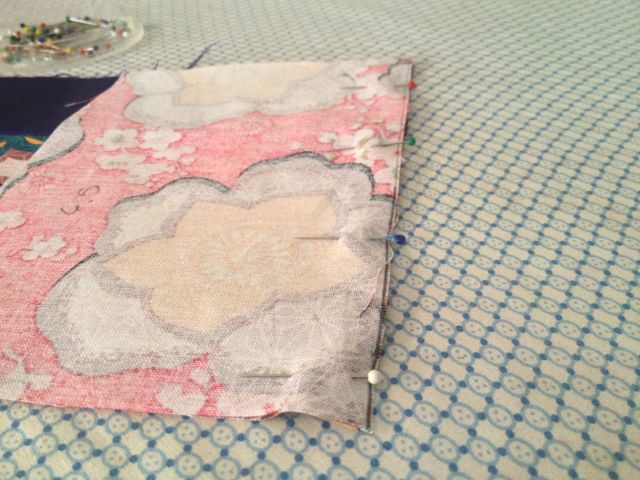
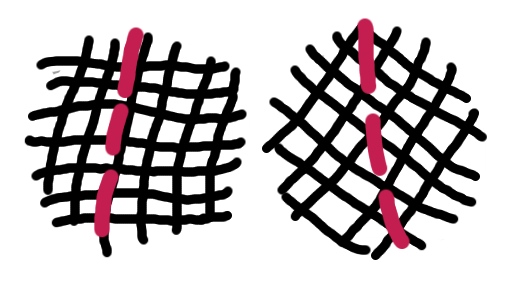
If you’ve never used a sewing machine before, it’s worth knowing that the arm of nearly every sewing machine is on the right. To avoid having to shove a bunch a fabric through the hole created by the arm, pin your fabric on the right so that the part you’re not sewing will hang out over the left side of the sewing machine. You should pin at a 90 degree angle to the seam so that the pins are easy to pull out, but the way which the heads of the pins face (right or left) is up to you. As to how far apart the pins should be, every three to five inches seems to be a good guideline.
Sewing 101
If you’re one of those aforementioned experiences seamstresses/seamsters, go ahead and skip this section because it’ll be a review. Or read it and fill in the blanks I undoubtedly left for sewing newbies!
So sewing. It’s a magical skill that transforms all the clothes in the world into your potential clothes. Plus it’s kind of like driving. At least that’s how I felt when I was too young to drive but definitely of age to be making hideously long, swishy prairie skirts. Just like driving, the harder you push on the pedal, the faster the machine will go. And although there’s not a steering wheel, you still have to use your hands to feed the fabric into the needle in a straight line.
In a car-like fashion, all sewing machines are different but have the same basic parts. Although your sewing machine might seem completely bewildering at first, it’s actually easily learnable.
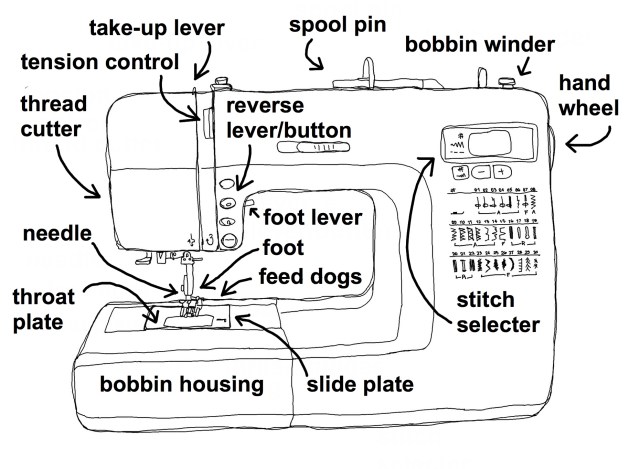
Spool Pin – This is where the thread sits. It can be vertical or horizontal.
Take-Up Leaver and Thread Guides – As their name suggest, thread guides guide the thread from the spool to the needle. They look a little different on each machine, so you’ll have to check your manual to make sure you put the thread through them the right way. After going through the first set of thread guides, the thread will go through the take-up lever. This lever moves up and down with the needle and keeps the tension correct. If you notice the thread jamming up under the cloth when you try to sew, chances are the take-up lever isn’t threaded.
Tension Control – Inside a sewing machine, there are two discs that squeeze together around the thread to keep the tension correct. The tension control determines how tightly they squeeze. Turning the dial to a higher number increases the tension while turning it to a lower number decreases the tension. You probably won’t have to deal with this much, but if you notice your thread or bobbin thread showing through on the other side, you’ll need to fix it. We’ll talk about this more when we get to bobbins.
Needle – The needle on a sewing machine isn’t the same as a needle you use to sew by hand; the eye and the head are together rather than on opposite sides.
Bobbin Housing – The bobbin housing is where the bobbin lives. (Sensing a pattern here?) A bobbin is also unique to machine stitching; it provides the thread for the underside of the stitch. Unlike hand sewing – where the thread enters and exits the material in different holes – sewing machines work by creating a locking stitch wherein the thread enters the material, wraps around the bobbin thread, and exits the same hole. Take a look:
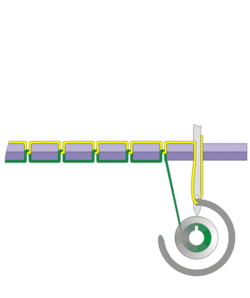
via wikipedia
Tension becomes important because the threads have to be synchronized so that the right amount of thread is pulled off of the spool each time the bobbin turns.
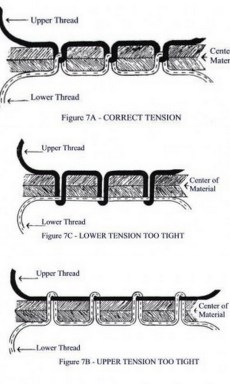
via Sewing Business
The sketch on the top left shows the machine at the correct tension. The thread is only visible from the top and the bobbin thread is only visible from the bottom.
The second image shows what happens when the (upper) tension on the machine is too loose; the thread goes flying everywhere while there’s juts barely enough bobbin thread to pull across the tops of the stitches. You won’t see the bobbin thread on the good side, but you will see the thread on the bottom. This can lead to bunching up and tears because the stitches are weaker. To fix this problem, turn the tension control up until you reach equilibrium
The last picture shows what happens when the (upper) tension is too tight; the opposite happens. Turn the tension control down until you can’t see the bobbin thread through from the top.
Bobbin Winder – Because buying bobbin thread is silly. You can make bobbin thread that perfectly matches all your other thread by making bobbins on your machine.
Hand Wheel – While you’ll do most of your stitching using the pedal, the hand wheel also moves the needle. This is useful when turning corners, untangling knots and inserting and removing cloth. The needle should always be in the up position when moving fabric around (except when turning corners, but we’ll get to that later) so that you don’t dull the needle. Some modern machines come with features that automatically lift the needle when you stop the pedal and many have an up/down button.
Reverse Lever/Button – The reverse lever or button allows you to stitch backward to lock in seams.
Thread Cutter – The thread cutter lets you to cut the the thread at the end of a seam so that you can remove the fabric without having to use scissors. It’s usually located behind the needle.
Foot – The presser foot holds fabric in place while you’re stitching. A machine usually comes with a variety of machines for different stitches and for adding zippers and buttonholes.
Foot Lever – Before beginning a seam, you should lower the presser foot and after finishing one, you should lift it before removing the fabric. The foot lever allows you to do this. Lowering the foot engages the tension discs around the thread. You can control how much pressure the presser foot exerts by using the machine’s pressure adjustment.
Feed Dogs – The feed dogs are little pieces of textured metal (or sometimes rubber) that move the fabric through the machine. The speed at which they move the fabric determines how long the seams will be and can be changed using the stitch length adjuster in the stitch selector.
Throat Plate – The throat plate is the metal part under the needle that houses the bobbin. It typically has markings that can be used to guide the fabric through at a specific seam allowance.
Slide Plate – The slide plate is a piece of material that can be removed to allow access to the bobbin. Many are made of clear pastic so that you can see the bobbin and have a diagram showing how to correctly insert the bobbin.
Stitch Selector – The stitch selector allows you to choose which stitch you’ll be using. In a nearby area on the machine, you will be able to change the stitch length, width and needle position. Changing the stitch length alters how much fabric is fed through the machine at a time; 10 to 12 stitches per inch is typical. Changing the stitch width is only applicable when using a zigzag or decorative stitch. Changing the needle position can help you when trying to sew at a very specific point in the fabric. It’s good to remember that if the machine is newer, the needle will probably return to the original position after turning the machine off.
To start you seam, go forward about five stitches, press the reverse lever/button to go back five stitches, and then let go and sew forward as you would normally. This locks the stitch in and will keep the thread (and resulting seam) from coming undone. When you finish a stitch, sew to the almost-end of the fabric (never sew off the end), backstitch about five stitches and then sew forward back over the two seams.
While you’re sewing, you’ll want to guide the fabric as opposed to pushing it. Modern machines all have a feeder that will automatically pull the fabric towards to needle at the right speed. If you push or pull the fabric faster, you’ll have unevenly-spaced stitches. To make sure that your seam is straight, pick a marker on the machine’s foot or metal plate under the needle to align the edge of the fabric with. I usually go with the right edge of the foot just because it’s so easy.
You’ll also want to get in the habit of pulling pins out before they reach the needle. Once you get the hang of the machine, this won’t necessarily be a hard and fast rule because you’ll know how to keep the needle from colliding with a pin. Even then, I hardly ever leave the pins in because it’s so much easier to pull them out beforehand than it is to go back through the seam afterward and find them all.
i spy two pins
Turning corners can be a little tricky, but once you know how it ain’t no thang. When you reach the end of a stitch and are ready to turn the corner, let up on the pedal. Check your needle; is it down in the fabric? If so: awesome! If not: turn the hand wheel so that it’s in the down position. Now raise the foot lever so that the foot is up. Turn the fabric at a 90 degree angle and lower the foot lever so that the foot is holding the fabric tightly in its new position. You’re ready to keep sewing.
Sewing curved lines can be even harder, but chances are you won’t be sewing any if you’re making a quilt. If you ever are, though, just be sure to keep the fabric aligned with the right side of your foot and you’ll be just fine.
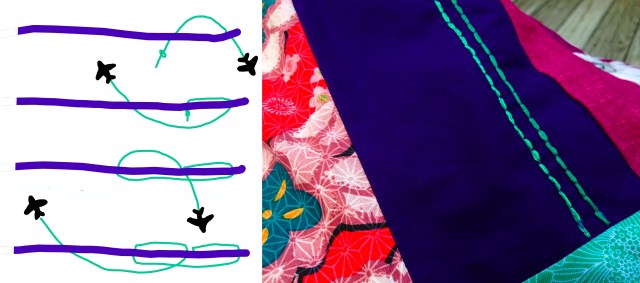
We need to tackle the problem that is sewing on the bias. I have no idea why bias is called bias, but all bias means is diagonal. So if you’re sewing on the bias, you’re sewing fabric diagonally across the fibers that make up fabric instead of in line with them. The good and the bad of sewing on the bias is that sewing this way makes the fabric more stretchy. You have to be extra careful not to pull on the fabric when you’re feeding it into the machine because even the slightest bit of pulling will result in a bubbling seam.
L: regular stitching R: stitching on the bias
Finally: splicing. There are at least two ways to splice fabric: the right way and the desperate way. The right way involves making a precise, pretty bias seam so that the change isn’t too disruptive. Unfortunately, the right way takes a good deal of extra fabric which is why we must sometimes revert to the desperate way. The desperate way requires very little know-how because all you have to do is sew a normal straight line between two pieces of fabric.

The is the right way to splice
Ironing, again
After each and every seam that you make, you’re going to need to iron that puppy flat. It’s easier to iron on the wrong side because you can make sure that the seam allowances are all facing the right way.
All ironed and pretty. See that piece of yellow on the right? That was spliced desperately
Fixing Mistakes
When you finish your quilt, you may decide that one of the fabrics you picked just doesn’t go with the rest. That’s okay, it happens to the best of us. You know that orange that I picked up at the last minute just because I liked it? Well, it turns out that it just didn’t look good with the rest. Luckily, there were only three pieces of it in my quilt and I was able to cover them up.
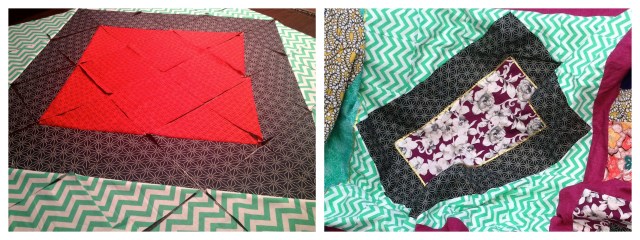
it turns out that the orange was really ugly
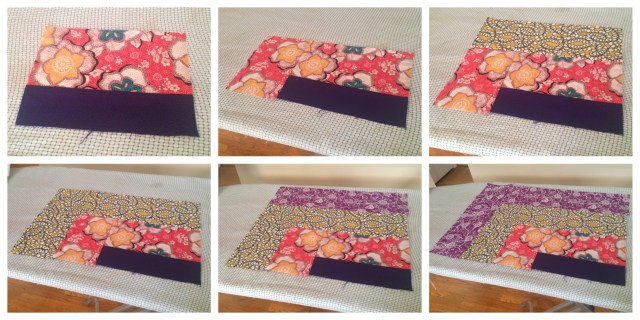
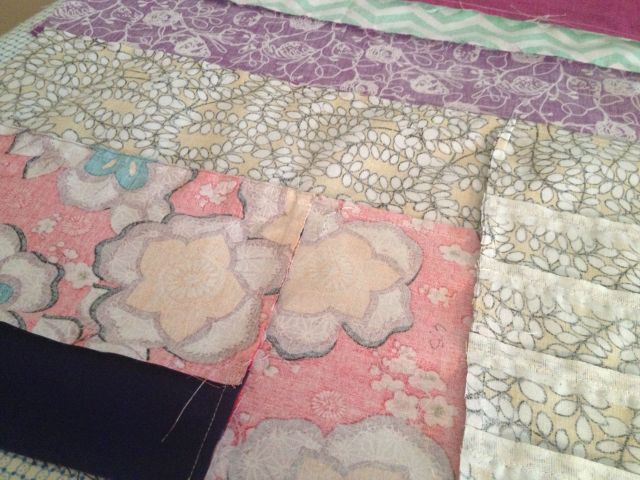
For the large diamond portion, I cut the piece out, turned the rough edges in and ironed them in place, pinned the piece onto the quilt and carefully sewed right along the edge of the new purple fabric. Since it was such a large piece of fabric, I later covered the seam up with a bit of gold ribbon. I repeated the same process – minus the ribbon to hide the seams – for the smaller sections. The only way you’d be able to tell they were sewn in later is if you were looking for the seams.
There Is No Real Ending. There’s Just The Place Where You Stop
Embellishments
Ribbon, embroidery floss, or even beads can be added to your quilt to give it just a little extra something fancy. I sewed gold ribbon along some of my seams using my machine and embroidery floss on the darkest purple fabric by hand. I used backstitch (which, by the way, I leaned from one of my campers at A-Camp) to create bold lines and then sewed over them using my sewing machine to keep them in place through washings and thrasing nightmares.
The sewing airplane will teach you how to backstitch
Finishing with Batting or as a Duvet Cover
While filling your quilt with batting is always an option, you can also turn it into a duvet cover. To make a traditional quilt, you need a roll of quilt batting and either a length of complimentary fabric or another quilt to cover the back. I’ve never done an entire quilt myself so if this is the route you’re taking, head over to the fine people at Quilt University for a lesson on batting.
If you’re making a duvet, I’m your girl. I chose to make another – much simpler – quilt for the back. I also decided that I’d prefer to add a backing to each quilt to give the finished cover a little extra strength. After sewing the backing onto each quilt, I added a few stitches to keep the two pieces – the quilt and the backing – together. Then I sewed the two quilts – right sides facing out this time – together, leaving a three foot hole along the bottom so that I have space to put my comforter in.
the back: much, much simpler
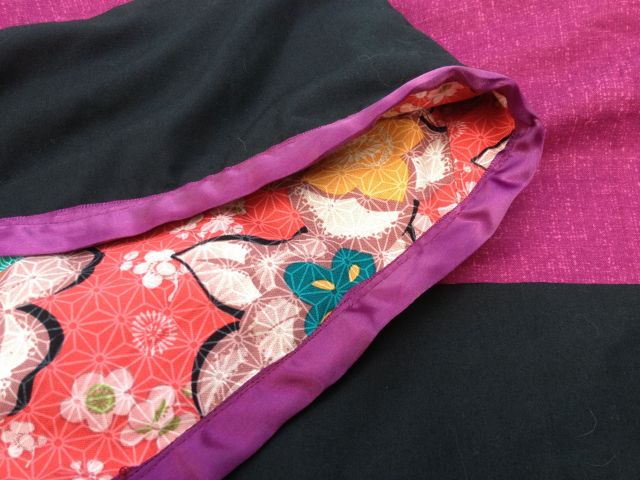
I was able to sew the quilts together right-side out because I added a binding around the edge to cover the seams. Stores sell bias tape that works great as a binding strip, but I chose ribbon. After ironing the entire length in half, I pinned it around the edge and sewed it on using thread that matched.
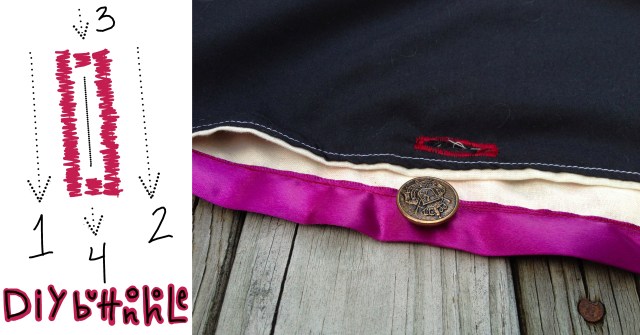
pro tip: if you can’t sew straight lines, make it look like you did it on purpose
The last things to add when making a duvet cover are buttons and button holes. While some machines come with a button-sewing setting, I find it’s just as easy and often more reliable to sew them on by hand. If your machine has a button-hole setting, though, use it! If it doesn’t, don’t worry. You can make your own buttonholes using your machine by selecting a zig-zag stitch, setting it so that the stitches are very close together, sewing a small rectangle and cutting the center of the shape open when scissors.
see this buttonhole? i made it myself!
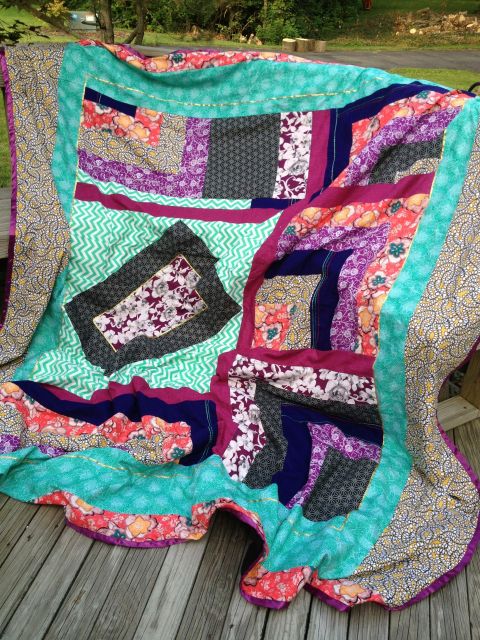
After many (many) hours, you’ll have a quilt all ready to grace your bed, sofa or chair with its warmth, charm and I-made-that-ness.

Quilting (and crafting in general) looks so fun, but I am too inadequate for it.
Tip! If you don’t have a sewing machine, check thrift stores. I got mine for roughly $70, as opposed to comparable ones at JoAnn’s for like $300. (I still lust after the $800 Bernina machines we had in my college’s theater costume shop, but I don’t sew enough or make enough money to justify consummating this desire.) This might be easier if you already know a little about sewing, but it saves lots of money.
Sometimes they still have manuals and bobbins and things with them, which is the best. (Especially manuals. Manuals tend to cover important things like how to properly clean and oil the sewing machine you just got from the dusty thrift store. And the idiosyncrasies of threading the thing, which is kind of important for your sanity to do right.)
holy crap thank you for the guide to sewing machines.
the sewing airplane is the adorablest thing I have ever witnessed
I appreciate this post. Thanks for all the valuable info. I’ve been daydreaming about getting a sewing machine…this post might just be the push I needed to make it happen. Thanks Laura :)
Love your stuff! I recently became a sewing instructor at a local sewing lounge and am struggling to teach all the details let alone how a sewing machine works.
I would like to show my students your animated lockstitch example and am including your web address in my handouts. Provided this is ok, the rest of your site will teach them much more and clench the info for them to recall later.
Though a quilting site, I find the information is critical as a seamstress/ter. Quilters are Awesome and know so many cool tips and tools.
Thank you so much for a job well done, coherent,simple and with a wonderful sense of humor! I can’t wait to share.