
It’s cozy season, and I’m done with going outside. So, for those of us who haven’t entirely succumbed to cuffing season, I propose an alternative way to spend hours netflix and chilling: cross stitch!
Hear me out: cross stitch is simple. It involves stabbing things with needles thousands of times, so it’s great for getting out all the frustration you’re holding. You can make some really cool patterns, creating a great juxtaposition between the assumed traditionality of the craft and whatever wild things you queerdos come up with. It’s a great fidget to channel antsiness for those of us who can’t sit still while watching TV. It’s also extremely inexpensive as far as crafts go, doesn’t involve any fancy equipment, and you can have hours of fruitful crafting for less than $10.
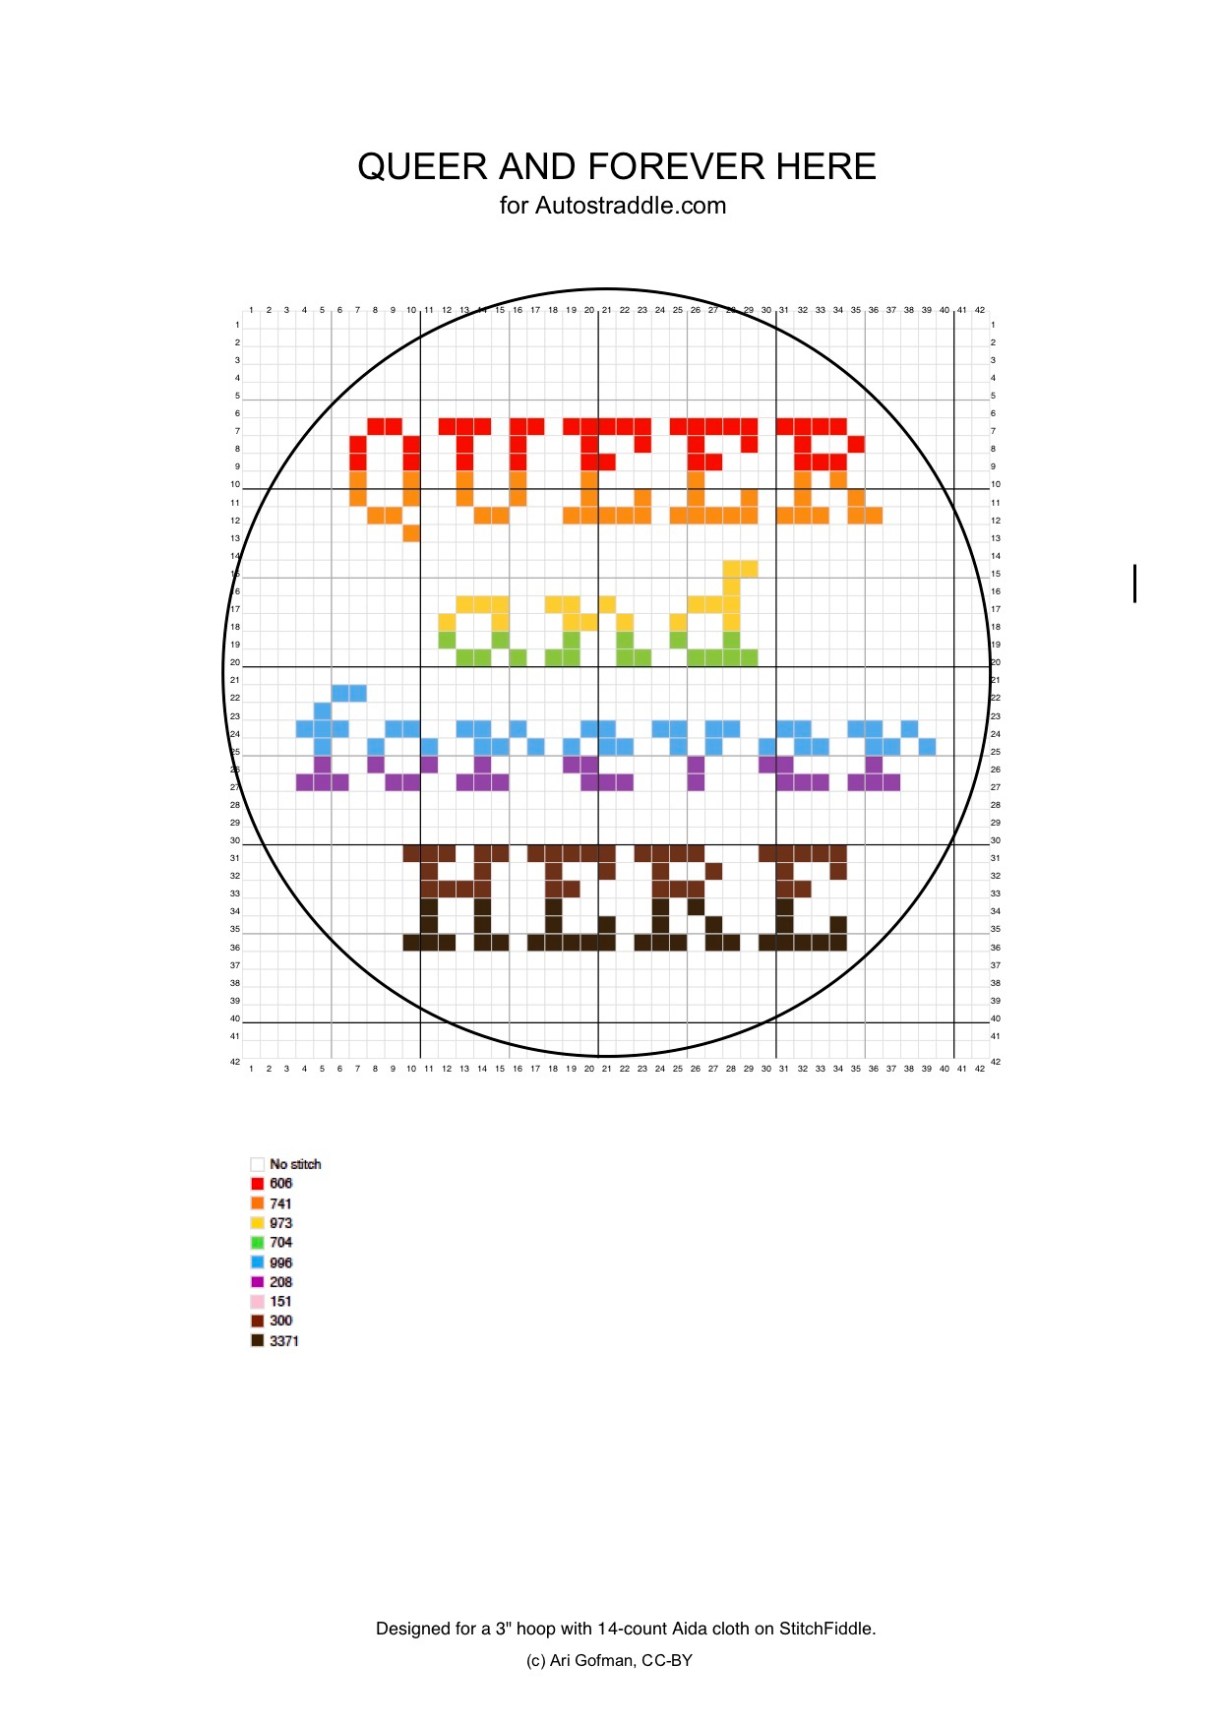
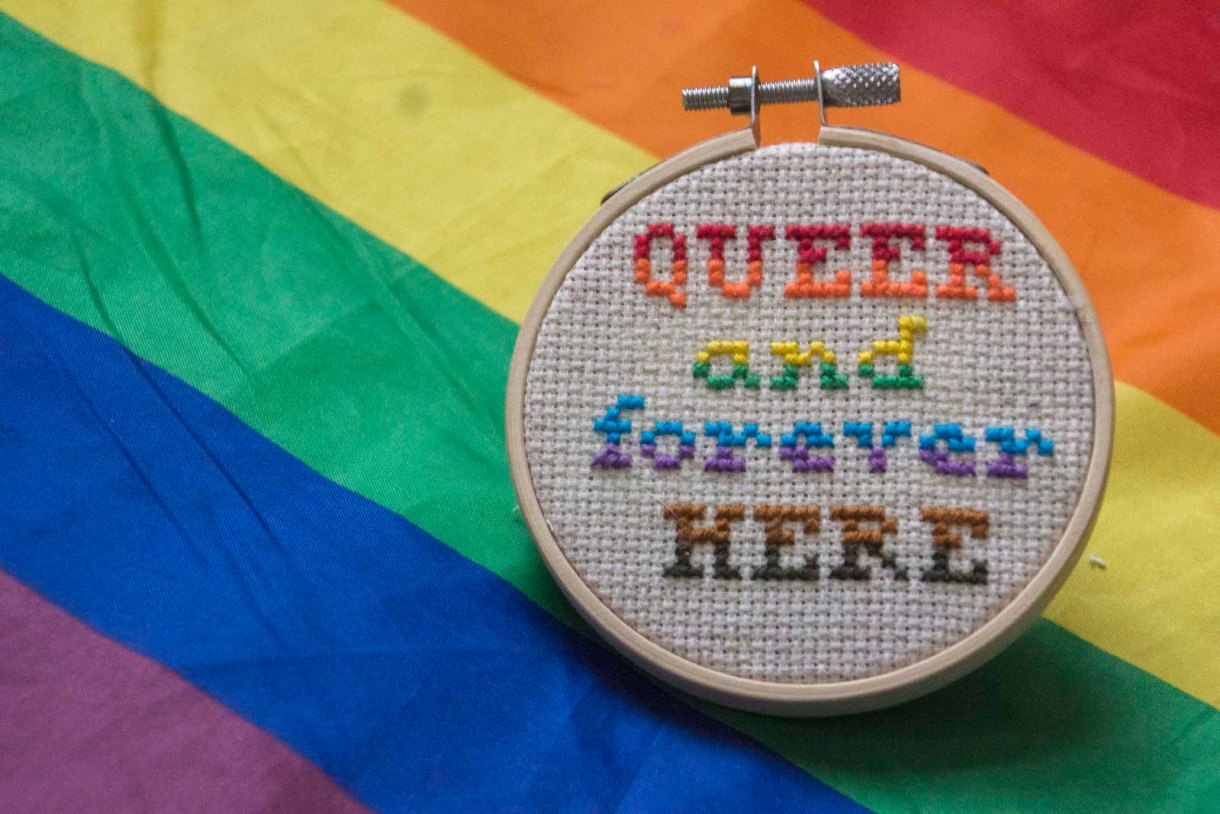
Inspired by one of my favorite t-shirts by Kristin Russo, I developed a super simple, super queer pattern to share with y’all.
There have been a bunch of previous cross stitchers here on Autostraddle, and we’ve published tons of tutorials on how to do this, so if you want some great basics, check out Hansen’s round up of how-to’s and Subversive Cross Stitch’s truly glorious Vapid Fluff pattern & instructions. Subversive Cross Stitch’s how-to page is really comprehensive as well. If you’re interested in getting cozy this week and making the Queer and Forever Here cross stitch design I created for you, here’s what you need to get and what you need to do.
Supplies
- Fabric: 14-count Aida cloth. The number refers to the number of little squares per inch – you can absolutely do this with a different size if you want, but if you’re going out to buy something, this is a good all-purpose size.
- 3″ Embroidery Hoop: This design fits in a basic 3″ wooden hoop, which you can then display the finished piece, if you want!
- Embroidery Needles: Get at least two, you’ll almost certainly lose one. Look for an eye that is large enough to easily thread.
- Embroidery Floss: Standard DMC embroidery thread, or whatever you happen to have around. If you want to buy a starter variety pack, these colors will almost definitely be in it. If you want to get individual ones, there are some recommended shades on the pattern.
- Scissors: A pair of scissors. I have a cool pair of bird embroidery scissors, you can literally use anything that cuts.
Steps
1. Cut your Aida cloth to a square about an inch larger than the 3″ hoop.
2. Secure cloth in the hoop. Place it on the smaller (inner) hoop, then pull the outer hoop on top, sandwiching the fabric. Make sure the fabric is taut like a drum – it will help make sure your stitches are even.
3. Cut a length of the first color you’re working with, about 15 – 18 inches long. I do this pattern with 3 strands, out of the six strands that make up standard embroidery thread. You can also do it with two, it’ll just be slightly less full. Take your cut piece, and gently pull three strands apart. I’d recommend starting with the red.
4. There are several strategies for dealing with the ends of threads. I tend to tie a double knot at the end of my thread, about 1/2 – 1 cm from the end. You can also leave it unknotted, and hold it in place manually while you make the first few stitches so the thread doesn’t pull through.
5. Thread your needle!
6. While many patterns recommend starting in the middle to make sure you don’t run out of space, this pattern is fairly simple and you should be able to start in the top left – leave 3 empty squares up and left before the first row of the Q.
7. Start stitching! Come forward from the back, so your knots are hidden. Each stitch will become an X, but start with half stitches (/////) to create the shape, and then go back over it afterwards (\\\\\) for the second half of the X. This way, you only need to be actively looking at a pattern half the time, and can more easily pay attention to the TV/audiobook/meeting that you’re doing this during.
8. Switching colors: Cut off the remaining thread, leaving about 2 inches behind. If you cut it too short, you risk it falling back to the front. Start with a new color.
9. Finishing! Cut a long (24 inches or so) thread of a light color you have extra of, tie a knot at the end, and weave through the border outside the hoop, on the back side. Do this about a centimeter from the hoop. Each stitch should be somewhere in the range of 1 cm to 1 inch. Once you’ve done a full circle, pull tight to draw the excess fabric in. Do a few loops with the thread to make it stay at the very end, and then cut the tail short. (If you have a different preferred method of finishing, go for it).

10. Once you’re done, take a moment to trim up any long tails in the back (but not too short, or they’ll fall through the cloth!). Trim the edges of the cloth to round, leaving about 1 – 1 1/2 inch border.
11. Display or gift your beautiful creation!

Awesome! I want to make this, and I think I have an embroidery hoop sitting around somewhere already.
This is great! I was just thinking about making a cross stitched present for my mom. (She is retiring in less then a month and feels very old…)
Also: are there more crafty stradlers around? I knit/crochet/ some sewing/lots of other stuff. Anyone on Ravelry? (I’m on there as Ikat)
Yep! I also knit, do a bit of crochet (I prefer knitting though), sew, bookbind… I’m on Ravelry too, but I don’t remember my username off the top of my head, and I admit that I don’t even put most of my projects on there (baby hats in bulk for my mom to give away, as she knows a lot of people with kids). But I like to search for inspiration there!
Yes! I am a knitting & cross-stitching person, plus assorted random crafts that find their way into my life. My ravelry name is “like trees”, but all one word; AS folks are welcome to befriend me, though I tend to add my projects sporadically at best! I’m great at faving things…
I love this AND I finally found Kristin’s new version of the t-shirt; here it is if anyone else wants it: https://www.hellomerch.com/collections/gay-stuff-by-kristin/products/queer-forever-here-grey-tee
As an avid cross stitcher (a hobby I picked up to deal with grad school stress) I was so excited to see this article—thank you for making this adorable pattern! For those who finish this and want more, I buy all my patterns on Etsy; I particularly like “PlasticLittleCovers” but I also just search for whatever I want.
This is also a helpful tool for designing: http://www.stitchfiddle.com/
Gosh, I can’t believe I almost missed this! I cross-stitched like mad as a kid (I was obviously very cool) & this looks like just what I need to get back into it!
enjoy!!