Welcome to the another installment of Make A Thing, where we make handmade gifts for people. Or ourselves. Who doesn’t need something special in their life? Join in on the DIY fun and avoid the unnecessary consumerism of the world (and I promise you’ll save a few dollars while you’re at it).
Header by Rory Midhani

CLICK HERE FOR ALL OF THE MAKE A THING TUTORIALS EVERRRRRRR!
Maybe sewing isn’t your strong suit, but you still need to make something that looks like you know what you’re doing. Enter: The Cassette Tape Wallet. These make great wallets, coin purses, or gift card holders. The best part? No sewing required, only liberal amounts of hot glue. I’m going to be honest, I fucking hate hot glue guns. I hate the stringy bits and I burnt my fingers no less than two hundred thousand million times during the making of this. Sometimes gifts mean making sacrifices to your fingerprints that will probably never grow back, you know?
Cassette Tape Wallet
Supplies Needed: Cassette tape (Olivia Newton John is optional! Maybe you have some, but I picked mine up at Goodwill for $1 each), a 14 inch or longer zipper in coordinating color, hot glue gun, hot glue, felt in coordinating color, scissors, small flat head or phillips screwdriver (if your cassettes have screws)
Level of difficulty: I wound up with three blisters, but maybe you have better dexterity than I do?
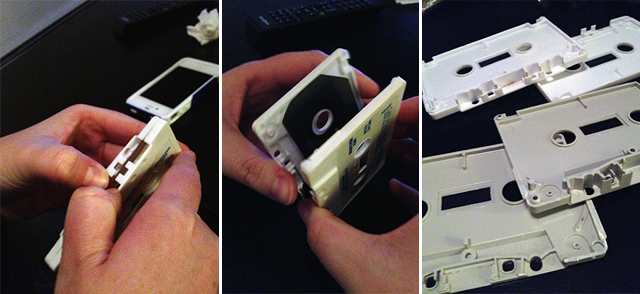
1. Open up those cassette tapes. Yours might have tiny screws. Mine didn’t, and I recommend trying to choose cassettes without them because your life will be easier. Having a flat head screwdriver to pry it gently open also helps. My lady friend did this for me because she’s a nice person.
2. Once you have an edge open, continue to gently pry it open. Take out any junk (read: everything) that’s inside of there and throw it away. Don’t let your cat eat this, because they are going to try. Clean up the inside of them with a q-tip and rubbing alcohol or water.
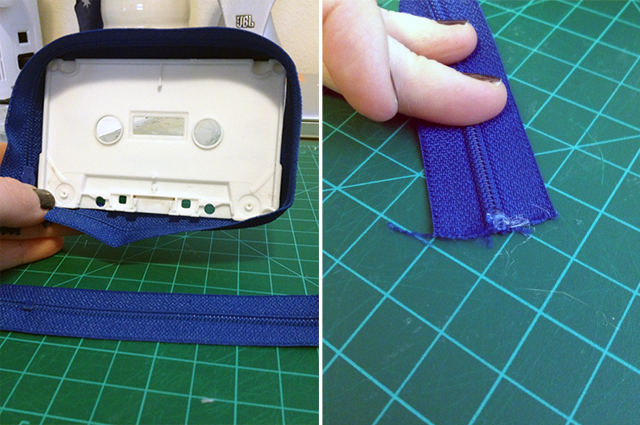
3. Measure out your zipper against your cassette tape. My cassettes were approximately 13″ around. Trim your zipper to the right length.
4. Put a dab of hot glue at the cut end of your zipper. Do this step, for reals. If you don’t do this, you’re going to be an idiot and unzip the whole thing and then have a little breakdown because you can’t get the zipper foot back on. This is why you can’t have nice things. I speak from personal experience.

5. Start gluing! Do one side at a time. I found that putting glue on the cloth and then sticking it to the cassette tape resulted in 50% less hot glue mishaps. Don’t worry about the aesthetics of the inside part, we’re going to cover it up with felt.
WORDS OF WISDOM:
Visualize how much hot glue you’re going to use. Now cut that in half. The more you glob on, the more will stick to the metal zipper part and/or burn you and you’re gonna have a bad time.
6. Glue around the entire cassette tape, making sure not to get any glue on the zipper itself. Patience. Go slowly. You can always scrape off a little bit of hot glue, but a lot of hot glue is just going to make this look bad.
7. When you get to the other side, slowly unzip the zipper foot to be in front of your gluing area so it doesn’t get in the way until the end, when it’s easier to deal with. Be careful to keep your cassette sides aligned, because a crooked wallet is not a happy wallet.
8. Try out your zipper to make sure it goes around your corners and doesn’t get stuck on any stray glue areas.
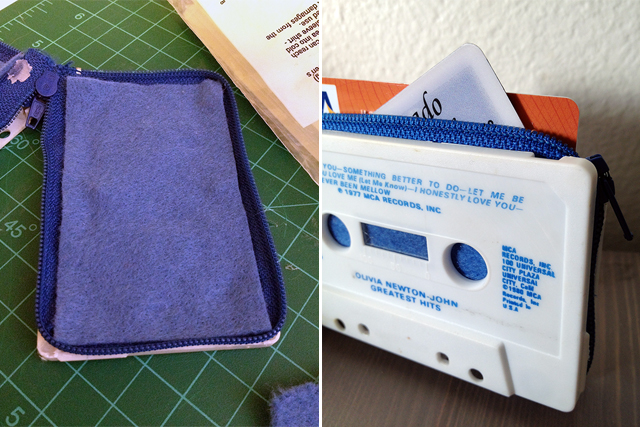
9. Cut a piece of felt to size (about credit card size) and hot glue it on in there.
9 1/2: If you’d like extra security, you can sew around the end of the zipper so you can make extra sure the zipper foot doesn’t come off. You can also hot glue a piece of fabric on the edge, if you’re really, really, really opposed to sewing.
10. DONE. You should be so proud of yourself because that wallet looks so good.

THIS IS AMAZING. I may make it for a girl. I’m sure she deserves a cool wallet.
This is the coolest thing ever! Everyone I know may be getting one of these eventually!
I’d probably make one side a strip of double-thick fabric and have 3 sides zipper. Takes care of the foot problem too.
I have a semi-irrational hate of hot glue because it never seems to hold for more than 20 minutes. Have you road tested these babies?
I made mine a four-sided zipper because I didn’t like the look of a three-sided one closed. That’s just personal preference — maybe some fabric would spruce it on up.
I road tested mine last night inside of my purse of doom (everything goes in, nothing ever comes out unscathed) and it did fine! I even let my two year old niece play with the zipper for awhile and it held up perfectly.
My reasoning is that the fabric could be made to take up the same amount of visual space as the uninterrupted zipper and keep the lines consistent but provide more structural support.
I may try it out and get back to you. Hmm…
Get back to me! Send pictures if you do! hansen[at]autostraddle[dot]com.
This is so cool! I’m definitely going to be making this (:
Ooooo, now I want to dabble in other outdated formats – perhaps 8-track clutches?
VHS clutches
Well damn, it does look good.
That was SO SO SOOOOOOO funny. aahhhmazing. you sir, keep writing.
this is SO RAD.
I need a PIN IT button!
This is actually the coolest idea! Thanks Hansen!
This is freaking amazing.
Kris Kringle present possibility…except my friends think I’m obsessed with AS, an this might add fuel to that suggestion…nooooo matter.
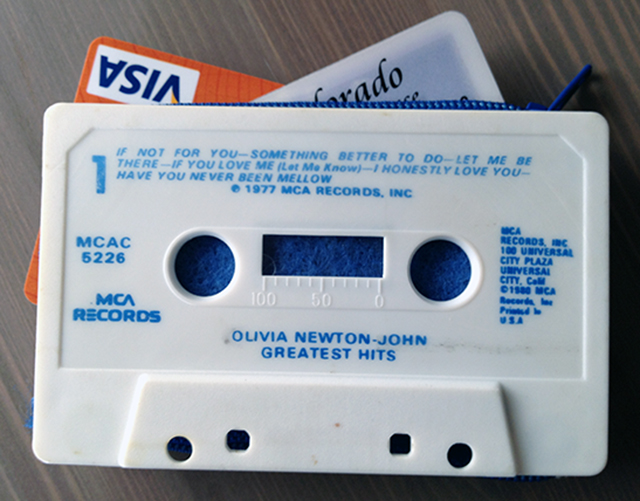
It being Olivia Newton-John just made this a lot cuter. I think I have to make one of these.
THIS IS THE BEST IDEA
dude, can you come to my crib and show me how to make this awesome awesome thing?
i’m terrible at following craft directions but you know what, I just might try.
This here is another option. I made one for my girlfriend’s birthday last year and it held up for about six months.
http://diyfashion.about.com/od/diybagsandpurses/ss/Cassette_Wallet.htm
Oh, this is *so* happening. I’m going out to buy
I have like half a dozen younger cousins that are freshmen in college, and if all goes well on the first trial, these are definitely going to be xmas gifts.
This is a thing I actually want to try.
Putting hot glue at the end of the zipper! You are brilliant! I have ruined so many zippers because I did not do this.
I am so proud of you! You are so darn creative and smart to boot.
We need more of these posts! New fav after lesbosexy sundays!
Dear Hansen.
Is that orange credit card a Biolife card? Because we might just have one more thing in common. Cheers.
P.S. Best xmas idea. I need one of my roommates to supervise this craft.
I am the last person that should be crafting …or for that matter trying to use glue on my own but this is too good NOT to make!! The hardest part…which cassette?!
This looks awesome. Definitely going to give this a try.
Pingback: Maak je eigen portemonnee van een cassettebandje | Lady Geek
Hot glue sucks. Doesn’t stick forever, and leaves stringy bits while you’re working.
Try WeldBond instead. It sticks to porous and non-porous surfaces, and dries clear. I used for my art projects. (Haven’t tried this cassette project.)
three days later am covered in glue and burns but reasonably pleased with the results. thanks :)